Category: Dynamics 365

  • Vendor Prepayments and Revenue Recognition For Fixed Price projects in Dynamics 365 For Operations

    Vendor Prepayments and Revenue Recognition For Fixed Price projects in Dynamics 365 For Operations

    Hello, Good to be back here on the blog !!! Jumping straight into topic here today about a new addition of a feature for vendor prepayments in relation with fixed price project revenue recognition !!

    Issuing large amounts of prepayments to vendors is often a common business requirement for large scale, long term fixed price projects, which involves a lot of sub-contracted work. Vendors often request prepayments for the subcontracting services they are contracted to deliver for these projects. These prepayments can sometimes be just a flat amount based on mutual decisions, or it can sometimes be a percentage of the total cost of the subcontracting service. There can be several months of gap between when the prepayments are issued and when the vendors actually delivers the services.

    For such projects, customers usually recognize revenue on a percentage completion basis and need the ability to include these vendor prepayments in the project percentage completion calculation of the project for revenue recognition/revenue estimates calculations.

    In this post, we will evaluate one of the new features of Dynamics 365 For Operations (Referred as D365 – Operations from here on), which allows to consider these vendor prepayments automatically when running the monthly revenue recognition/estimates for fixed price projects for calculating the % completion of the project.

    For this demonstration, I have setup a fixed price project and the associated contract already. This project is setup to recognize revenue on a % completion basis.

    Contract Setup

    Project Setup

    The Project Manager has created and submitted the purchase requisition for approval, so that the services can be procured from Rebar Supply Co. Ltd. See screenshot below.

    PR Submitted

    The purchase requisition gets approved by the designated manager and the Purchase order is automatically crated. See screenshot below.

    PR Approved

    The Project procurement team/Project manager then sets up the prepayment details on the project purchase order that was automatically created upon approval of the requisition.

    PrepaySetupOnPO

    Finance and Accounting team now processes the prepayment invoice to initiate the prepayment to the vendor.

    Prepay Invoice

    Prepayment

    Now that the finance team has processed the vendor prepayment for the subcontracting work, let us now go ahead and see what happens when they run the monthly revenue recognition process for this project.

    Notice that system was able to consider the vendor prepayment cost for the project and was able to determine the percentage completion based on the total project budget/forecast defined. See screenshot below

    PComp

    When this revenue recognition entry is posted, the revenue amount (based on Percentage complete and the total contract value) will be posted to general ledger. We all know how it works from here :)

    That’s it for today !!

    Sandeep Chaudhury **

  • Review of new features for Project Management and Accounting in Dynamics 365 For Operations

    Review of new features for Project Management and Accounting in Dynamics 365 For Operations

    Dynamics 365 For Operations is a cloud based SaaS service, which provides rich features and functionalities to manage simple to complex business processes across all major industry verticals, such as Manufacturing, Professional Services, Financial Services, Retail, Distribution and more. It provides very rich features and functionality for project management and accounting for the professional services industry. In today’s post, we will review some of the key new features and enhancements that were released for project management and accounting, in Dynamics 365 for Operations (Update 3 released on NOV 1st 2016).

    Let us review and discuss these new features in the order of what I think their significance would  be for customers.

    Dedicated PowerBI Content Pack for Project Management and Accounting Reports and Dashboards:

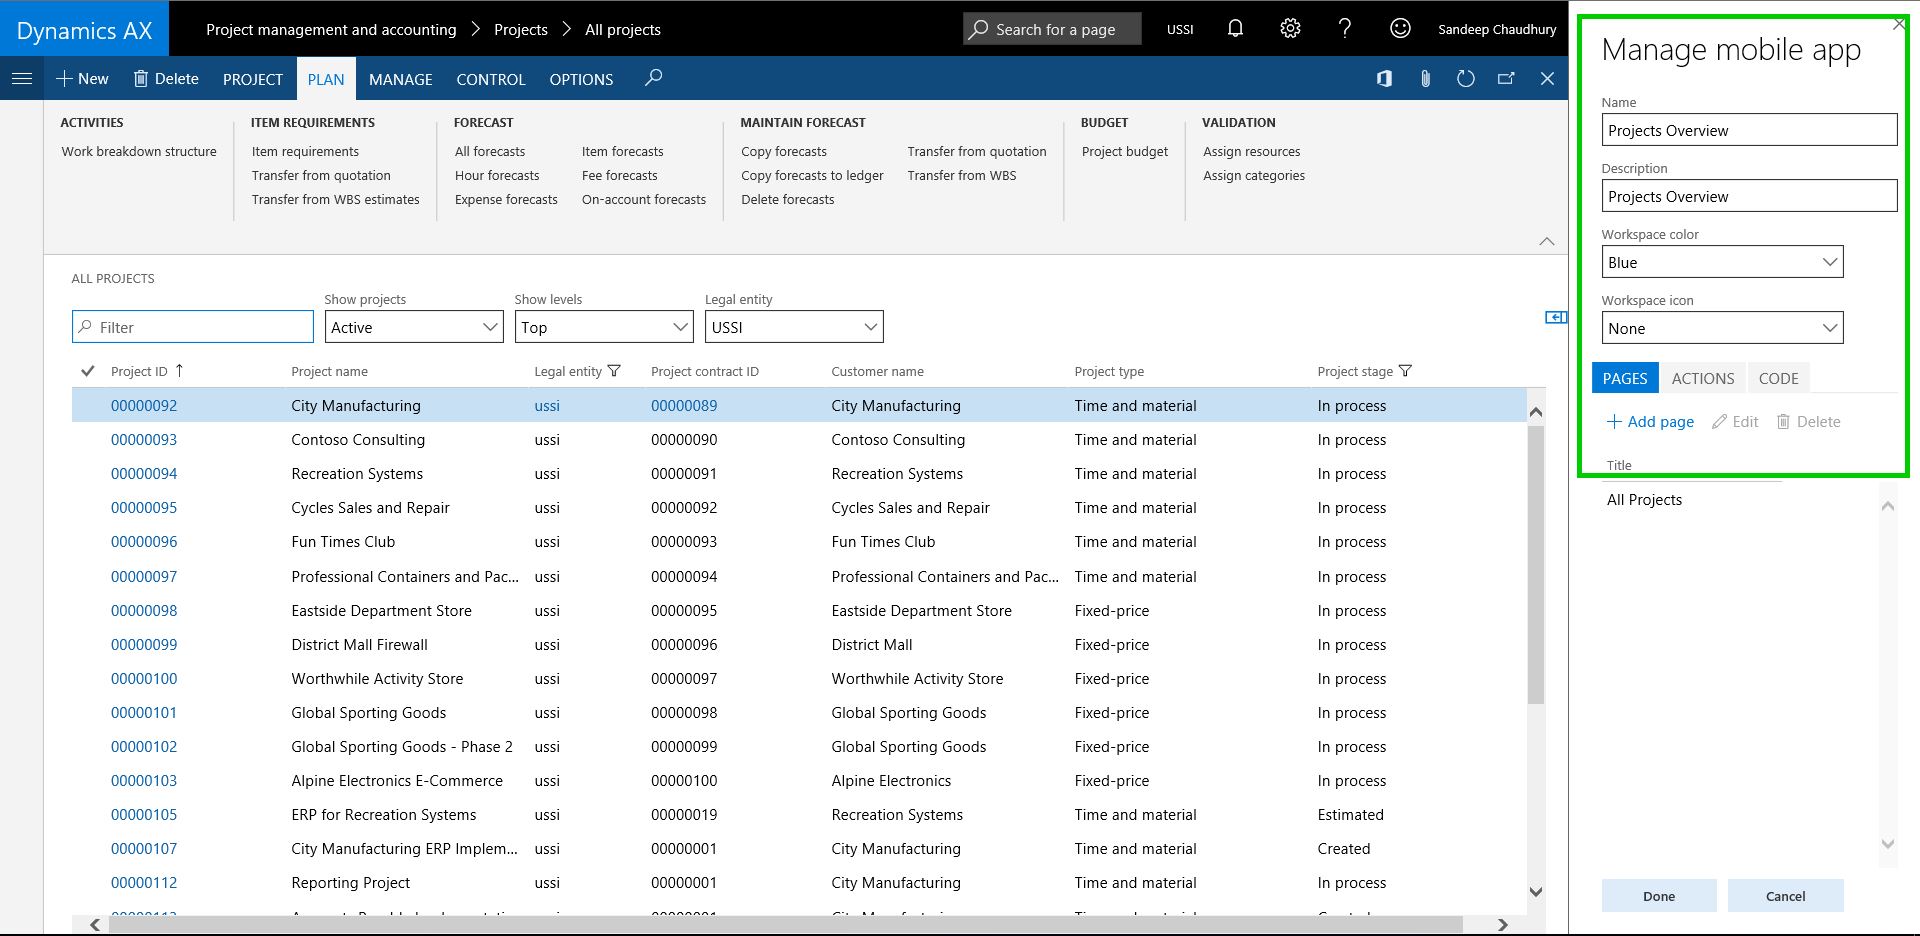
    The is the biggest enhancement /new  feature under Project Management and accounting in Dynamics 365 For Operations. Customers will now get access to  preconfigured PowerBI Content pack that comes out of the box and provides key project management and accounting related dashboards and KPIs that are readily available for consumption . This content pack offers the following dashboards and reports. (Note: You can get access to the .pbix PowerBI files via the shared asset library in Life Cycle Services)

    Projects Overview Dashboard: Shows overview of projects by customers, budget performance and revenue and provides a bird’s eye overview of the projects so that you can promptly review projects that are either exceeding budget, underperforming in revenue to take actions.

    proj-db

    Project Cost and Revenue Details Dashboard: These 2 dashboards enables you to view the project cost and revenue trends easily by customer and various other classifications and also shows actual bs budget comparisons.

    proj-cost

    proj-rev

    Earned Value Management: Earned value management(EVM) is one of the key project health and success measuring criteria for professional services firms. Traditionally, in the earlier version of Dynamics AX, there was no dashboards/KPIs available out of the box that shows EVM and associated KPIs such as Cost Performance Index(CPI) or Schedule Performance Index (SPI), even though you could develop or customize reports and dashboards for these. But in Dynamics 365 for Operations, the content pack provides these out of the box enabling organizations to measure EVM and associated KPIs easily for projects. A very welcome addition !! (In one of the upcoming posts, I will dive deep into EVM in D365 For Operations)

    evm

    Project Hours Details report: This dedicated dashboard page shows the hours/time details for projects and resources. This also allows you to measure resource utilizations in various perspectives.

    proj-hours

    Manage Estimated Costs, Revenues and Item requirements on WBS Task Details form of a project:

    In the earlier releases of the New Dynamics AX (Update 2 and earlier) or even in AX 2012, you could always define the estimated costs and revenues for each task on the WBS for a project. In Dynamics 365 For Operations, you can add estimated costs and revenue lines for Hours, Expenses, Items and Fees on the WBS task under ‘Estimated Costs and Revenue Tab” as you were able to do in earlier versions, But additionally, you can also manage these on the “TASK Details” form. You can also add/setup “Item Requirements” on the WBS Task details form, so that when you save and publish the WBS, Project Item requirements will be automatically created. (It was also possible earlier, but you had to transfer the WBS Item estimates to Item requirements specifically). Small enhancement, but can be very useful !

    wbs-details

    Option to setup ledger accounts for intercompany cost and revenues based on lending and borrowing entities for projects:

    The Intercompany timesheet and intercompany customer invoicing has been one of the very useful features of AX which enables organizations to deploy resources from multiple entities on the project of borrowing entity and automate the intercompany timesheets and invoicing and accounting. In earlier versions, you only setup one Ledger account for Intercompany Cost and One ledger account for intercompany Revenue postings, regardless of the resource borrowing and lending entities. Dynamics 365 For Operations now provides the option to setup multiple ledger accounts for intercompany cost and revenue posting based on the resource lending and borrowing entities respectively.

    int-cost-account

    int-rev-account

    Enhancements to Project resource management:

    There are some significant changes and enhancements to the project resource management feature in the Dynamics 365 For Operations release. I am listing some of those which I think are important, but will discuss them in greater detail in one of the future posts.

    • Organization’s Operations resources such as Machines, Tools, Facility etc. can now be added as project resource and can be scheduled on projects. Earlier, only workers (Employees and Contractors) could be designated as project resource.
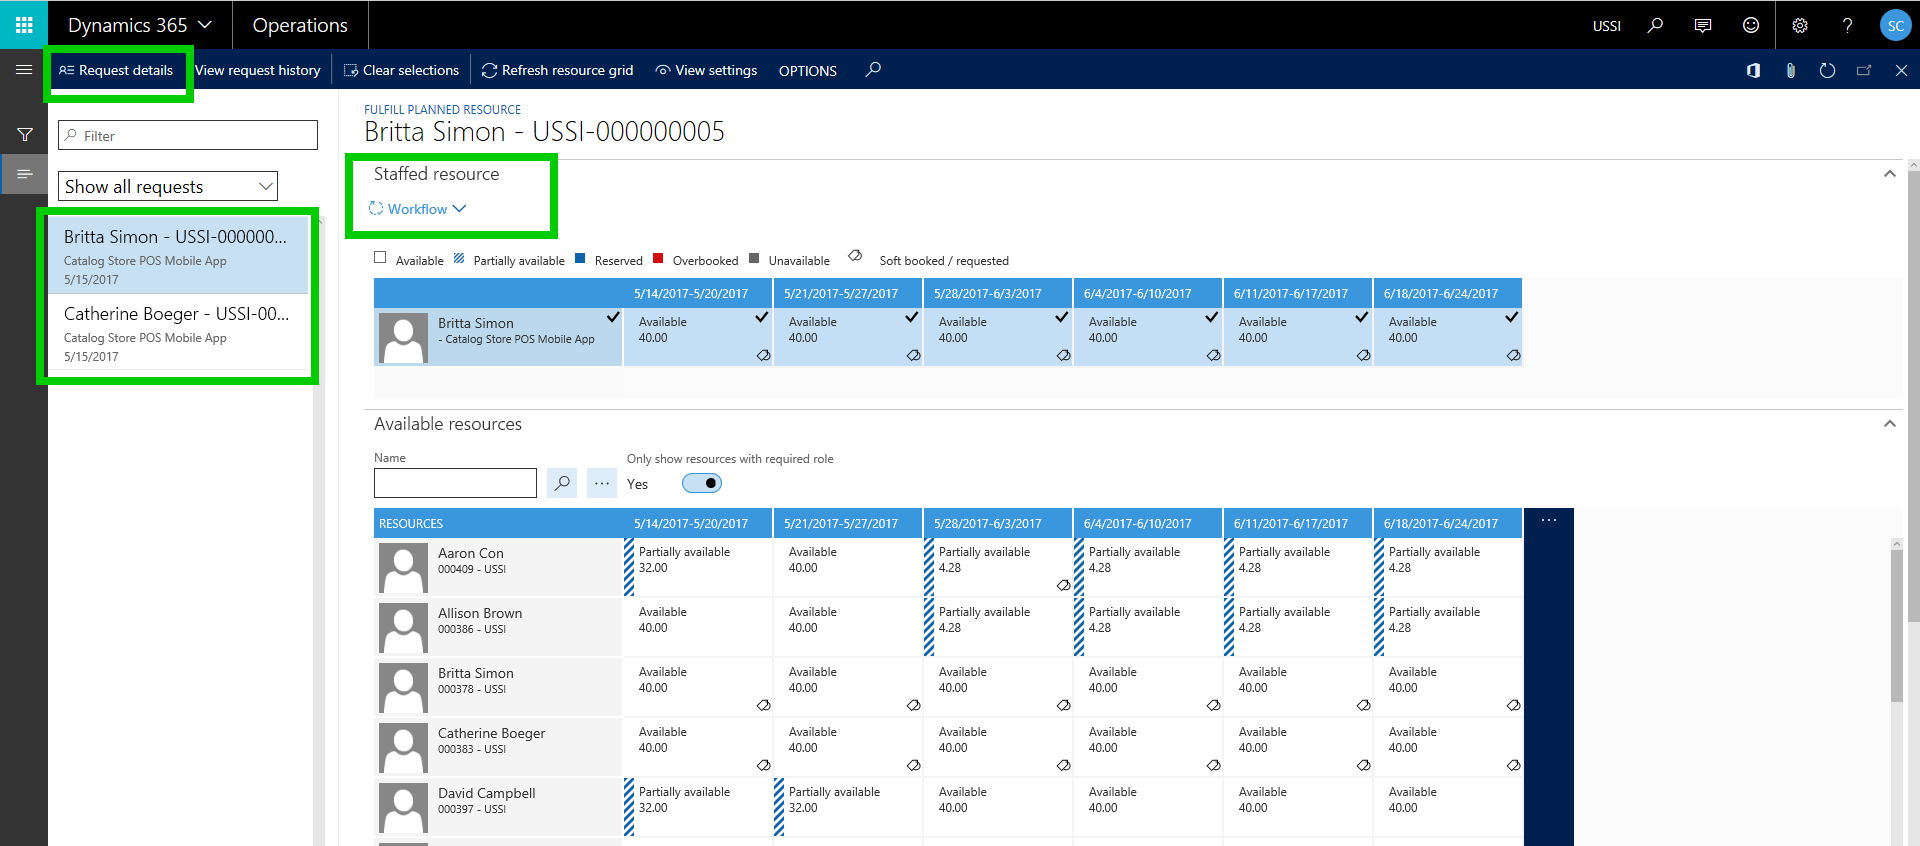
    • New Resource request workflow enabling a resource allocation manager to control the resource requests from various projects. (It was there in the AX 7 release as Planned resource, but it has be revised up to some extent)
    • Resource role based pricing and cost price visibility based on date of Task and booking.

    resource-request

    resource-request1

    Miscellaneous usability enhancements across various forms:

    The following are some of the miscellaneous usability enhancements.

    • WBS Task ID and the Task Name are now visible on the Project Forecasts Transactions forms. This will certainly make it easier to see the forecasts (Labor, Expense, Items, Fee etc.) at each Task level with easy identification of the task, instead of just looking at the Activity ID.

    taskidname

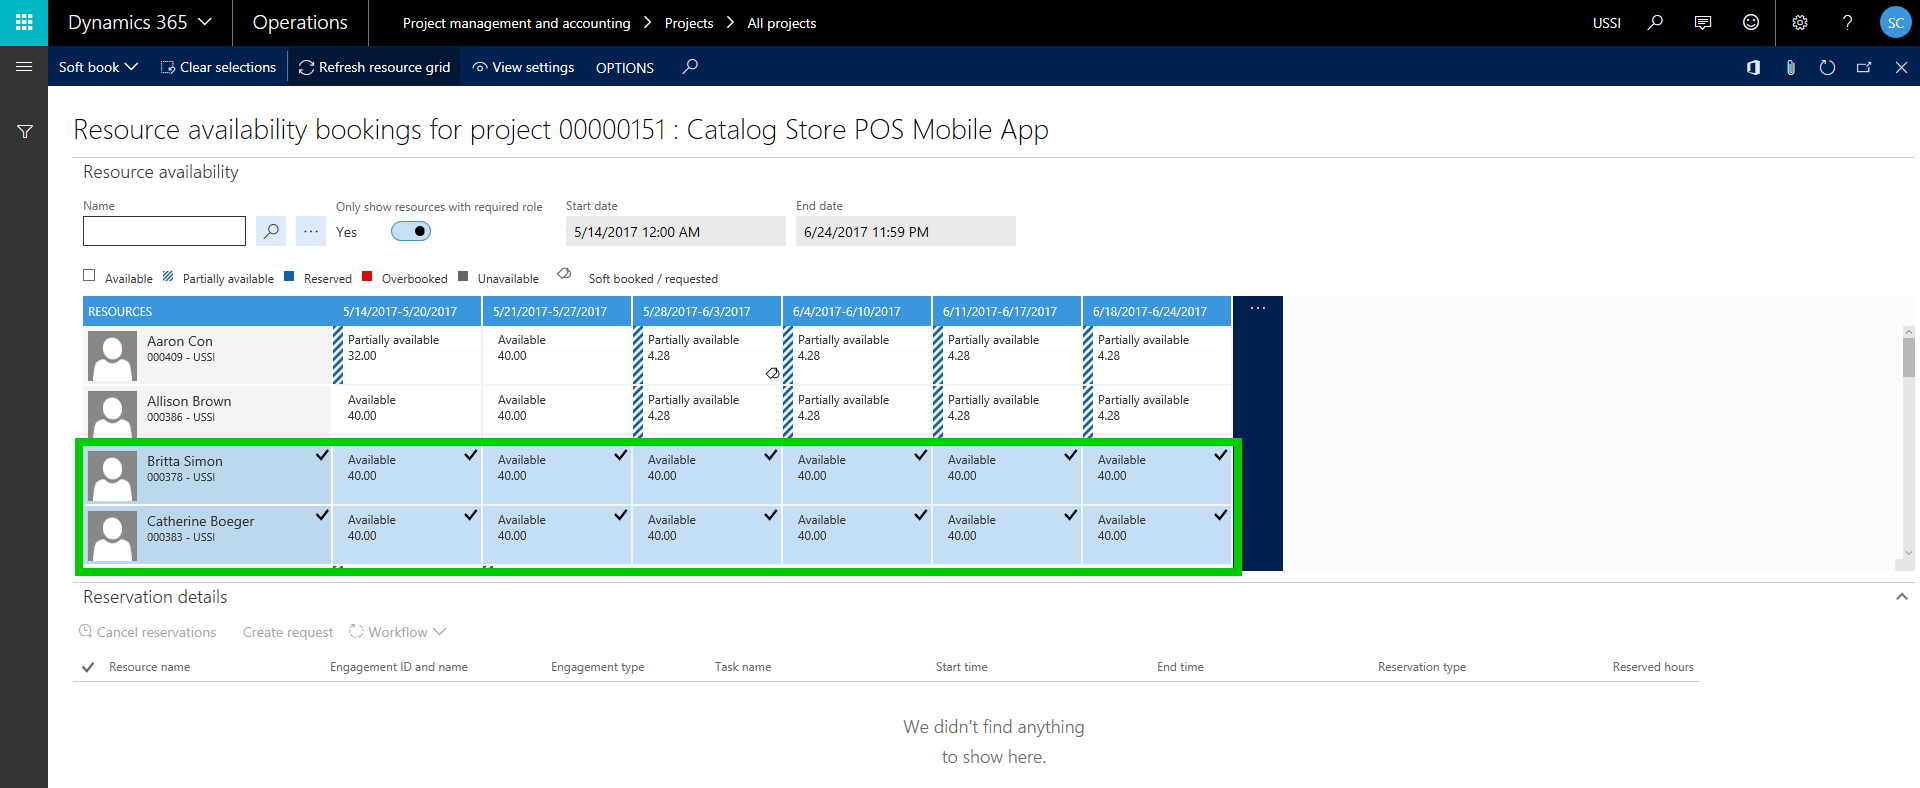
    • On the Resource management screens such as Resource Availability, Resource fulfillment, clearing record selections for each date range is now possible and it a whole lot earlier and neat! Certainly a very useful enhancement.

    clearresselections

    • Multiple record selections on various forms to take actions is now possible. An example is the price setup form.

    multiselect

    • The Project resource availability form’s business logic now considers Employee’s efficiency rate. Earlier the resource availability was based on Competencies and calendar availability, but Efficiency rate might be a good addition. I am not sure yet if I would use/need it that much, it certainly is a good add-on.

    res-avail

    • When you select the Project Manager on a project, it is automatically added to the Project Team under the Project Team and Scheduling tab. Make Sense and makes like a little easier :) !!

    pm-team-member

    • Timesheet workflow status is Reset if the workflow and Document status are out of Sync. I believe this enhancement is related to cases when the “Approval status” of a timesheet changes, but the corresponding workflow status does not change sue to unexpected intermittent issues. If this happens, my guess is the workflow status will automatically reset to match with the timesheet document/approval status. I was not able to review and test this feature yet.
    • You can now select a funding source specifically on Fee journal lines. This will prove to be a very useful enhancement, especially in cases where there multiple funding parties responsible for a project contract and when booking Fees for the contract, you can select a specific funding source if you want to bill the partially fee to that funding source. (Note: This was indirectly possible in earlier releases where you could do a Project Free Text invoice and select a funding source on the line, which in turn will post a project Fee transaction.

    proj-fee-fundsource

    Hope this was helpful! Till next time..


  • Vendor Self-service portal and Vendor collaboration in Dynamics 365 For Operations

    Vendor Self-service portal and Vendor collaboration in Dynamics 365 For Operations

    Having a fully functional vendor self service portal in an enterprise class cloud ERP solution is a huge advantage and allows your organization to streamline the collaboration with vendors, there by helping you reduce back office efforts and improves accuracy of business transactions with vendors and procurement. Dynamics 365 For Operations provides this right out of the box !

    In today’s quick post, we will take a look at some of the key capabilities of the Vendor Collaboration/Self-service portal in Microsoft Dynamics 365 For Operations. Let us first look at some of the key setups involved.

    Activate a vendor for Self -service/Collaboration:

    • On the vendor master record > General fast Tab, select Active (PO is auto-confirmed) or Active (PO is not auto-confirmed).

    vendor-master

    • Setup the Primary contact for the vendor. I have setup Erin in this demonstration.

    Prim Contact.jpg

    • Setup the user account for the vendor contact/vendor user. You will need to setup a Azure AD account for this for the vendor user and assign the Vendor(external) or Vendor admin(external) or both of these roles to this user. Then link the vendor primary contact to this user. Important Note: Note that you would not want to give the System user default role to this user, as this is purely an external user.

    vendor-role

    Additional Note: Since the vendor is an external user, you would definitely want them to personalize Dynamics 365 screens to add new data fields on their views. To block this, you can Block personalization for the vendor user in Dynamics 365 for Operations.

    With the understanding of the some of these basic setups, let us now see , what are some of the key features of the self-service portal.

    Shared View of Purchase Order Communications and Responses with Vendor:

    • Let us say Contoso Entertainment Systems USA wants to order some Wiring Harness and Speaker Units from their vendor Fabrikam Suppliers. The purchasing clerk at Contoso USA creates the PO. The purchase order is shown below.

    po

    • He then sends the PO to the vendor portal for obtaining confirmation response from vendor.

    send-for-conf

    • Notice at this stage, the PO status is “In External Review”.

    po-status

    • Now, Erin the contact Fabrikam Suppliers logs in to Vendor portal and can see that the PO that Contoso just sent is right there on the portal. He  logs in and navigates to Purchase Order confirmation workspace.

    vendor-portal-po-conf

    po-for-review

    • He sees that the PO sent by Contoso appears there and then he goes into the PO details.
    • At this point, as a vendor Erin from Fabrikam can review the PO header and line details and do the following.
      • Print a copy or original PO if he needs to send it to anyone else.
    • printpo
      • Review the PO Header and Line information and Accept or Reject the PO Confirmation request. If he accepts the PO confirmation request, then the PO will be automatically confirmed.
    • accept-reject
      • Additionally, Erin can suggest changes on the PO, such as Mode of delivery, Delivery date and Quantity. Erin can also view or attach Notes and documents both at the PO header and line levels at this stage. Let us say he changes the Quantity of the Wiring Harness to 170, as Fabrikam does not see to have enough stock at the moment to fulfill the order.
    • suggest-change-1
    • suggest-change-2
      • Eric can substitute a specific PO line if needed. He can also split the delivery of the PO into multiple deliveries for each PO line. Let us say, he splits the delivery of Wiring harness into 2 deliveries as shown below. He also adds appropriate note saying that they can deliver only 170 Qty. of the Harness ordered and they will need to delivery them in 2 schedules.
    • split-delivery
    • split-delivery2
    • notes
      • Erin can now go ahead and Accept all the changes he suggested and proceed further Accepting the PO with changes. He clicks on Accept with changes on the PO. At this point, Contoso will review the suggested changes on the PO on their side and confirm the changes, after which Eric has to do the final acceptance without making any further changes.
    • accept-with-changes-1
      • The purchasing clerk at Contoso can now view the suggested changed and accept the changes followed by final acceptance from the vendor.
    • vendor-accepts-changes


    Vendors can manage their Contacts and New Collaboration Users easily:

    • The primary contact/user at the vendor can view and manage the contacts and users for the vendor portal.
    • They can create new contacts and request to provision new vendor users for collaboration portal.
    • Can update contact information of the vendor users any time, anywhere.

    vendor-users

    provision-user

    vendor-user-requests

    Vendors can view and inquire on invoices and payments using the portal workspace:

    • Vendor can review the status of the their invoices and payments online.
    • Create purchase order invoices and upload invoice documents on the portal.
    • Inquire status of payment for the invoices.

    vendor-invoice-workspace

    vendor-creates-invoice

    vendor-invoice-attachments

    Vendor can view and inquire information about consignment inventory:

    consignment-inventory

    Vendor portal and Vendor collaboration feature  continues to be one of the major investment areas for Microsoft in Dynamics 365 For Operations, which means we will only continue to see more and more new features in the upcoming platform updates in next few months. Stay tuned !!

  • Mobile apps for Dynamics 365 For Operations is available for download in Android

    Mobile apps for Dynamics 365 For Operations is available for download in Android

    Exciting times are here for Dynamics customers, prospects and enthusiasts !!

    The mobile app for Dynamics 365 For Operations is now available for download and use in the Android platform.

    You can download it from Google play store today. Just search with keyword Dynamics 365 and you should see the app listed.

    After you have installed, login to your Dynamics 365 environment and provide your login credentials. That’s it.

    Below are some quick screenshots that I took on my phone. I connected to one of my demo environments that has the Update 2 environment and I was able to see the one mobile app workspace I designed a few weeks ago, which I described in the post below.

    https://sandeepchaudhury.wordpress.com/2016/09/30/sneak-peek-into-mobile-applications-framework-for-dynamics-axdynamics-365-enterprise-edition/

    android-apps

    android-apps

    Obviously this was just a very crude attempt at creating a prototype mobile app to evaluate the new feature in Dynamics 365 and it worked great.

    I could not connect it to the Update 3 environment, which is really the Dynamics 365 For Operations environment, as it is still being configured.I will work on creating a more usable and professional app/workspace in Dynamics 365 For Operations, and I will share more details once I have something ready. If you connect to an Update 3 environment, you will notice that there will already be several out of the workspaces/apps that are developed and published my Microsoft out of the box.

    Regards,

    Sandeep


  • Dynamics AX Tip: How to control Personalization options for specific users in the New Dynamics AX

    Dynamics AX Tip: How to control Personalization options for specific users in the New Dynamics AX

    The Personalization options has been a very widely used feature, which is powerful and has always allowed users to personalize various screens based on what they would like the screens to look like. You can learn more on the Personalization options in the New Dynamics AX on my earlier post.

    While this is a great feature to allow every users to be able to personalize screens, it is sometimes required to disable this option or even give some users explicit personalization options for certain users, based on what type of users of the system they are.

    For example, let us say you are configuring a vendor(External) user in your Dynamics AX environment, to provide them access to the Vendor portal, but you obviously do not want to them to be able to personalize screens to add any data fields which you do not want them to see.

    The vendor user is setup as shown below, with Vendor (External) security role.

    vendor-user

    In the new Dynamics AX, you can control user specific personalization options under System Administration > Setup > Personalization. All you have to do is, select the specific user ID and UNMARK the Personalization allowed checkbox.

    personalization-setup

    With this, when the vendor user logs into the Vendor Portal, they will not see the Personalize this form option.

    personalization-setup-dis

    If the Personalization was allowed for this user, they would see this option as shown in screenshot below.

    personalization-yes

    Cheers !!

    Sandeep

  • Sneak Peek into Mobile Applications Framework of New Dynamics AX/Dynamics 365 For Operations

    “Can I enter my time and expenses on the go, when I am at an airport, or in a flight” ?

    “Can I do my daily tasks of work while I am on the go “?

    “Can I inquire the status of a sales order and take some basic action on it, or even add a new customer contact when I am meeting a customer”.

    These are probably some of the very common questions we hear from users and customers who are either using an ERP or looking to implement an ERP for their organization. In today’s mobile first cloud first era, it is vital that the users of an ERP system remain productive regardless of their location, the computing device they use. They should be able to complete the key functions of their daily tasks “Anytime, anywhere”.

    So what is the story of Mobile applications for Microsoft Dynamics AX ERP, which is the main Operations component of Dynamics 365 Enterprise edition ? Well, traditionally till the AX 2012 R 3 release of Dynamics AX, the mobile applications platform (Windows, iOS and Android) existed and supported basic mobile scenarios, but they were not very significant and the framework had limitations obviously.

    Now with the release of the New Dynamics AX (Still widely known as AX 7 among the community), the whole scenario of Mobile applications is going to take a HUGE leap in terms of the quality, usage, configurability, capabilities and more.

    SOME KEY HIGHLIGHTS OF THE NEW MOBILE APPS FRAMEWORK:

    1. Support for full Offline/intermittent connectivity mode. You can interact with Dynamics AX even when you are not connected to the internet !!
    2. Inherits of all key artifacts of Dynamics AX (Such as Security, labels and more).
    3. Front end “Mobile experience designer” within AX client, to develop mobile screens/apps with literally less or no coding needed.
    4. Deploy these app experiences to the common mobile app present in Windows Store, App Store(iOS) and Play store (Android).
    5. There is no limit for the mobile app to certain functional areas only like time and expense. It can be used literally for any operational area of Dynamics AX from sales to warehouse and accounting. Very Powerful !!!!!
    6. Microsoft will release several mobile apps out of the box when this framework releases this fall (Around November 2016).
    7. Dynamics Partners will be able to create specific business apps and publish those to app source for consumption.
    8. Will take full advantage of smart phone features like GPS, Maps, Camera and more.
    9. While most of the apps and features will be available out of the box, if you need to make your apps more fancy (Like changing he UI, adding a file upload interface, or some real-time validation in the mobile client), you can do them by writing your own java script.

    The 2 significant components of this new mobile applications framework are as follows.

    1. The actual mobile app for Windows store, App Store and Play store. This common app is still in beta testing and not available for public preview yet. I don’t have access to the preview version unfortunately.
    2. The Mobile Experience Designer within Dynamics AX. This is the component I will provide sneak peek into in today’s post. Using this, you can create and configure the mobile application workspaces for different areas of AX the way you want it.

    If you have deployed the recent Update 2 release of Dynamics AX that came out in August 2016, then you can access the Mobile experience designer within AX and see what it is all about. Let us take quick ride on this.

    • Launch Dynamics AX  in your browser.
    • After that, Open the Settings menu and you will notice a new menu option called “Mobile Apps”.

    mobile-app-menu

    • Click the Mobile Apps option to load the designer experience.

    mobile-app-workspace

    • Now, you can create your mobile workspace for any functional area you want. Let us say we want to create a mobile app/workspace for the Projects.
    • Click Add and give a name and description for the app/workspace. You can also select a color for the workspace as well as a default icon (Which is how it will appear in the mobile app).

    new-workspace

    • Next, we will add a new page to the to app. This is the page which will appear when user launches the app/workspace in the mobile app. Click Add Page and provide a page title and description.

    add-pages

    • Click Select fields button to select the data fields you want to show on this page.

    select-fields

    • As soon as you do this, system will automatically prompt the data fields that you can simply select to add to the page. In this case lets add Project ID, Name, Customer Name, Project type and Project stage. Just click the + icon on each field to add them to the page.

    select-fields-details

    • Now, click Done when you are done adding all the fields you need.

    done

    • Go back to the main page now and you can add ACTIONS on this page if you want. Under action if click add actions and perform all the tasks such as save, submit, edit etc. on a specific form, system automatically record them and present the action in form of a button in the app.

    actions

    • Under the CODE tab, You can add custom code (Java script) for additional fancy customizations (such as  UI changes, validation in mobile client and more).
    • Finally , when done, click Done and You will see option to publish this workspace to the mobile app. As soon as this is done, you will start seeing it in the mobile app when you login to the app in your smart phone or tablet.

    publish

    I am not able to show how this all will actually look on the actual Mobile app on the Windows/iOS/Android smart phone or tablet, since I do not have access to the beta release of the apps and it is yet to be released for public preview. Expect the apps to be available for public preview around November 2016 timeframe, when the Update 3 for Dynamics AX comes out. However, below are some sample screenshots on how the ultimate apps may look like (This is subjected to change when it releases for public preview).

    mobile-app-sneak-peak

    With that said, one final note to mention. If you have explored the Microsoft PowerApps and Common Data model, which are 2 of the significant components of Dynamics 365, you might be wondering if I can build a mobile application using PowerApps, then how is this built-in mobile apps framework of AX different from that ! Well, the answer is,

    • If you are looking at extending Dynamics AX functions to mobile devices and build native mobile app experiences for those functions, you would use the built-in mobile app extensibility framework, which we just discussed above.
    • However, if you are looking for building a solution that needs to span multiple services, such as Office 365, CRM and other non-Dynamics AX services, you would use Microsoft powerApps and the new Common Data model, to build your mobile apps. You can read my blog posts on “How to build mobile apps using common data model and Microsoft PowerApps” for more information.

    I hope this post will give you some idea where the mobile app story for Dynamics AX and Dynamics 365 is headed in the future and the tremendous potential it has to unlock new scenarios of mobile capabilities of a high quality enterprise ERP software, which is Dynamics 365 (Enterprise edition) and Dynamics AX.

    Stay tuned for more updates soon!!

    Regards,

    Sandeep

  • Dynamics AX Tip: Interact with Dynamics AX Data using Microsoft Excel Online (Office 365)

    Dynamics AX Tip: Interact with Dynamics AX Data using Microsoft Excel Online (Office 365)

    In AX 2012 release, the Excel Add-in feature introduced additional productivity options and made it easy for end users to interact with Dynamics AX data from within Excel. This feature worked great in many scenarios, but it did not provide that seamless productivity experience for the user, as they had to launch the Excel On Premise app (Win32 app) and then had to connect to the AOS to select tables and data fields to be able to interact with the data. This required the end users to have certain knowledge of the tables/database to complete data exchange tasks with Dynamics.

    With the New Dynamics AX (AX 7), the Office Integration framework introduced significant changes in the underlying framework by launching the new ” Excel Data Connector App”. The Excel Data connector app interacts with your Excel workbooks with Dynamics AX OData Services (For publicly Exposed Data Entities) and this made it possible for Excel to become a seamless part of the user experience in Dynamics AX.

    Most of us probably know by now how the “Open in Excel” experience works in the new Dynamics AX, where you can launch your data (For example a journal entry) into an Excel On Premise app (Win32 app) with just one click. Once the excel app launches, you can sync data, make updates, add or delete data. The screenshot below shows this experience in the new Dynamics AX.

    Open in Excel

    Excel Launched

    In the New Dynamics AX, it is also possible to open the Dynamics AX data in the Excel ONLINE version (Office 365) in case you do not have the Excel On premise(win32) app installed. The only thing you have to do differently is as follows.

    After you click the Office Integration icon > Open in Excel, select Save To > SharePoint.

    Save to sharepoint

    Then select the SharePoint location (Document library) and Mark the Open file after save option and click Save button.

    Save to sharepoint Open

    Notice that the Journal entry will now open in Microsoft Excel Online and the Excel data connector app will run in an embedded experience within your browser(Built using Office web add-in framework).

    Opened in Excel Online

    From here on you still have the same user experience as you would see when dong it in an Excel On premise app. This will come handy in cases where you are away from your desk and using a device that does not have the native Excel on premise app installed. You still have full power of Excel and exchange data with Dynamics AX.

    That’s it for today’s quick tip.

    Regards,

    Sandeep

  • Dynamics AX Tip: Percentage complete calculation for revenue recognition, based on WBS Work Percentage Complete for fixed price projects

    Dynamics AX Tip: Percentage complete calculation for revenue recognition, based on WBS Work Percentage Complete for fixed price projects

    Traditionally, the 2 primary methods of revenue recognition for a fixed price project were the “Completed Percentage” and the “Completed Contract” methods. I have explained how these work in Dynamics AX for revenue recognition of fixed price projects in my earlier posts.

    With the AX 2012 R3 release (CU 10), the straight line method for revenue recognition was introduced, which I also elaborated in this earlier post.

    When you work with the Completed percentage method of revenue recognition, there are multiple ways to determine the percentage completion of a project. Some of these options are,

    1. Manage percentage completion on a manual basis
    2. Use project budgets or forecasts to the system automatically keep track of % complete.
    3. The new method to calculate % completion on a project is based on the WBS percent complete. In this quick post, we will how this works.

    The first step for this is to setup the Cost template and select the Completion based on as “Work percentage complete”. See screenshot below.

    Cost Template Setup

    Once you have that, associate it with the project group. See screenshot below.

    Project Group

    The next step is to setup the fixed price project and establish the project plan, which is basically the work breakdown structure. Once you have your WBS defined and the cost estimates established, Dynamics AX will automatically keep track of the “Percentage completion” for the project based on the WBS estimates vs the actual transactions. I have setup a very basic WBS for this walkthrough.

    WBS

    After I have progressed in the project and transactions (Timesheets, Expense reports, Purchase orders, journals etc.), Dynamics AX automatically starts tracking the % complete for the project at each task level of the project. See screenshot below.

    Percent Complete

    Let us say, at this point you are ready to run the revenue recognition for this project for the Month of August 2016.

    Navigate to the Project revenue recognition screen and click Create. You will notice here that “Work progress percentage” is a new option under the “Cost to complete method” dropdown. But we will just leave it as default (From cost template).

    Notice that after we have run the revenue recognition, system automatically shows the Percentage completion based on the WBS work percent complete.

    Revenue Recognition Percentage

    The process after this is pretty straight forward and as you would run the revenue recognition typically for the fixed price project.

    NOTE: The intention of this blog post was not to explain the end to end process of revenue recognition for fixed price projects. I have explained these in detail in my earlier posts. This post was specifically a quick tip to highlight the new method of automatic work percent complete calculation.

  • Check out what is New in Update 2(August 2016 release) for the New Dynamics AX

    Check out what is New in Update 2(August 2016 release) for the New Dynamics AX

    The Update 2 (August 2016) release for the New Dynamics AX (AX 7) is now available for download in LCS.  Checkout what is new in this release at the URL below and learn how you can benefit from these enhancements.

    https://ax.help.dynamics.com/en/wiki/whats-new-or-changed-in-dynamics-ax-platform-version-7-2-august-2016/

  • How to create a new Workspace with no coding needed in New Dynamics AX(AX 7)

    How to create a new Workspace with no coding needed in New Dynamics AX(AX 7)

    If you have worked enough on the New Dynamics AX , you must be well aware of the new Workspaces feature by now. The workspaces are basically an aggregation of several business tasks, insights, reporting and dashboards that a business user deals with on a typical work day. These workspaces comes in really handy for end users by providing everything they need to execute their daily tasks, all at one central location, so that they can become more productive and save time to focus on important things.

    Workspaces probably are one of the most liked and talked about features of the New Dynamics AX among users, customers and prospects. Some of the examples of the workspaces are ” Financial Period Close”, “Employee Self Service“, “Manager Self Service“, “Project Management“, “Cost Administration” and more.

    Standard Dynamics AX already provides several workspaces out-of-the-box for most of the operational areas and departments of your business(Shown in screenshot below), but there might be specific cases where you might want to create customized workspace of your own to meet your requirements. With the release of Update 1 for Dynamics AX in May 2016, you can now create and build your own workspaces without requiring a developer or any sort of coding. Let us see the steps involved in doing this.

     All Workspaces Dynamics AX

    Create a new Workspace in Dynamics AX:

    • On the main landing page of workspaces, right click anywhere on the blank area and click Personalize > Tile page container.

    TilePageContainer

    • You will notice a new pop-up menu wit several options.
    • Click Add a workspace button.

    Add A workspace

    • Come back to the main landing page and notice that a new workspace with a default name “My workspace 1″ will be added. Right click on this new workspace and click Personalize > My workspace 1.

    My workspace 1 Personalize

    • Let us now rename this workspace. Let’s say we are creating a new workspace for Fixed Assets Management, which is not available in standard AX yet.

    Rename a workspace

    • The next step is to add the different components of this workspace to make it look complete. Let us first add a few live tiles. Navigate to the Fixes Assets Module and go the list pages which you want to add to the workspace. In this case I will add a few of the list pages. On the list page, click OPTIONS > Add to workspace and select the newly created workspace, and click Configure.

    Add to workspace

    • Continue the same for the remaining live tiles you want to add. At the end of adding all the tiles, your new workspace will look something like below.

    Workspace Tiles

    • Let us now add a few List items on this workspace. Navigate to the “Fixed Assets Transactions” form and click OPTIONS > Add to workspace button. Select the Presentation as List this time.

    Add list items

    Field List

    • Repeat the same process to add all the lists you want on the workspace. At the end of it, your workspace will look something like below.

    Workspace List Tile

    • Next step would be to add the option of adding/removing Power BI tiles for dashboards and reports. Navigate into the new workspace and click Options > Personalize this form. On the Personalization pane, click the Add button and mark “Allow Power BI Control”.

    Add Power BI Tile

    Add Power BI Tile 1

    • At the end of adding the Power BI tiles option, your workspace should look something like below.

    Add Power BI Tile 3

    Add PBI Tile

    • The last type of element that you typically add on a workspace is quick links to different menus and reports etc. You can do this by Personalizing the workspace and add the menu Presentation as Link this time.

    Add Links

    Links

    That was all I had for this blog post. The workspaces framework in the New Dynamics AX will evolve for sure with lot of new exciting new possibilities in the upcoming releases. Stay tuned for more..

    Regards,
    Sandeep