Category: Dynamics AX 2012

  • Some useful new features of Dynamics 365 for Finance and Operations version 8.1 under Core Financials management module – Part 1

    Some useful new features of Dynamics 365 for Finance and Operations version 8.1 under Core Financials management module – Part 1

    The October 2018 release of Dynamics 365 for Finance and Operations (Version 8.1) introduced several new and very useful features in the core financials management area of the application, along with several other new functionality and enhancements across various other modules, analytics, overall platform, extensibility and more.

    In this blog post, we will review some of the key new features under the core financials area, which a lot of end users will certainly fall in love with.

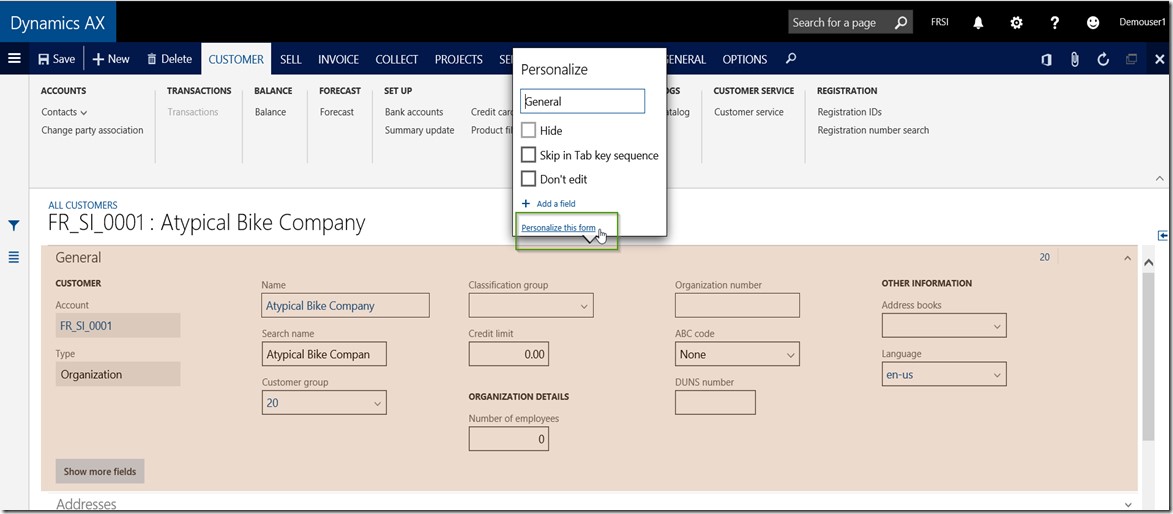
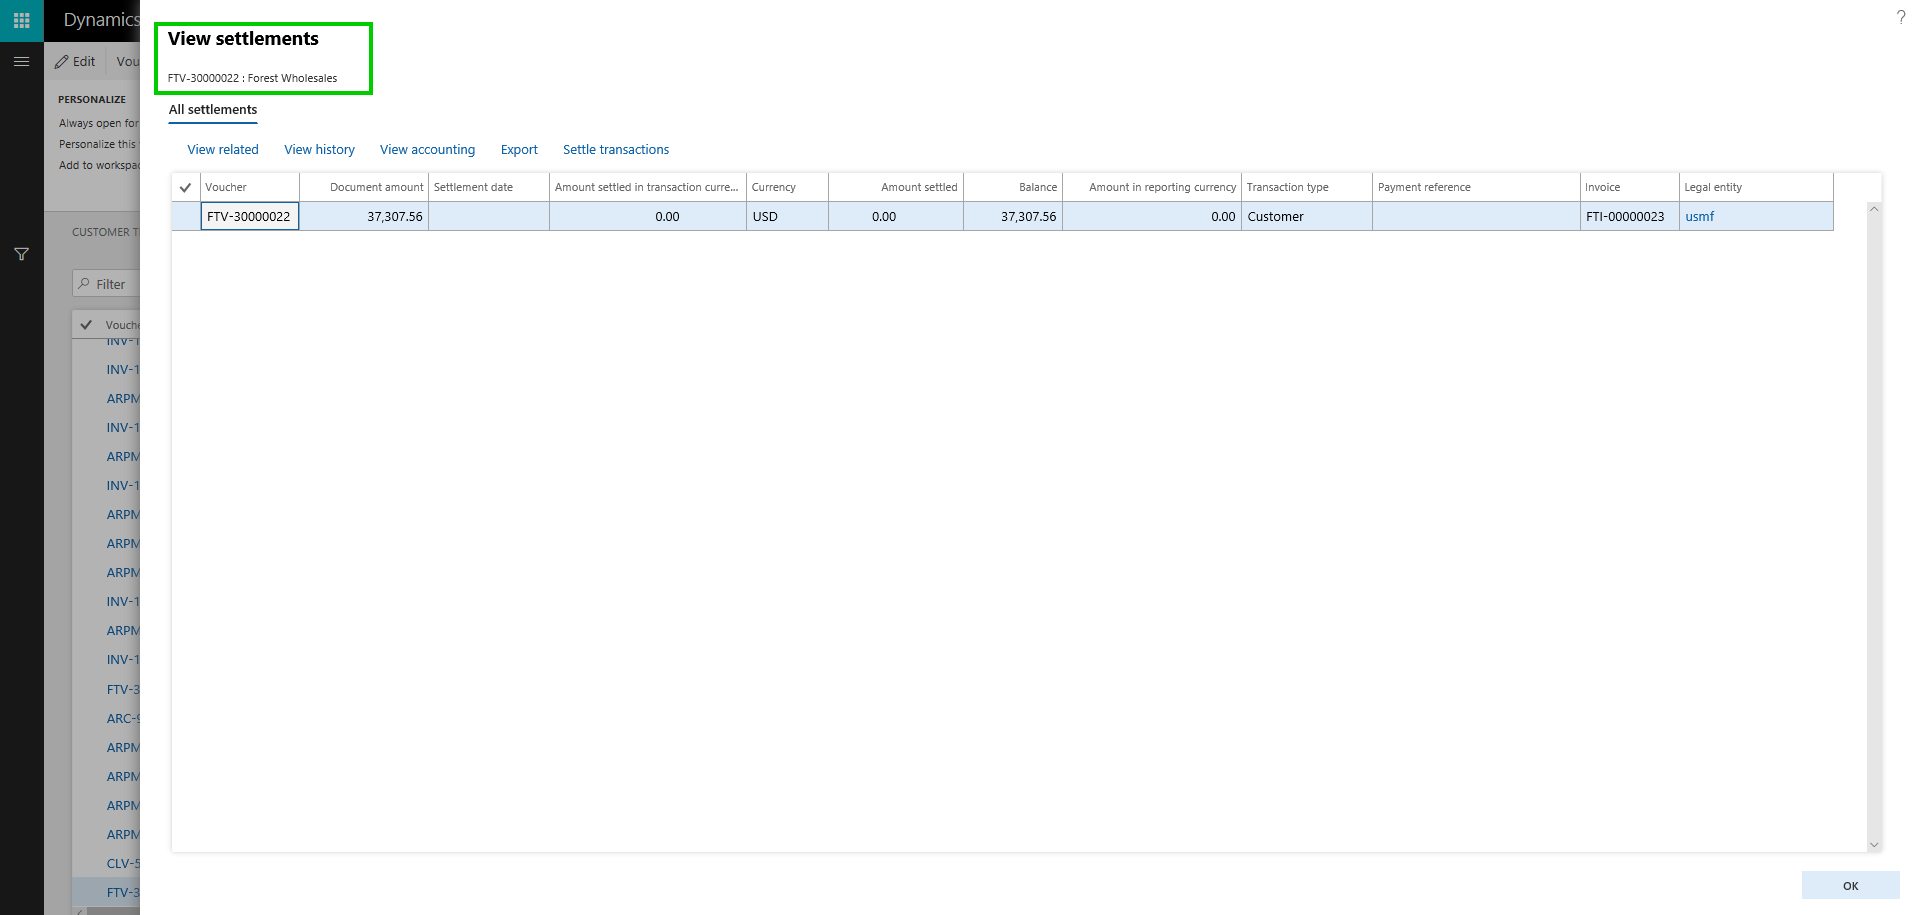
    Central view of Settlement Transactions: In the past, when you had to see the settlements on a customer or vendor transaction, you always had to make a few clicks and jump to more than one screen to find the relevant information, which was time consuming. With the new “View Settlement” form/option on the Customer and Vendor transactions form, you can now see the full settlement details, related transactions, accounting, history and more, all at one place. Here is an example.

    A customer invoice is posted: The View settlements form shows just the required details of the invoice.

    cust trans8.1
    view settlements

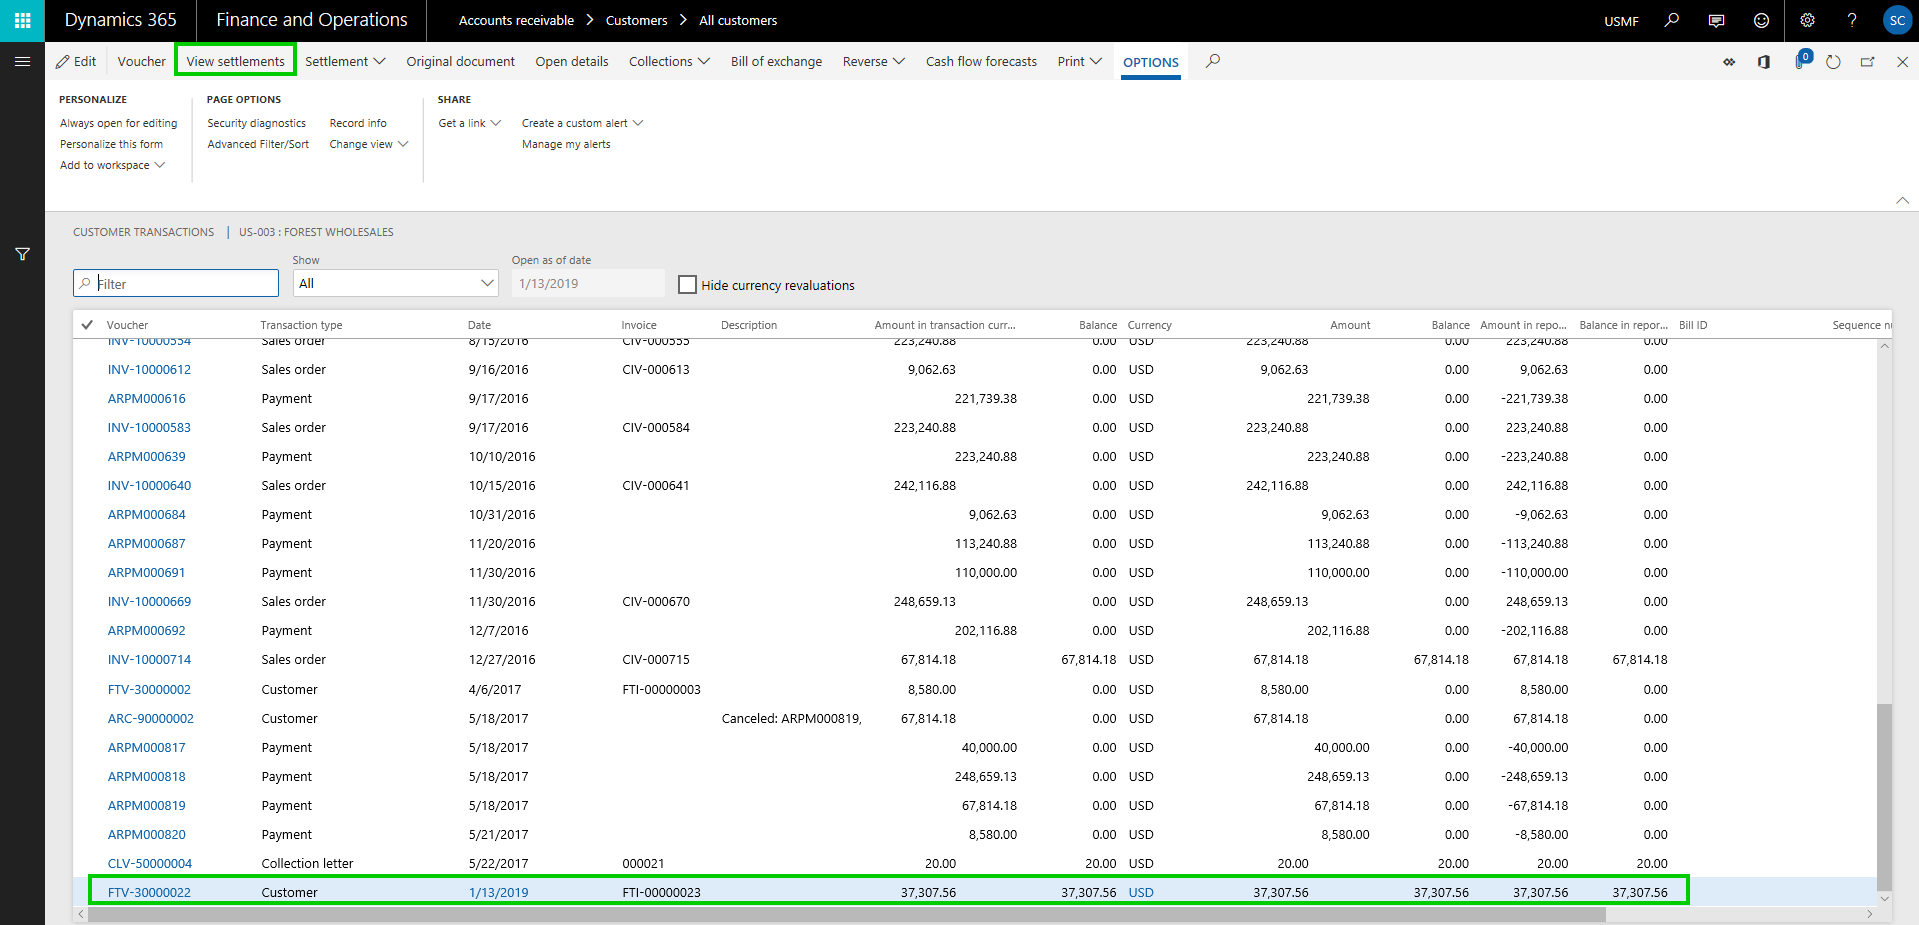
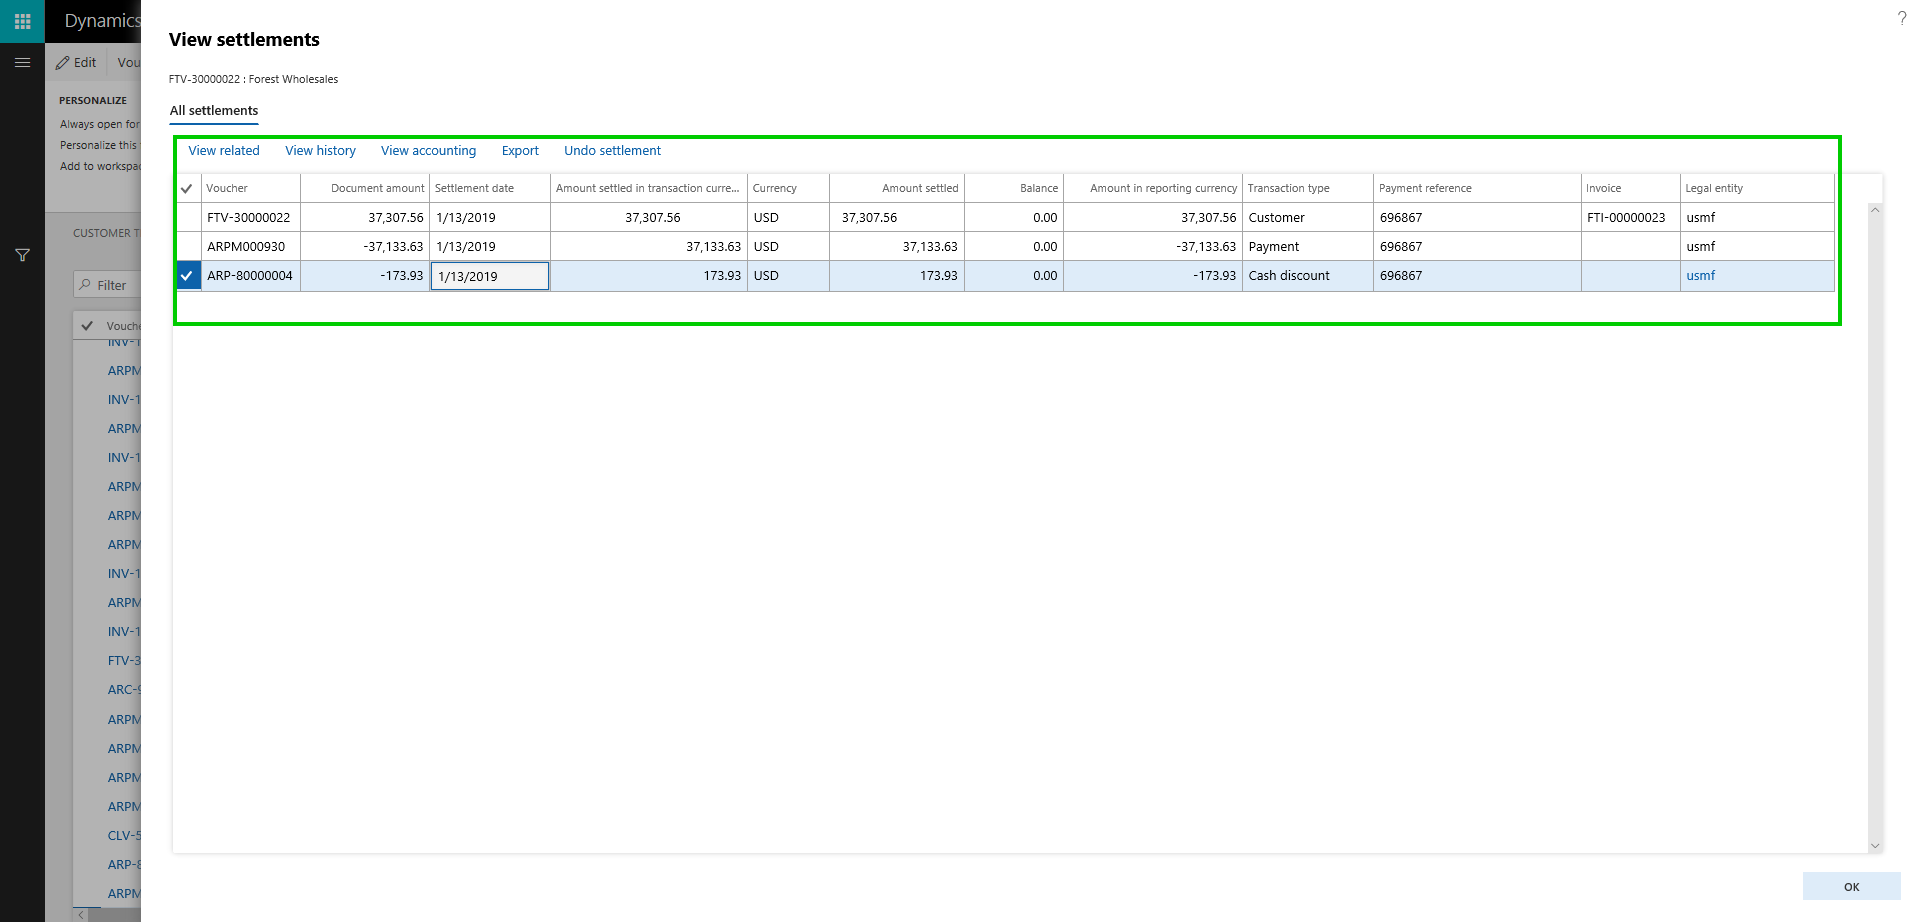
    Let us now settle this invoice against a customer payment along with some cash discount. Here is what you see in the view settlement form.

    view settleemnts after settlement

    On this new “View Settlements” form, you can,

    • View any related transaction lines for the invoice, payment, cash discount lines etc.
    • You can dig into the Settlement history, if there a transaction was settles, unsettled multiple times.
    • You can view the accounting entries directly from this screen, for each individual line.
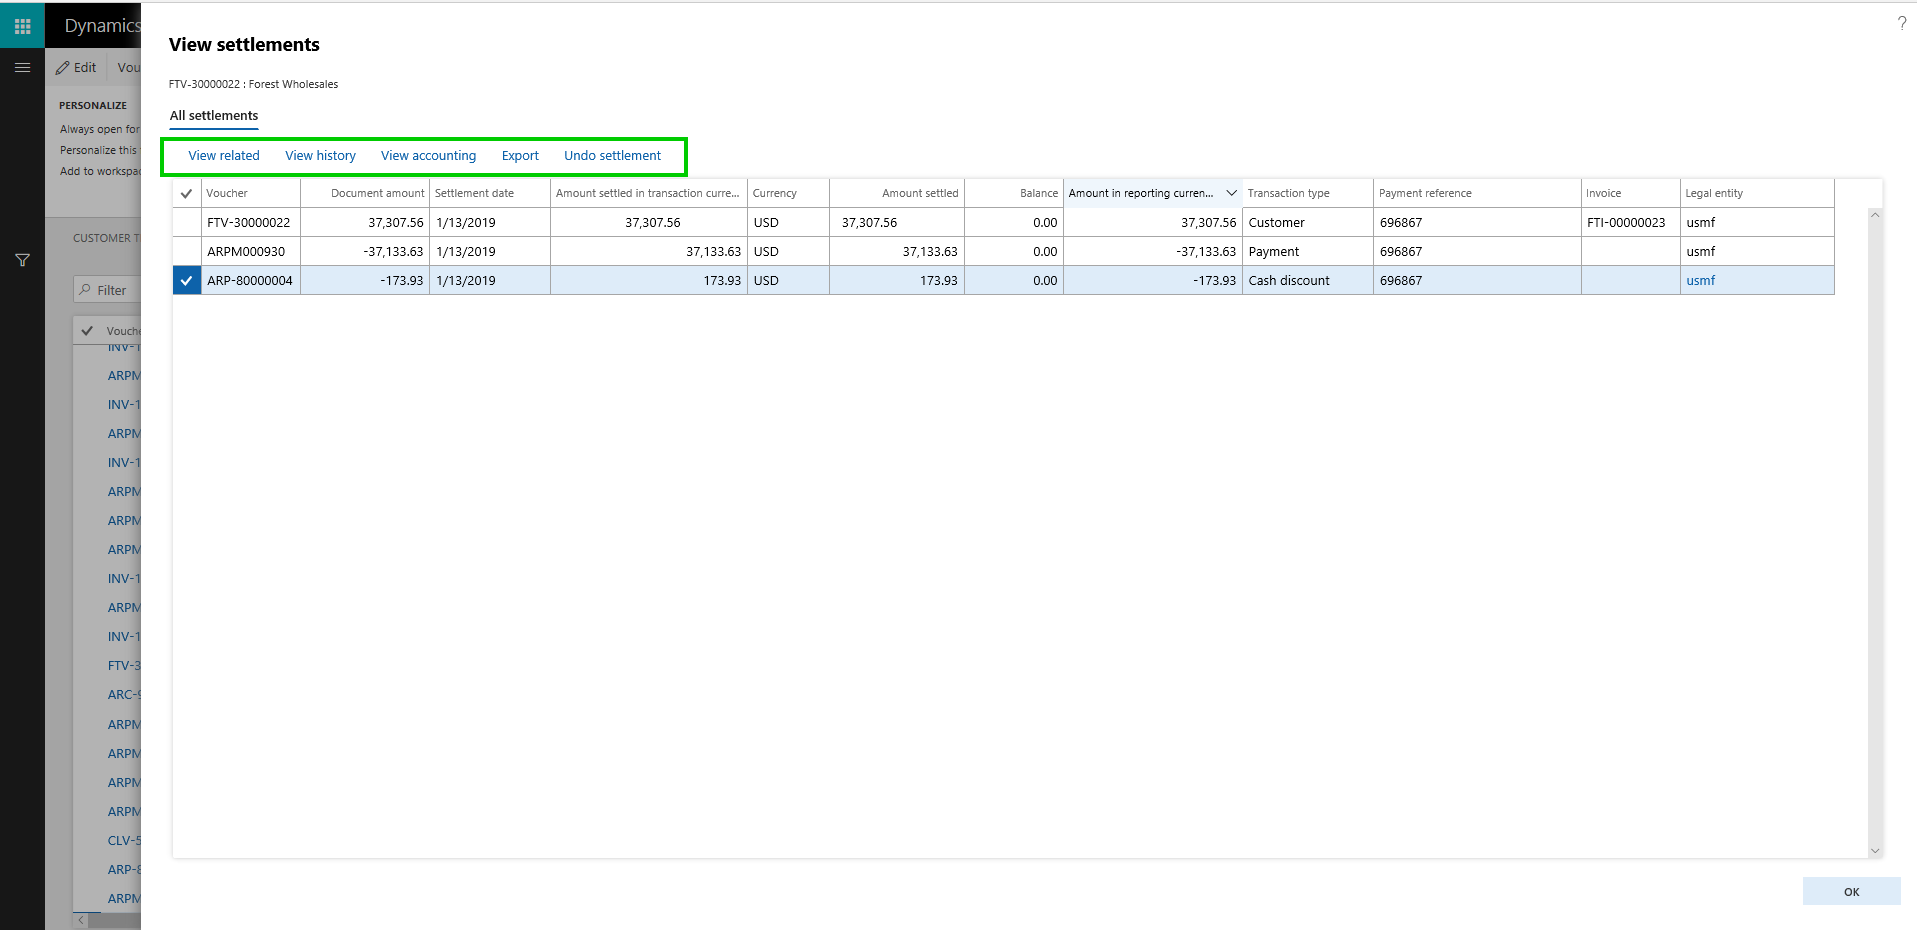
    • You can also initiate the Undo Settlement process from this new form.
    options on view settlements

    Customer and Vendor data field change approvals: On the Customer and Vendor master records, if you want approval process to be in place, when certain data fields are changed on the customer or vendor records, you can now enable that functionality optionally. This is a pretty neat feature, which let’s you chose which data fields you want to control from being changed accidentally, and then configure a detailed one or multi step approval process, so that the changes can be reviewed and approved, before the new field value comes into effect for the customer or vendor. In the post today, we will see this on the Customer side, but it is the same functionality on the vendor side as well.

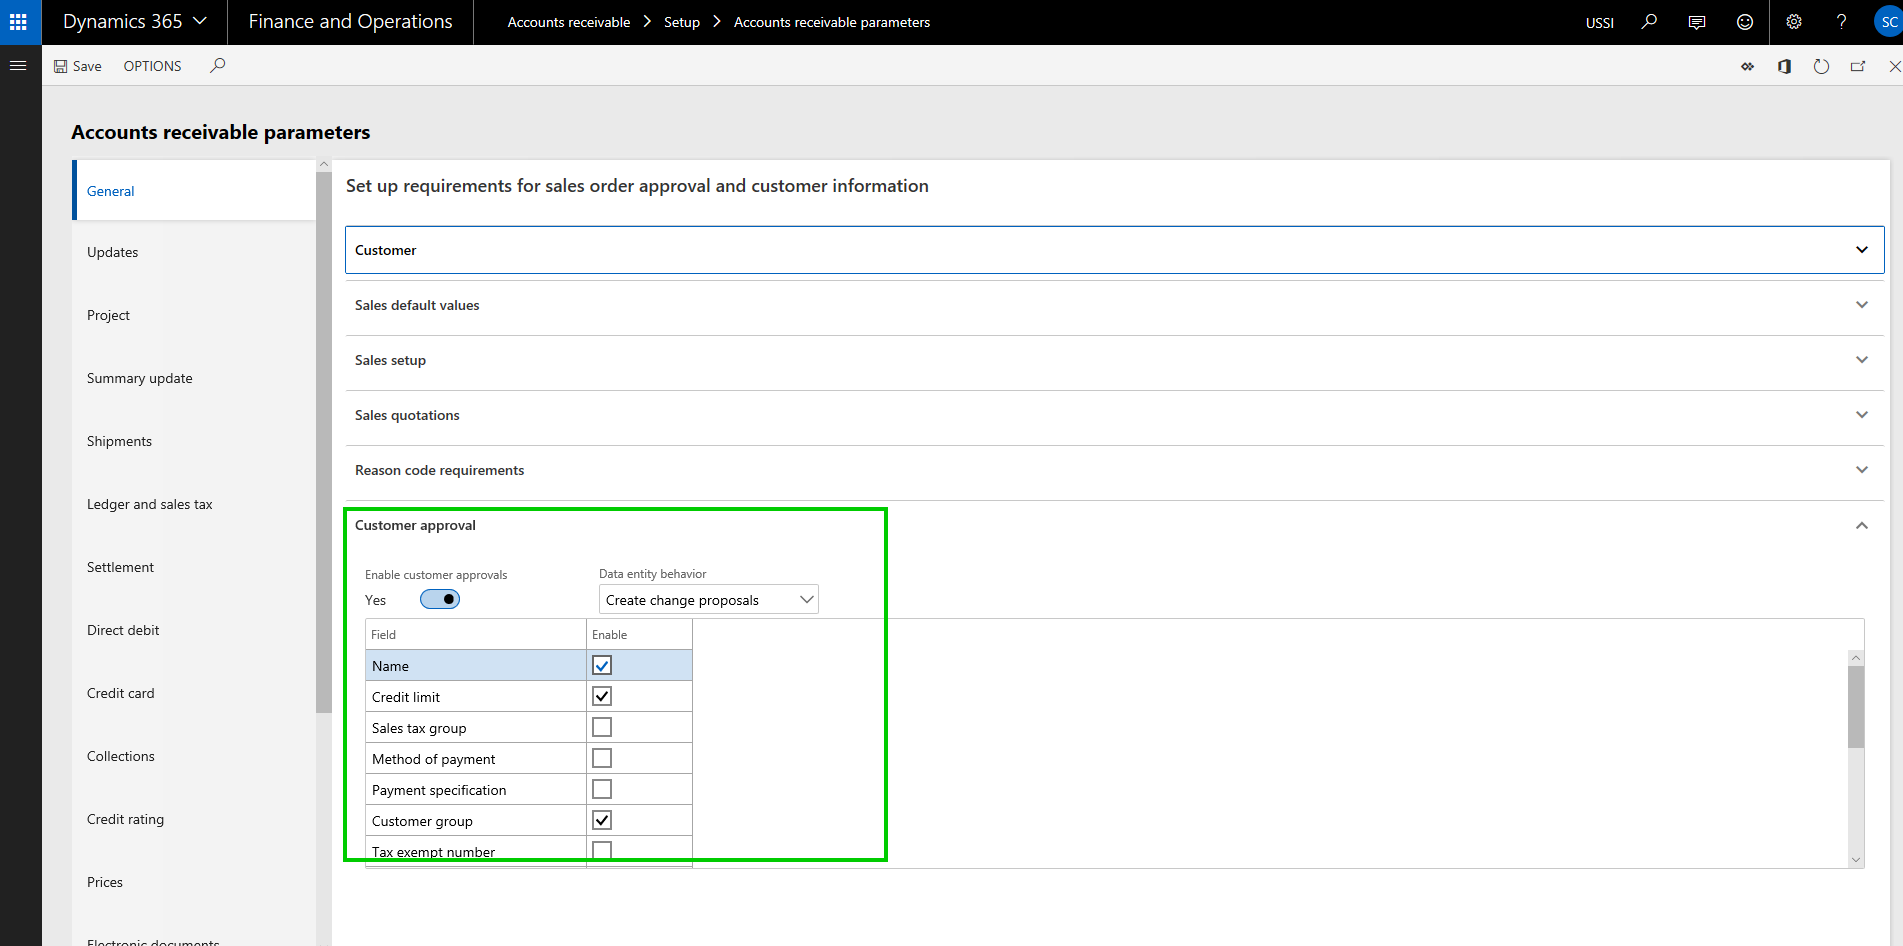
    So the first step is to Enable the approval process. As i mentioned, this is completely optional and if you do not need, you just leave the feature turned OFF. To enable this, go to Accounts Receivable > Setup > AR Parameters form and mark the “Enable customer approval” check box under the General tab.

    Enable Customer fields approval

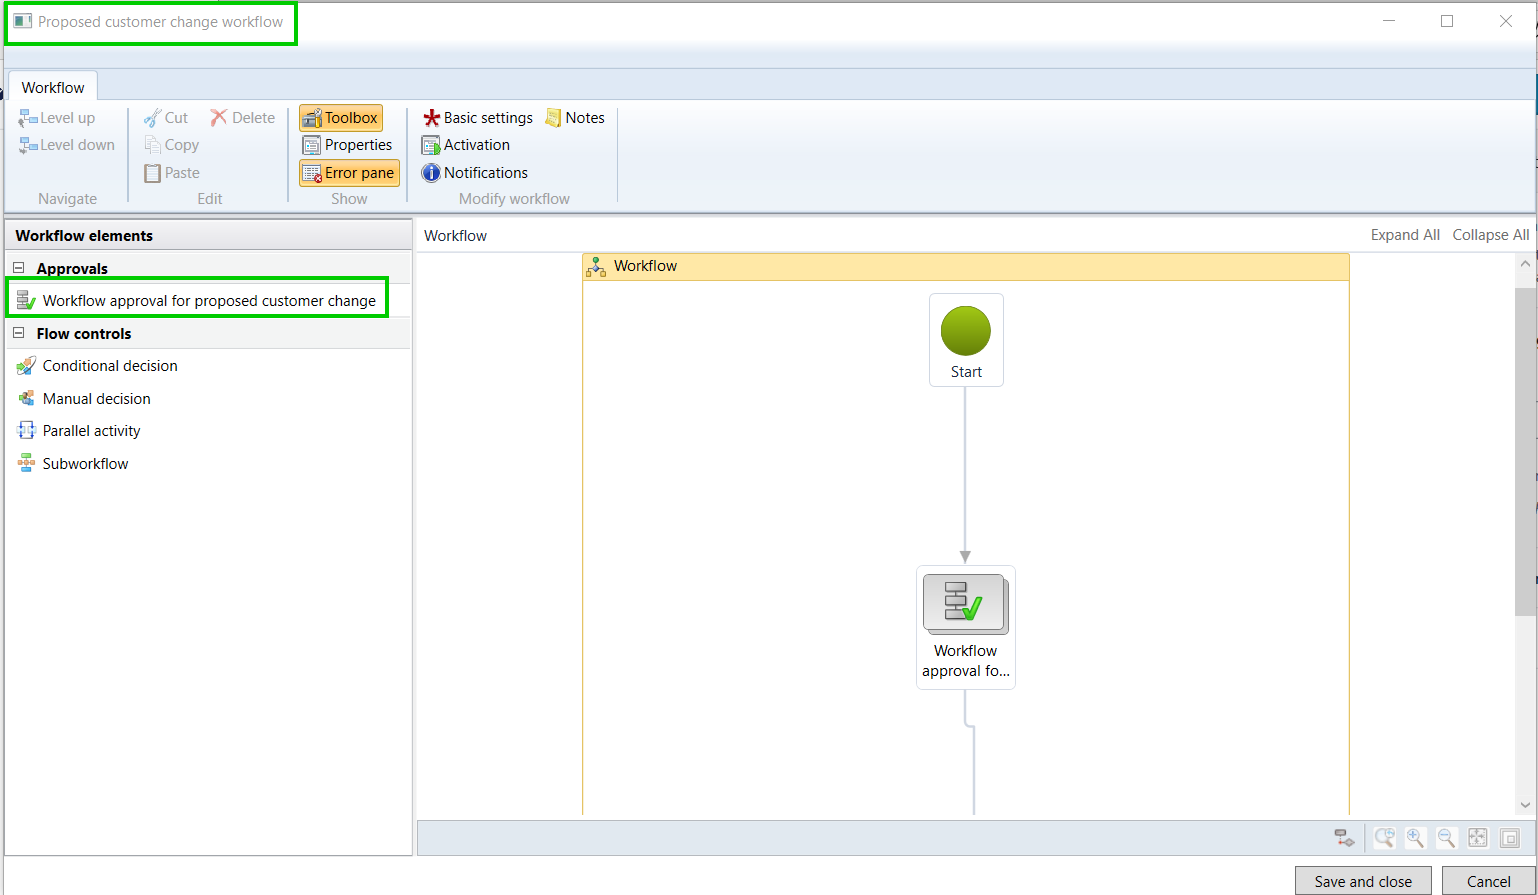
    The next step is to actually configure the approval workflow, which will be used for routing the proposed customer account changes for review and approval. This workflow is similar to other workflows in the system. In my case, i have setup a basic workflow with just one step approval process.

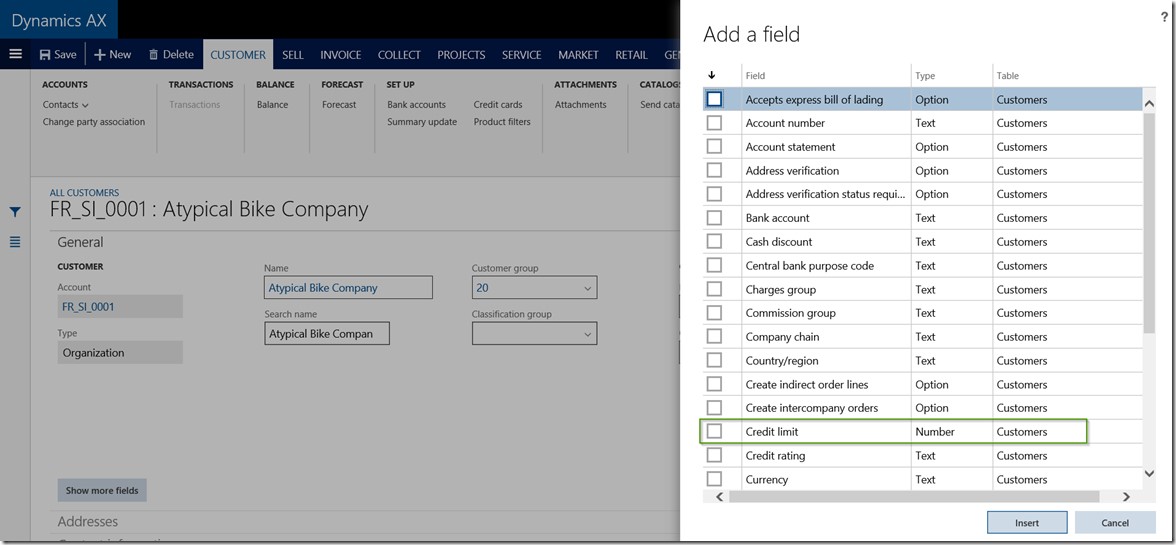
    Once you have the workflow configured, let us now see this functionality in action. Navigate to the customer master and you will notice that the data fields you selected in the parameter screen , will now show as “requires approval” indicator. This is super helpful and easily tells the user that this field if changes will require approval. Let’s try to change the customer credit limit and customer group field.

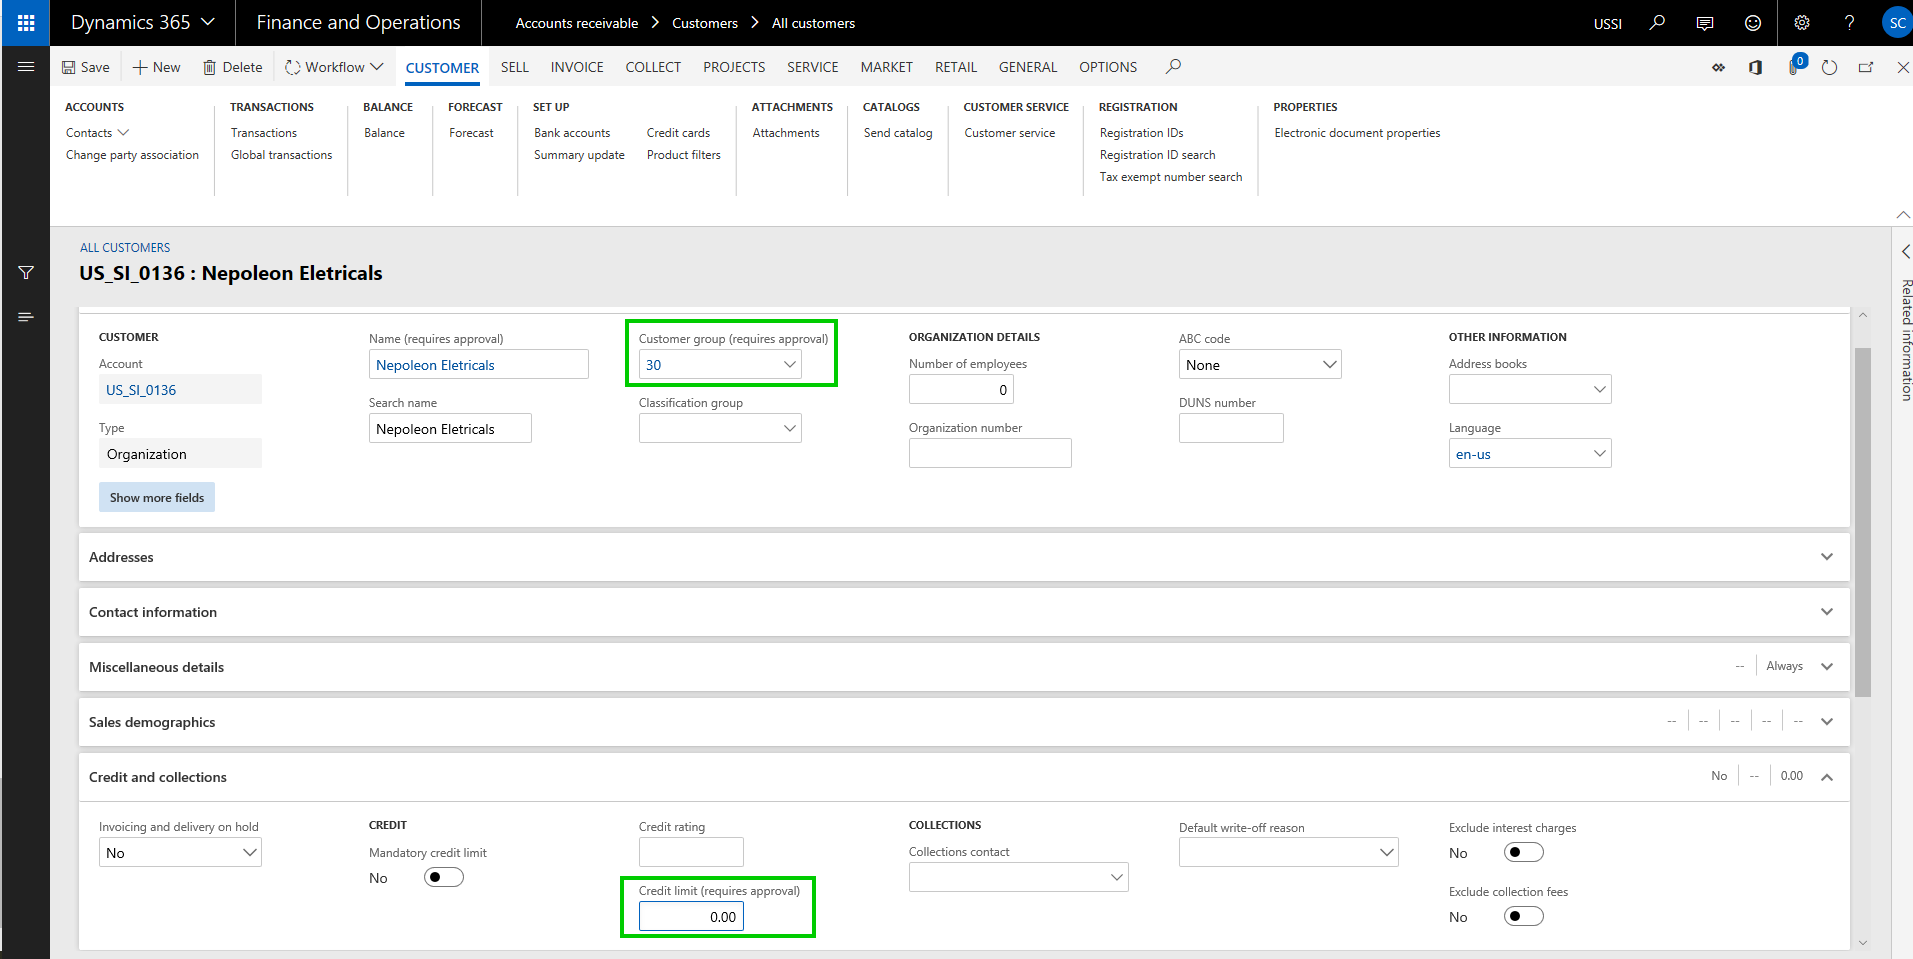
    Let’s try to change the customer credit limit and customer group field. When you save the changes, system will create and show the change proposal, which shows both current values and the proposed changed. At this point, the user if wishes, can discard the changes they made.

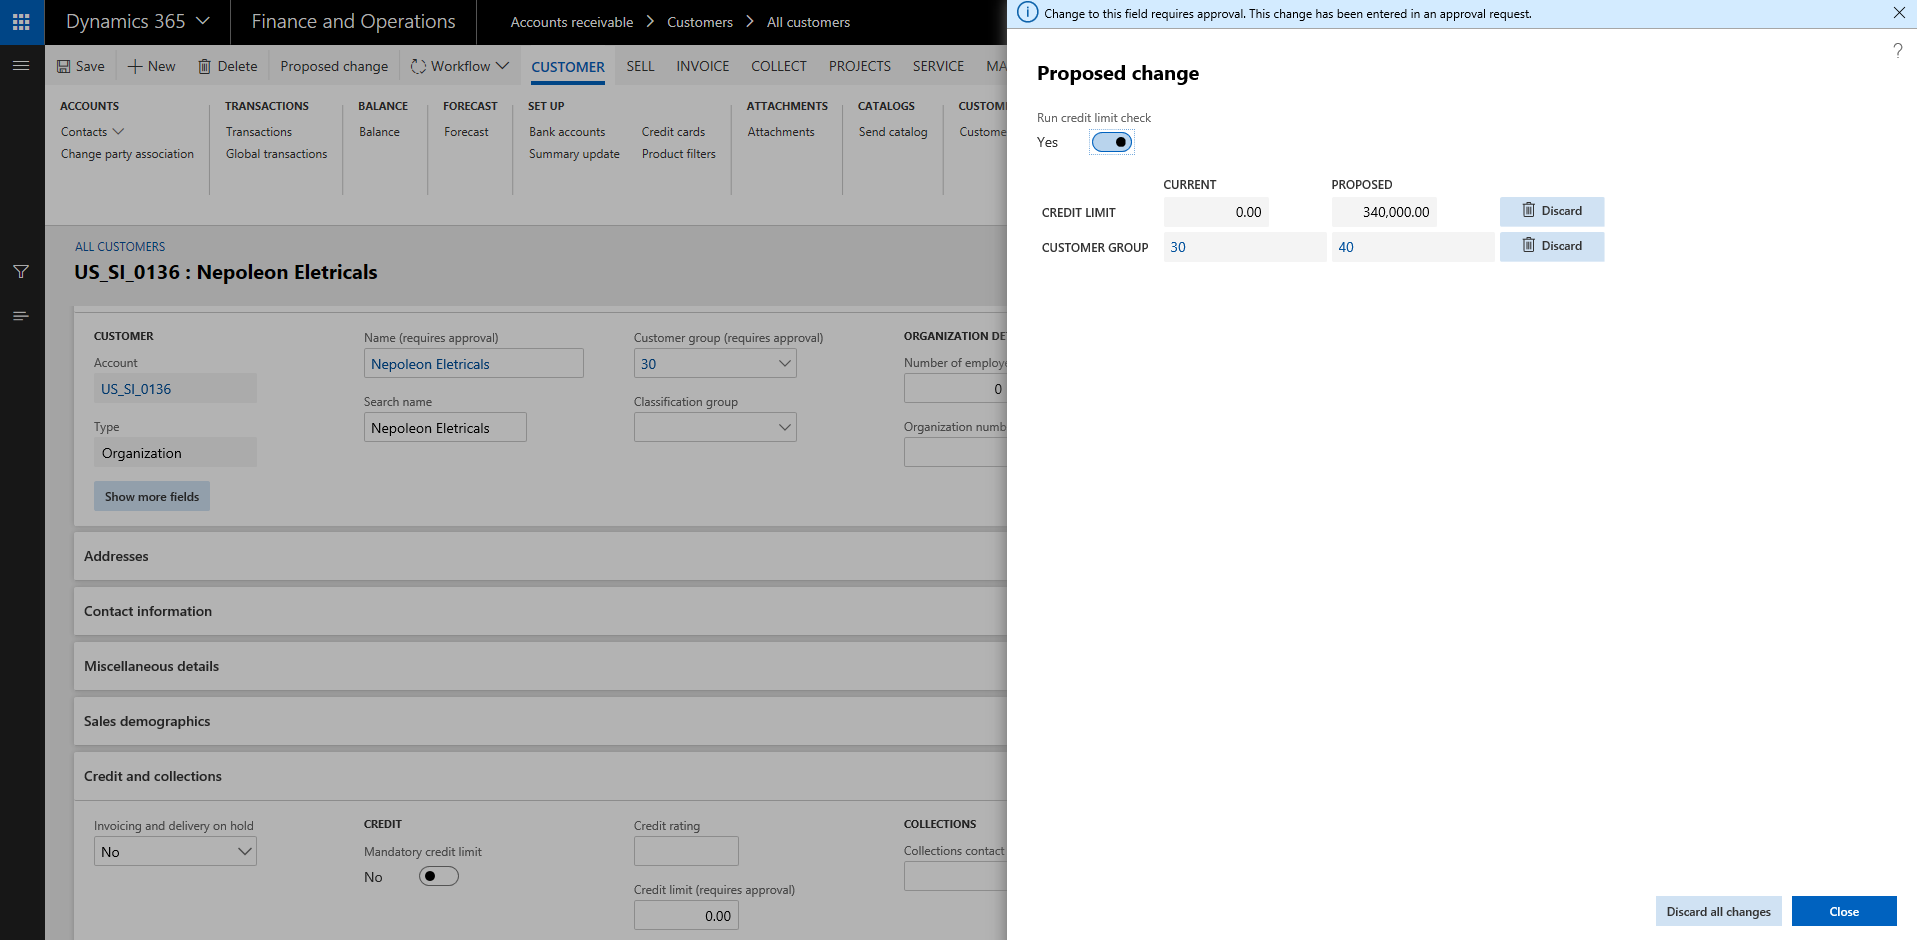
    Notice now that the status of the Customer account says “Changes not submitted”.

    One important thing to note here is, when the changes to the data fields are in process, you can still transact with the customer. System will just use the current values.

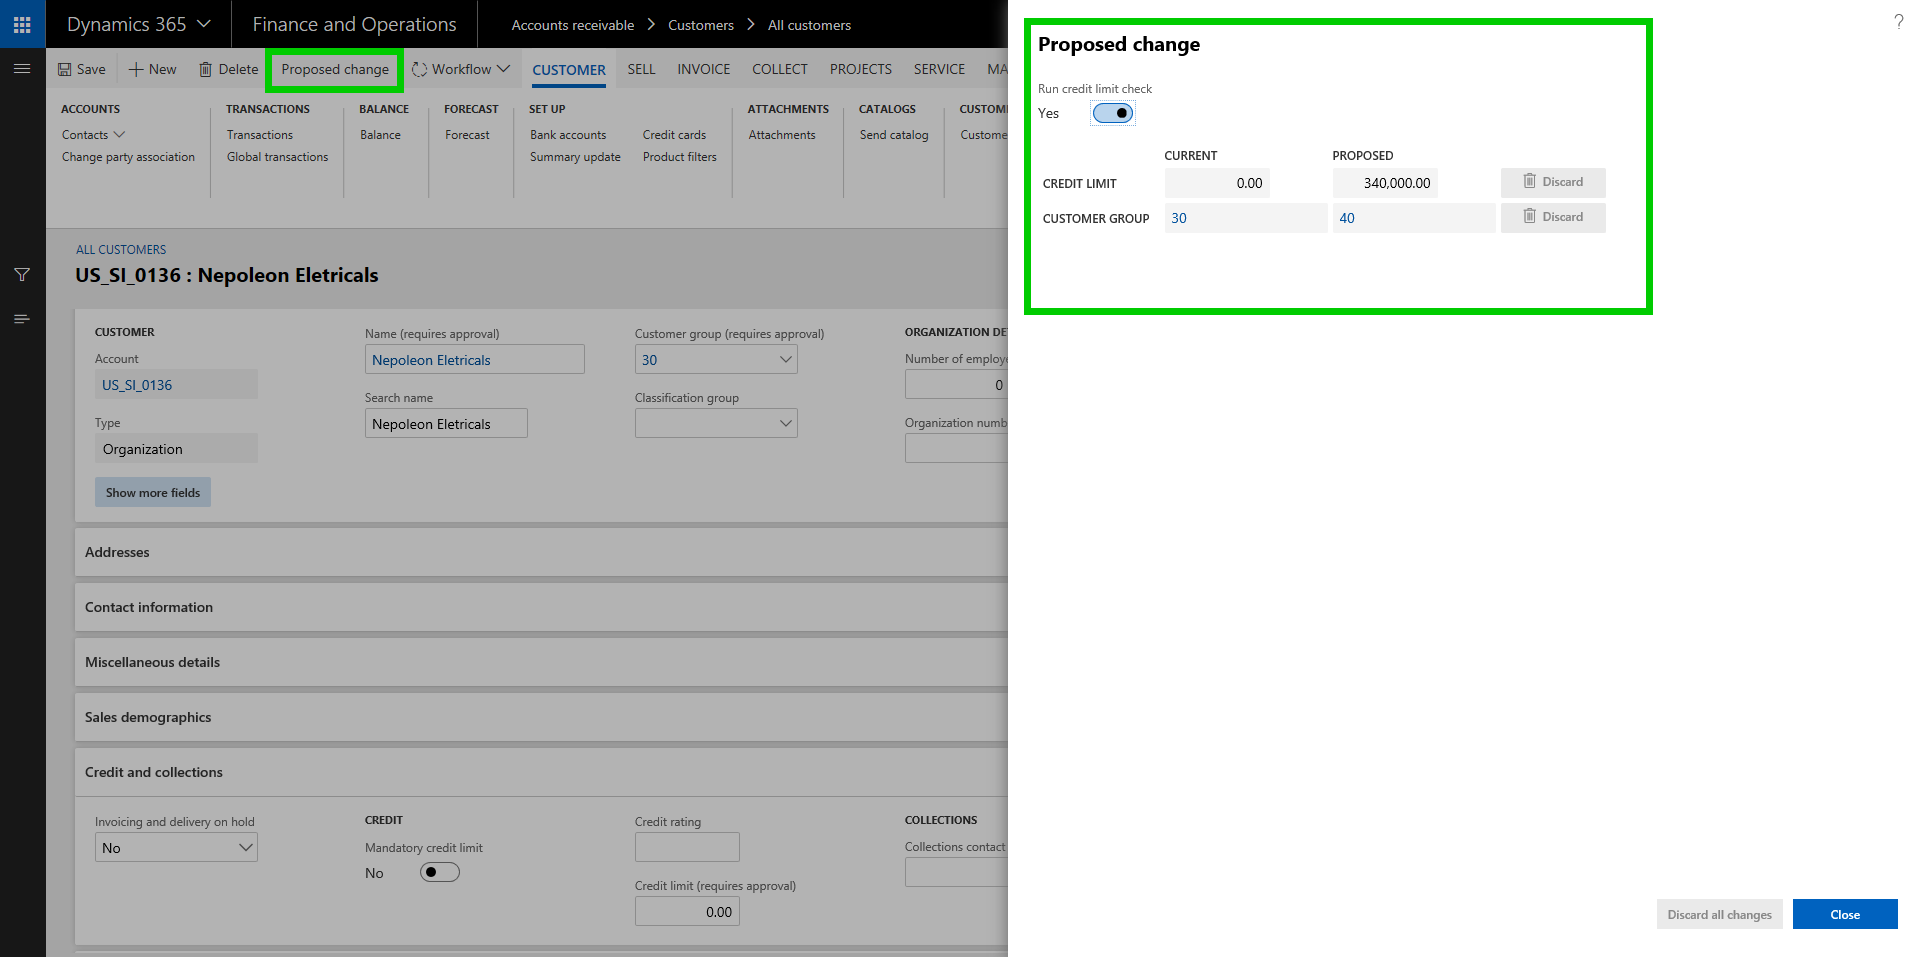
    Once you are done with the changes, click Workflow > Submit to submit the changes to the workflow for review and approval. When the changes gets assigned to the approver, they can view the Proposed changes on the customer record directly.

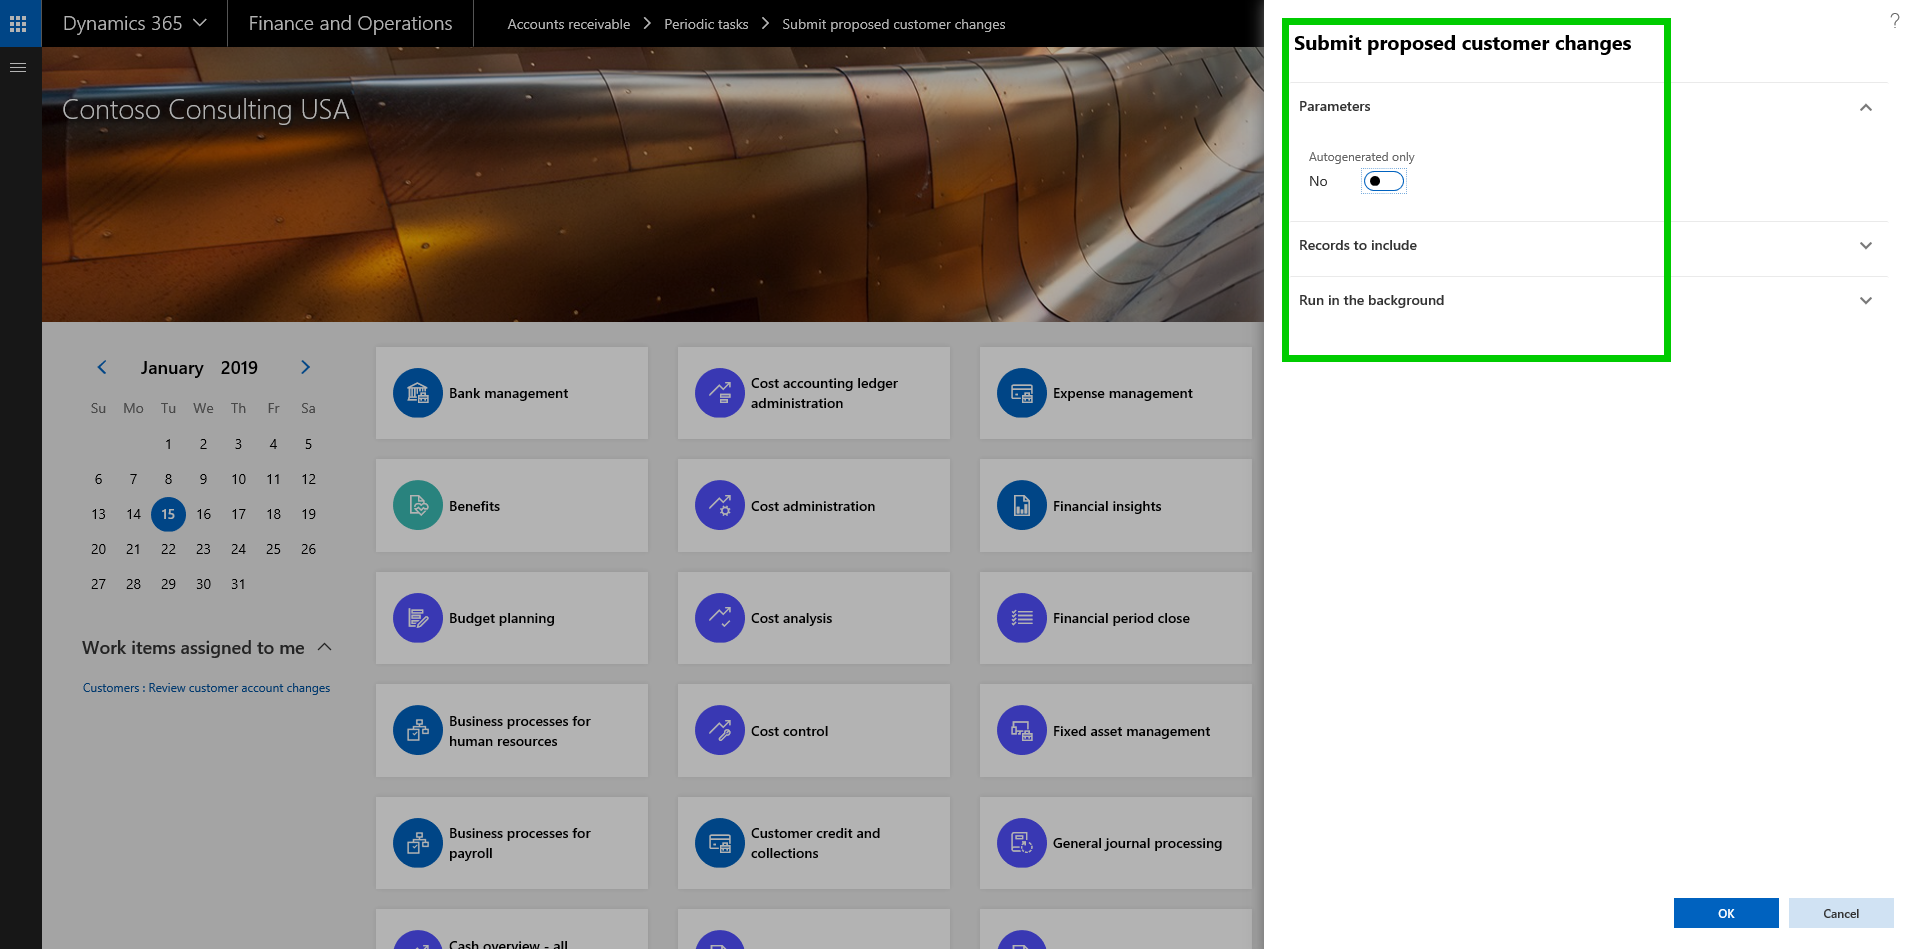
    Important note: There is a periodic option to submit all changes created for customer accounts in bulk. You can do it both manually and in the background/batch.

    The changes to the data fields will come into effect after the change proposal has been approved. It works the same way for vendor records as well.

    Financial Dimension values on Derived Dimensions: In many of the implementations I have done, a common requirement we here is to have some of the master records such as Item, Project, Customer etc. to be configured as one of the financial dimensions, so that customers can do adequate financial reporting on those. We use Derived dimension values for this and often end up having to select the financial dimension value manually on the master data record or we end up doing additional customization to automatically populate this value when new records are created in the master data table.

    With this new functionality, you do not need to do any customization or even setup the dimension value manually when new records are created. If enabled, the system will automatically set these up now. Let us see this in action.

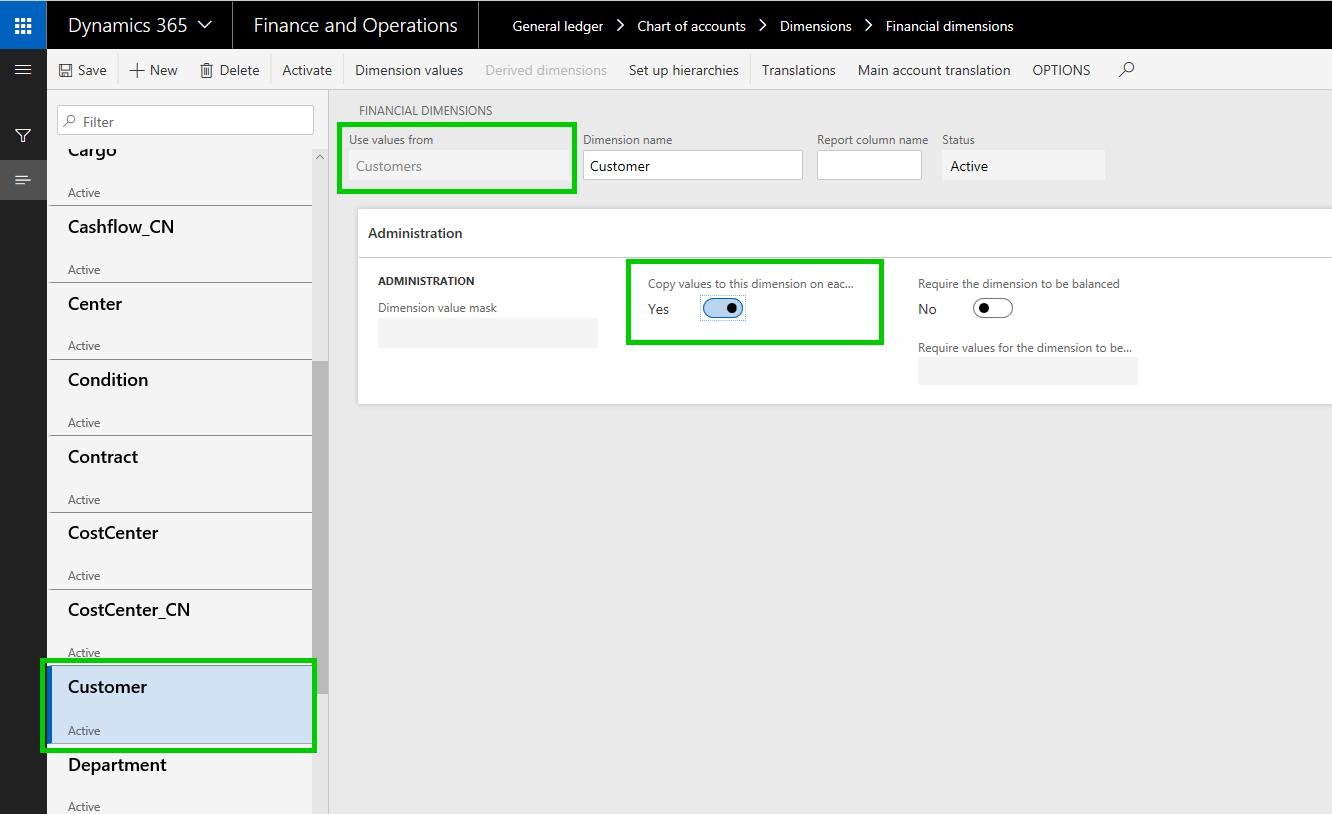
    Additionally, there is another new functionality available on the financial dimensions area, where you can now setup certain dimension values to be defaulted when you select another dimension value. For example, when you select a specific business unit, you can have the system automatically default a cost center value for you.

    To set this up, go under Financial dimensions > Select the dimension record and click Derived dimensions button. Here you can setup the value combinations of the defaulting of dimensions.

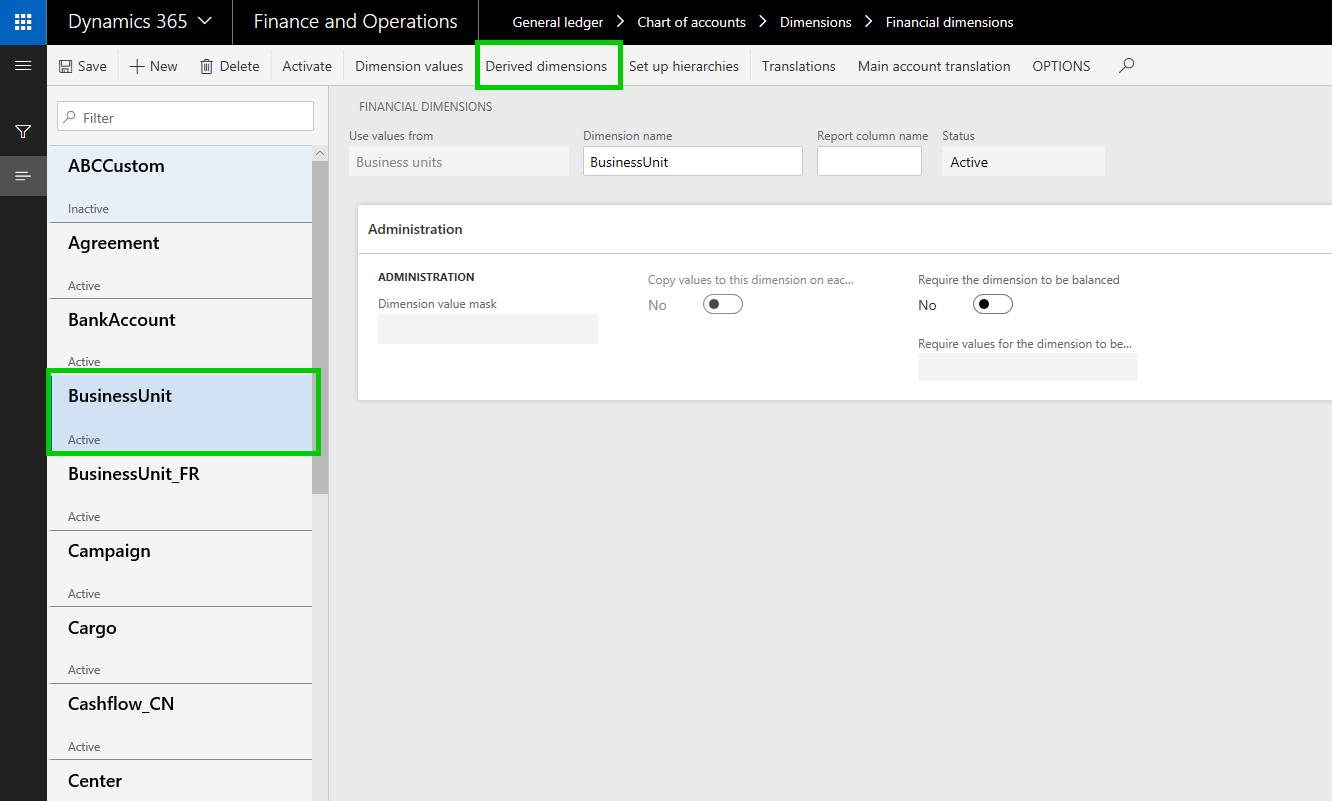
    In this case, i have setup to default Cost center and Department values to be defaulted when i select a certain business unit.”. Let us see this in action.

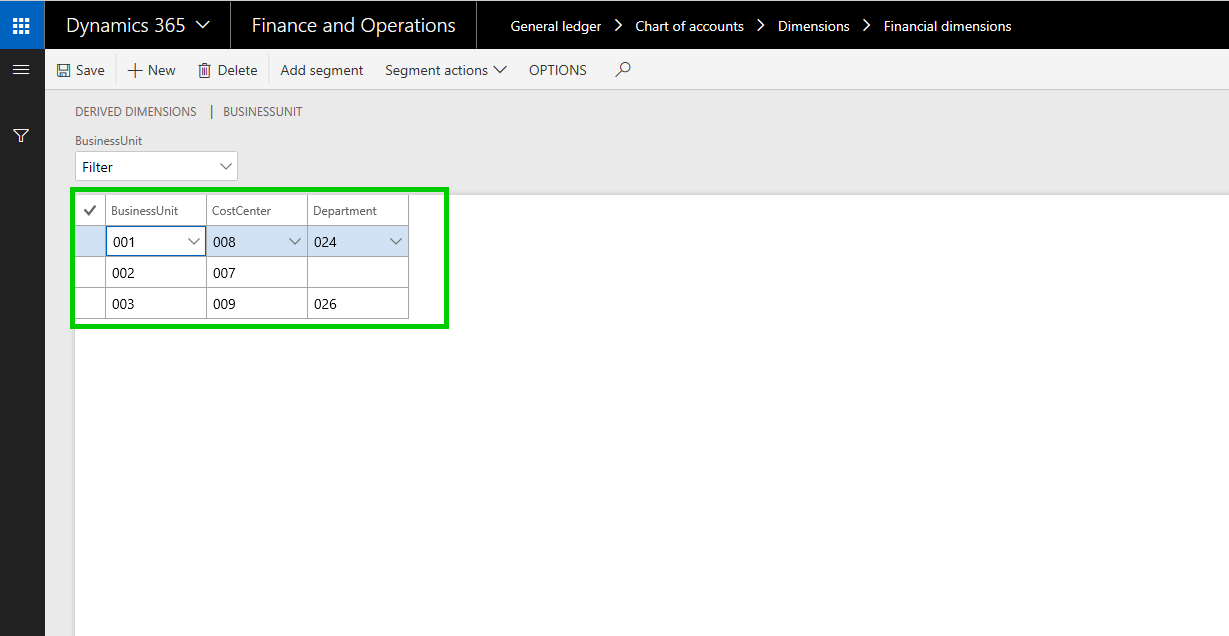
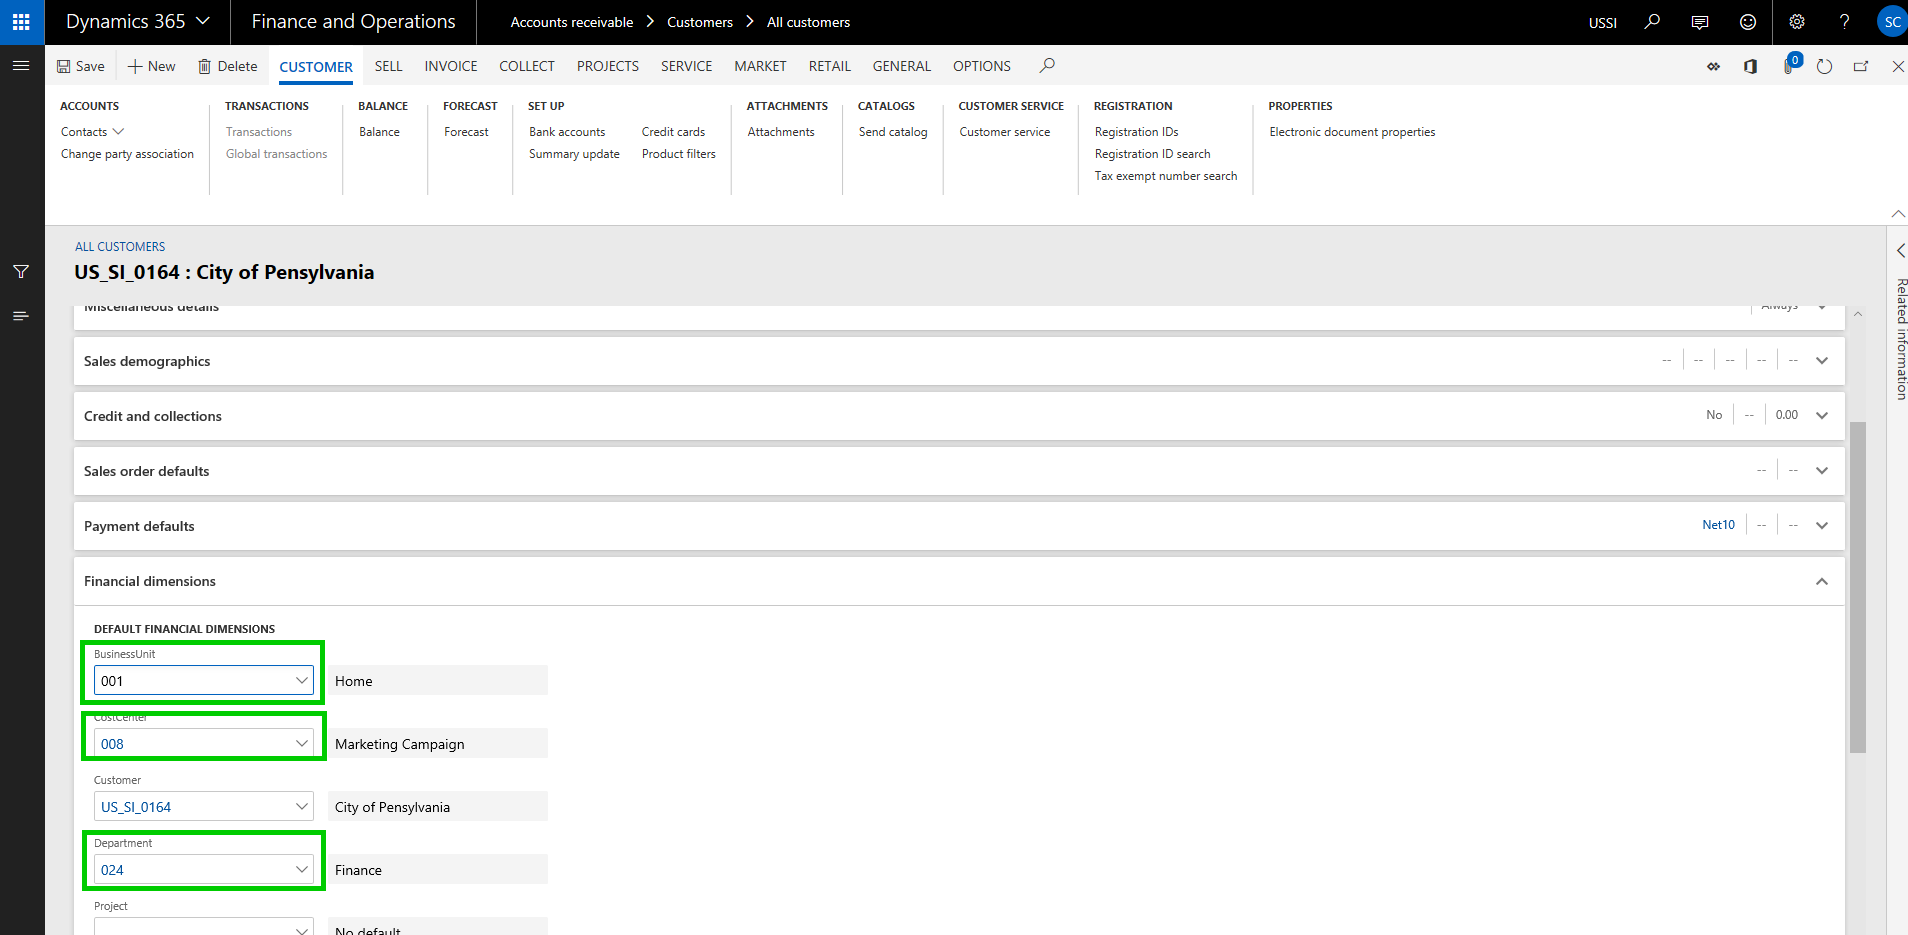
    With the above setup, when I select Business Unit dimension on a master record setup such as Project/Customer or anything else, the Cost center and Department dimensions will be auto populated, and i do not see to select them specifically. This is a pretty handy feature and will certainly save a lot of time for users in some cases.

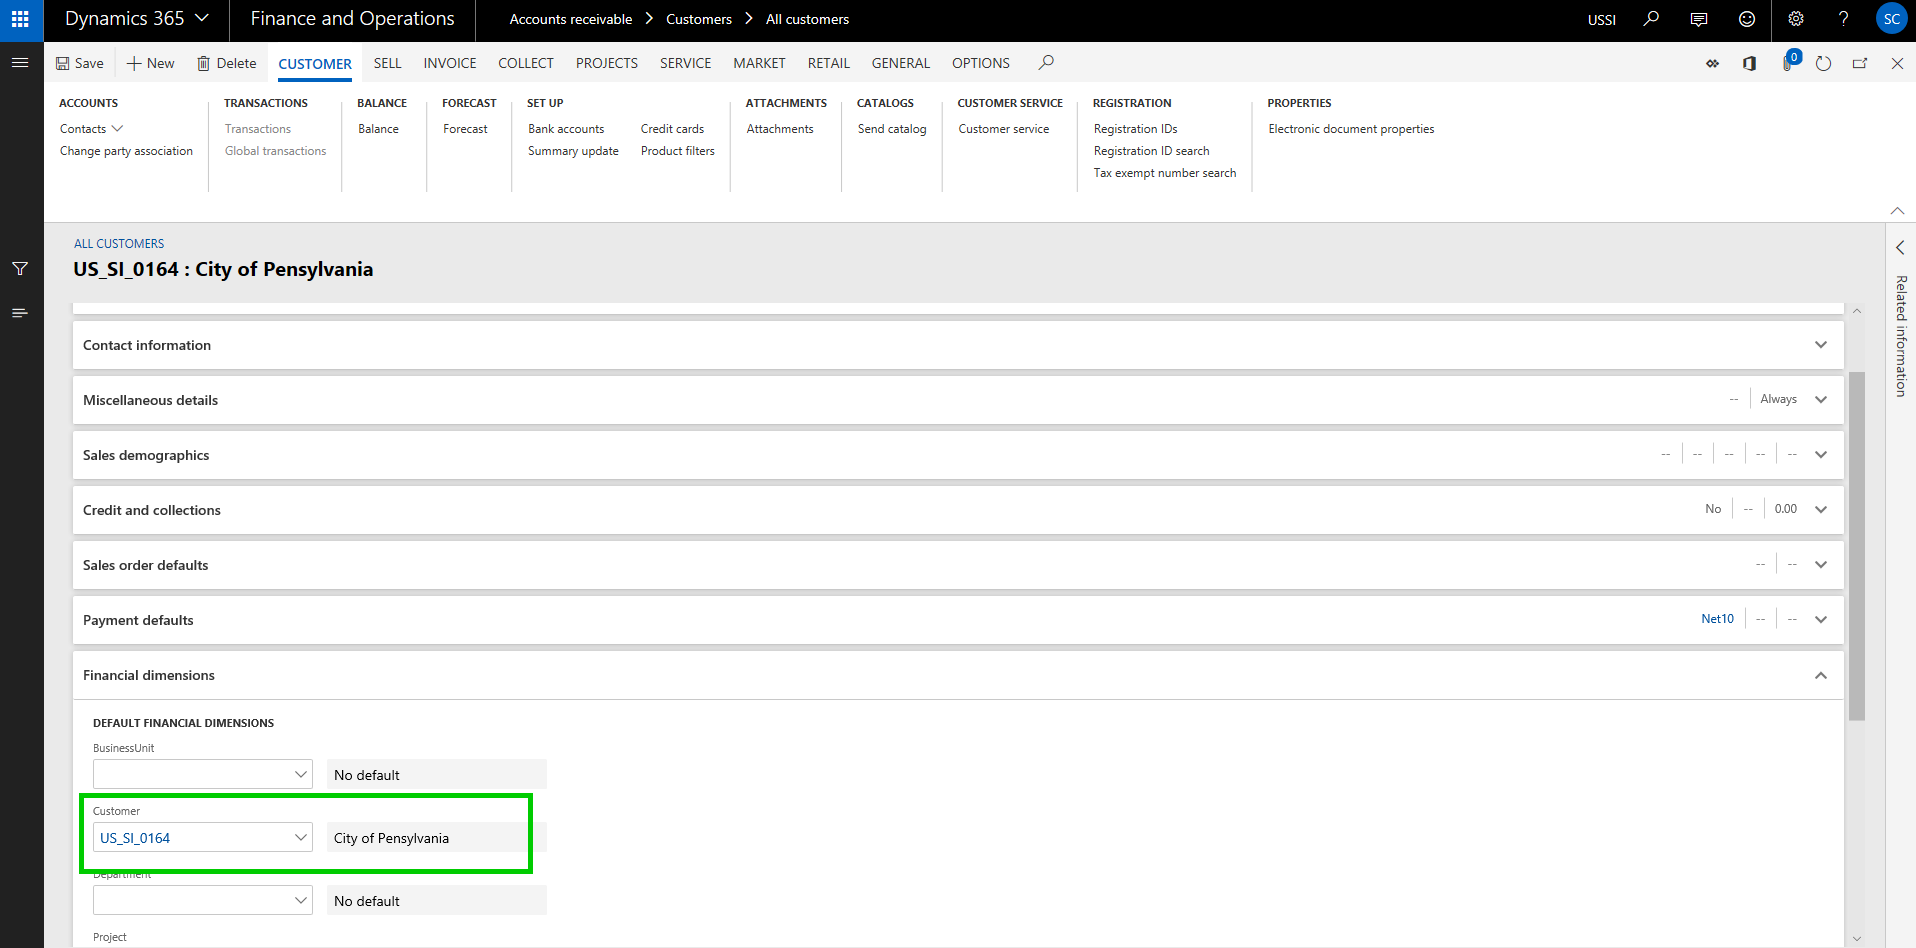
    For example, when i select Business unit 001 on my customer record, the Cost center and Department values auto populates to what i have setup.

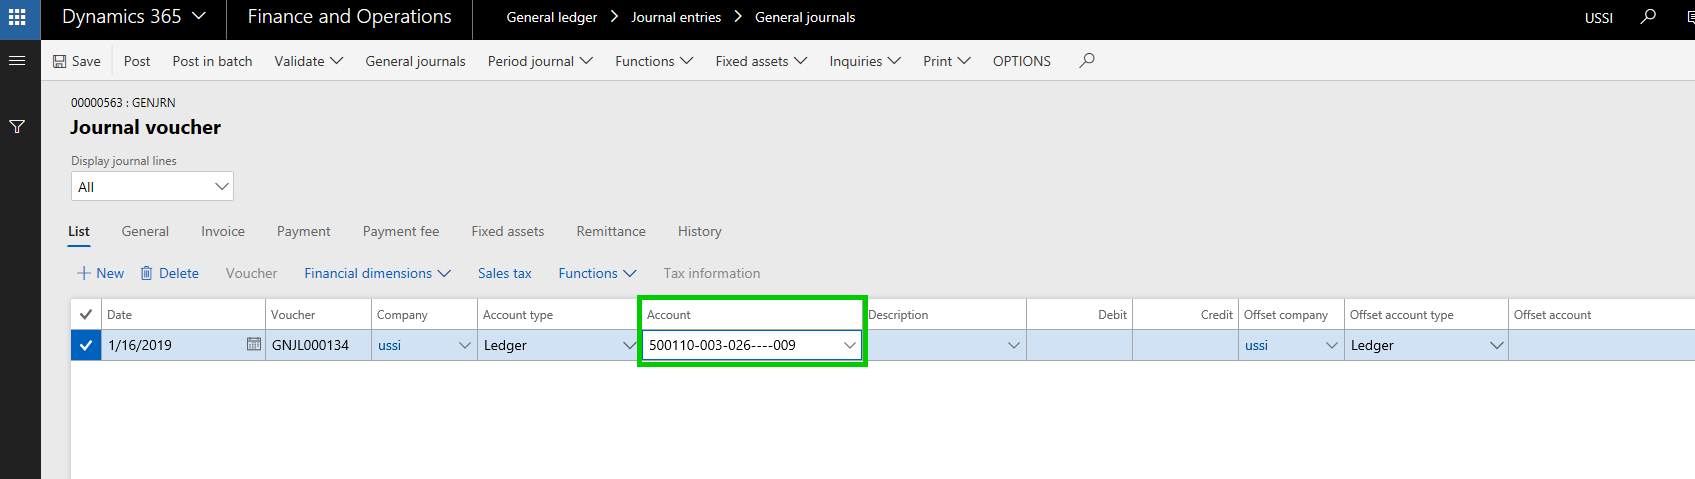
    The same defaulting functionality works on journal entry as well. For example, when I do a general journal entry and select the Business Unit dimension, i can have other dimension values defaulted (as long as they pass other account structure related validations)

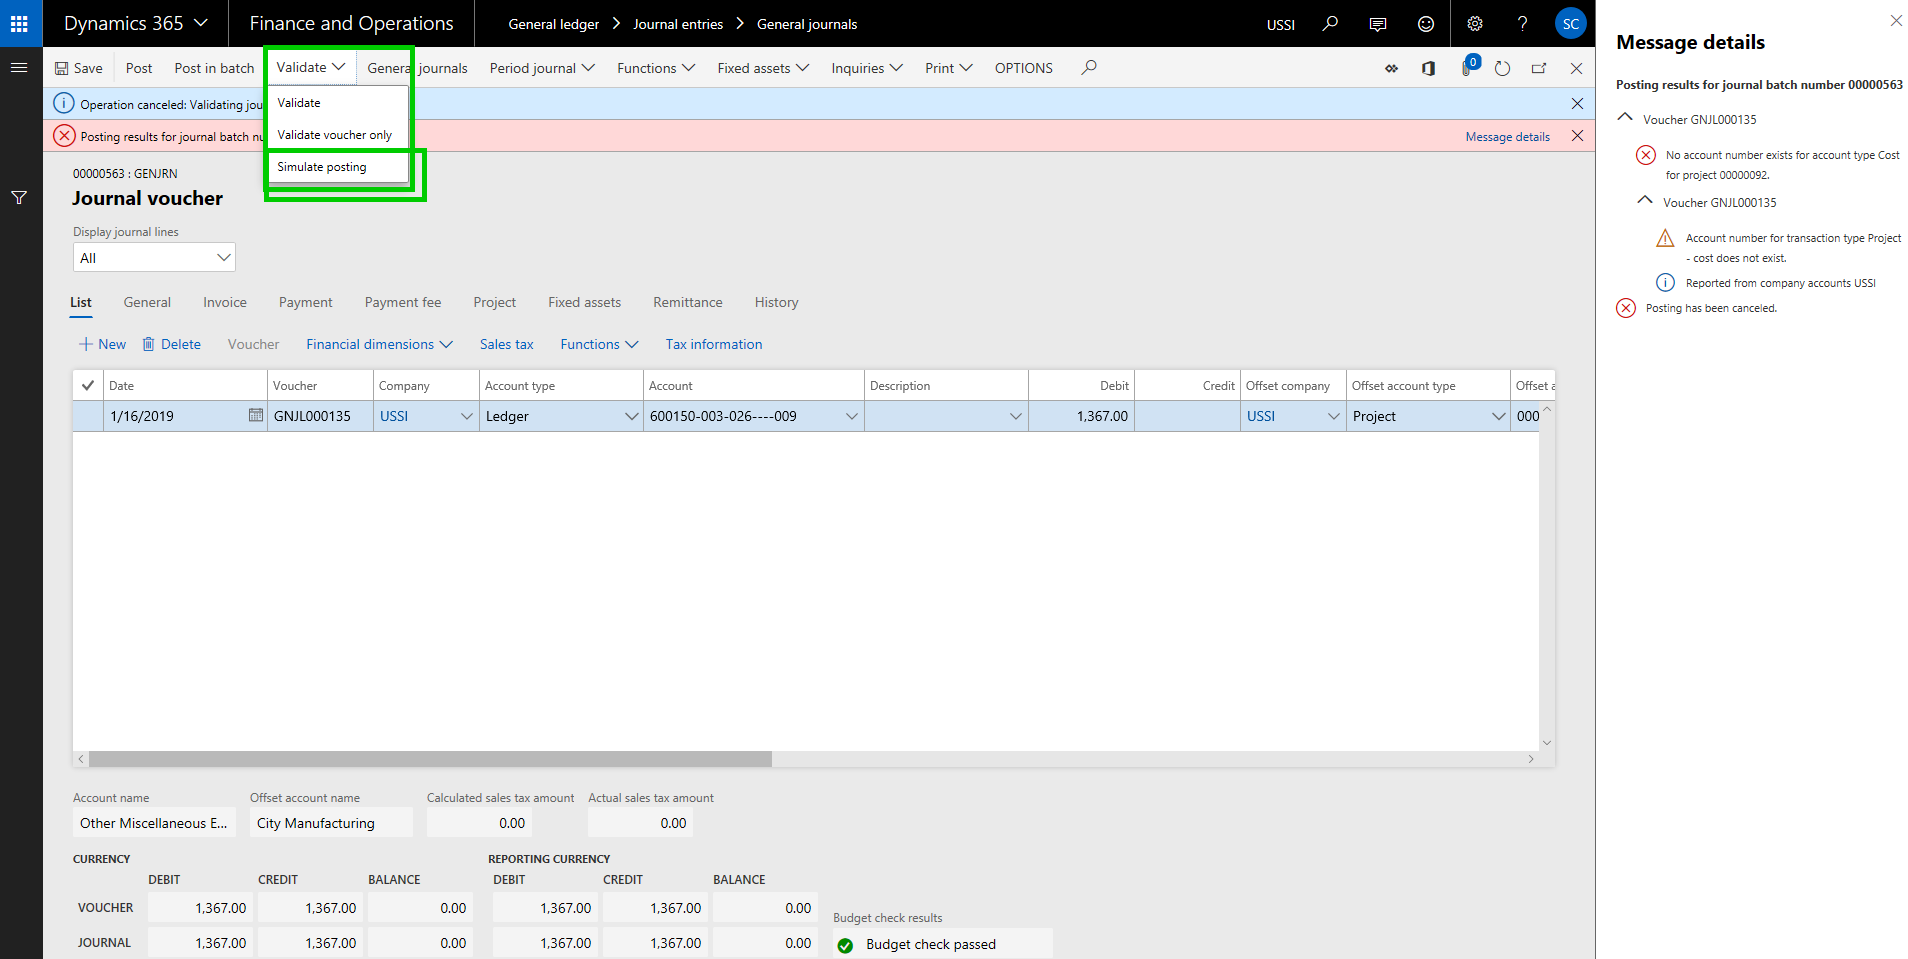
    Financial Journal Validation: Additional functionality to simulate posting during journal validation is available, which allows you to basically run the whole posting process, without actually posting the journal. As a result, you can see the possible errors, messages or warnings and you can take corrective actions on the journal.

    Global Shared Number Sequence for Customers and Vendors:  The global shared number sequence functionality allows you to use a single number sequence across many legal entities for customers and vendors. With this, you can also copy customers and vendors easily between legal entities. Since you cannot share master data using virtual companies anymore in D365 F&O, this might be a functionality you want to use to share the customer or vendor master if needed in your implementation.

    Note: This functionality is not a replacement of the Virtual company feature by any means. It is just a possible alternate that can be leveraged to have same customer ID and info for one customer across multiple entities, but they will live as separate data records and have their own transactions.

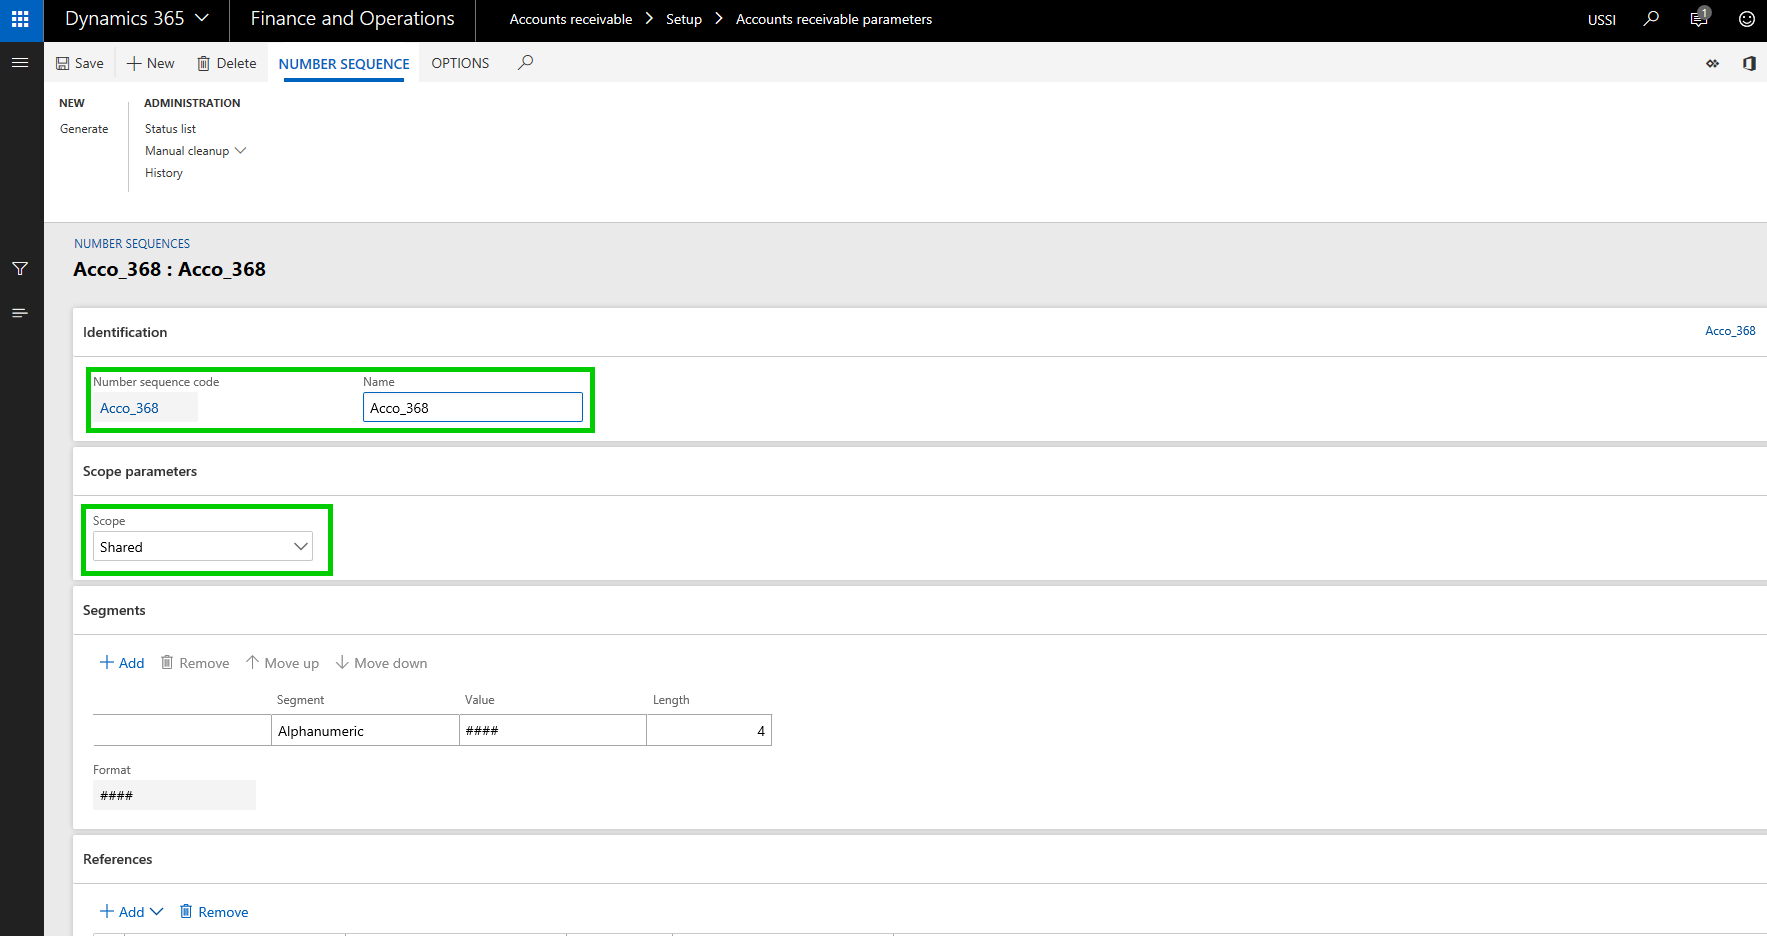
    The first thing you have to do is configure a Shared number sequence and then you will need to select the same shared number sequence under the Number sequence parameter.

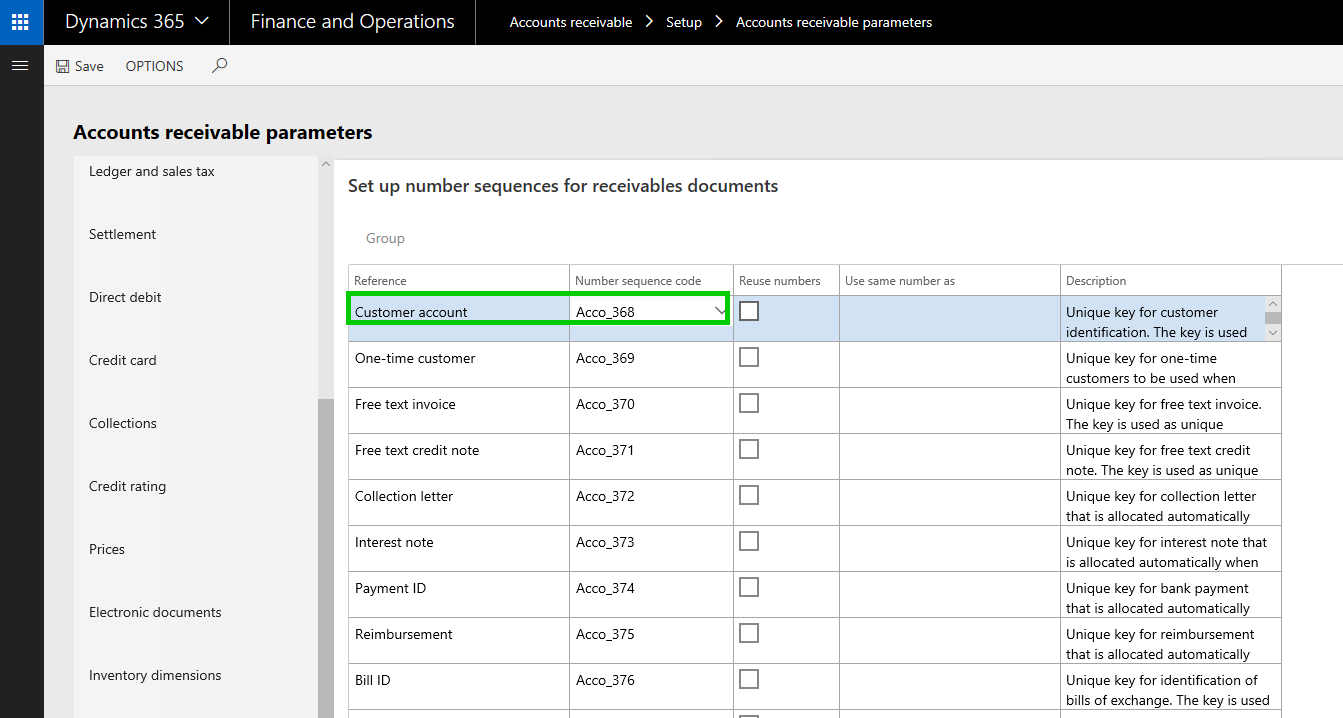
    Then you need to make sure you select the same number sequence code for the customer account under the AR parameters page in all the entities where you want to use the shared customer account ID.


    With that setup, let us now see how you can copy customer accounts from one entity to another and they will use the same customer account number and other related info for the customer.

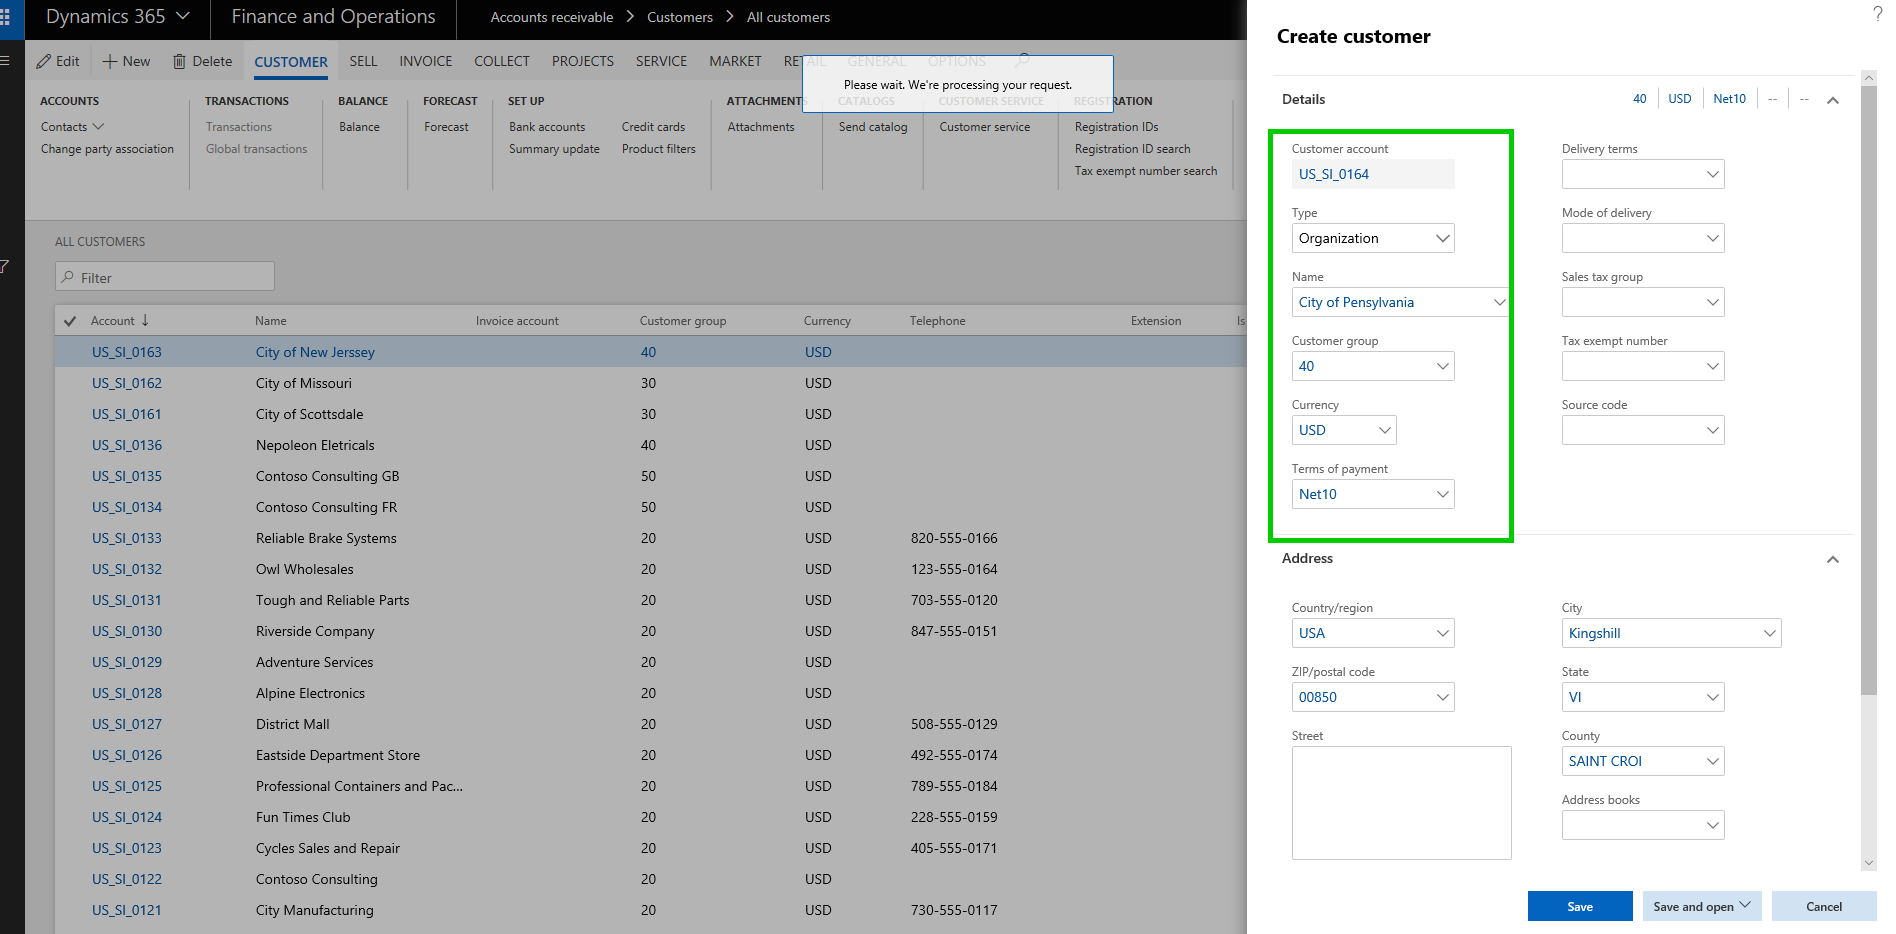
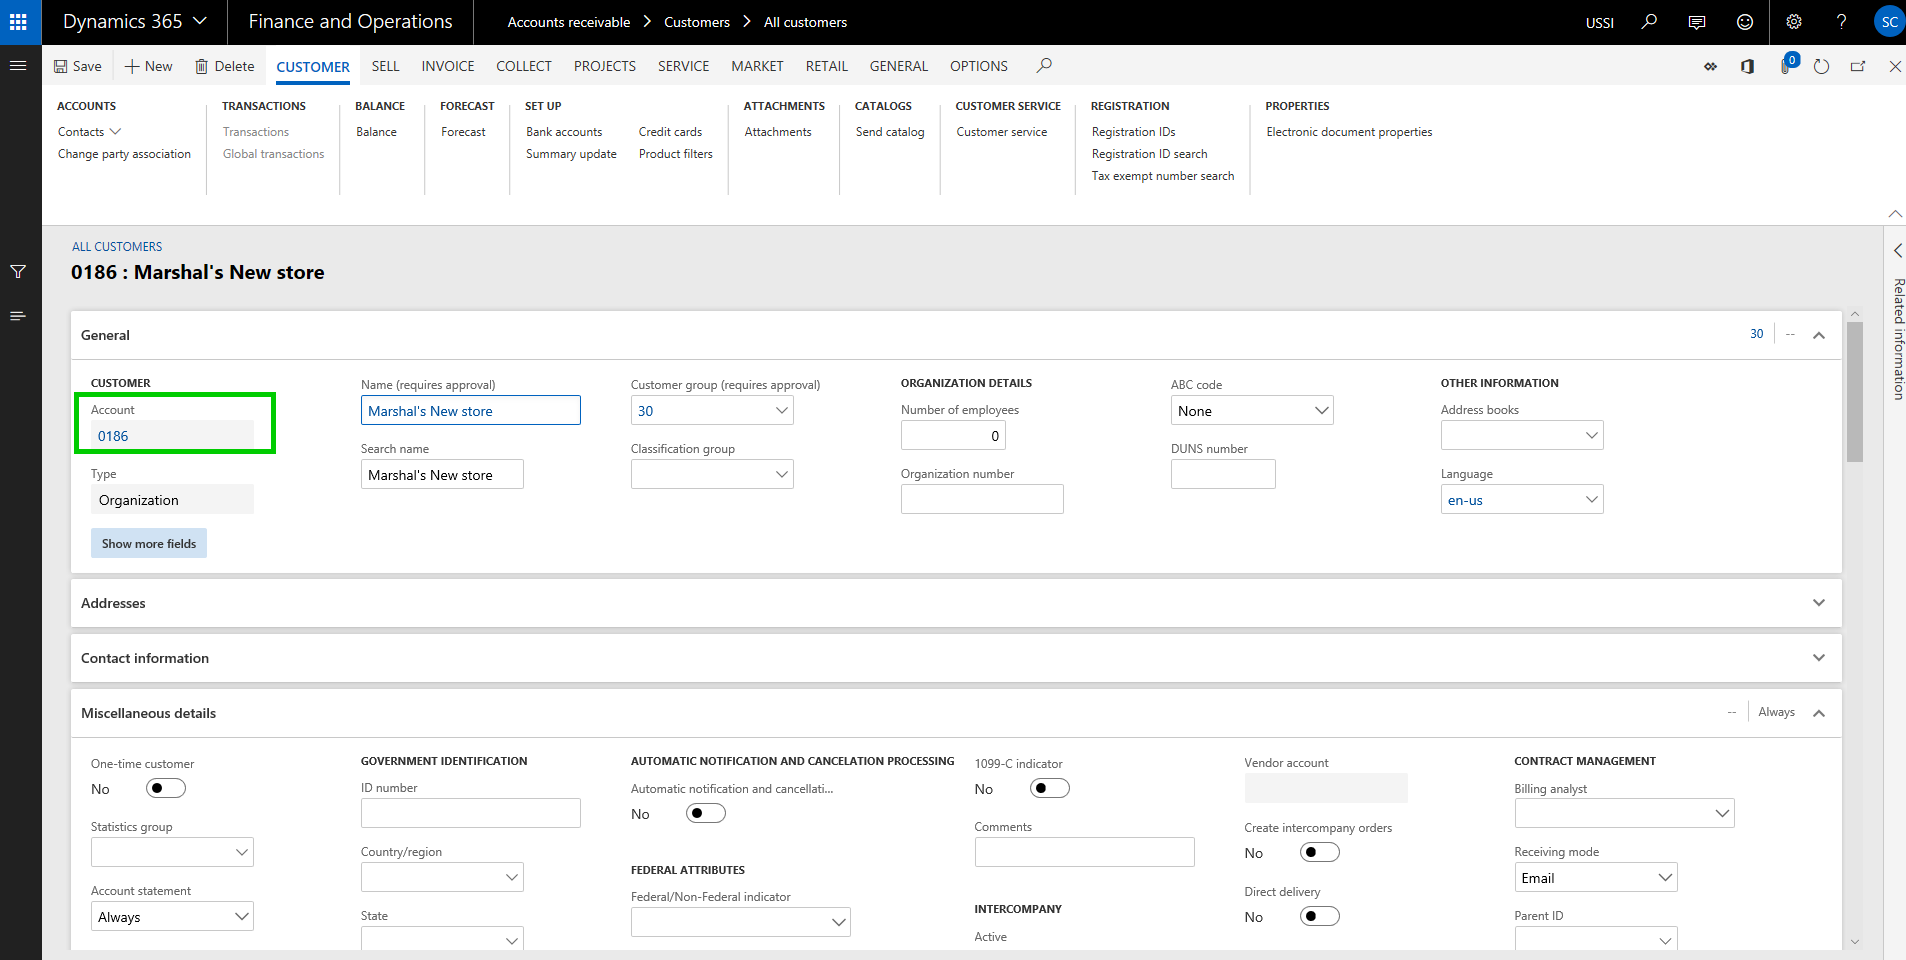
    In USSI entity, I created a new customer account. Notice that when i create the new customer, system does not assign a Customer account number immediately. This is because, if you want to copy the customer from another entity, it will use the same customer account number. If not, it will assign a new shared number after you save the details on the customer. (We will see this copying feature when we create this same customer in another entity USMF).

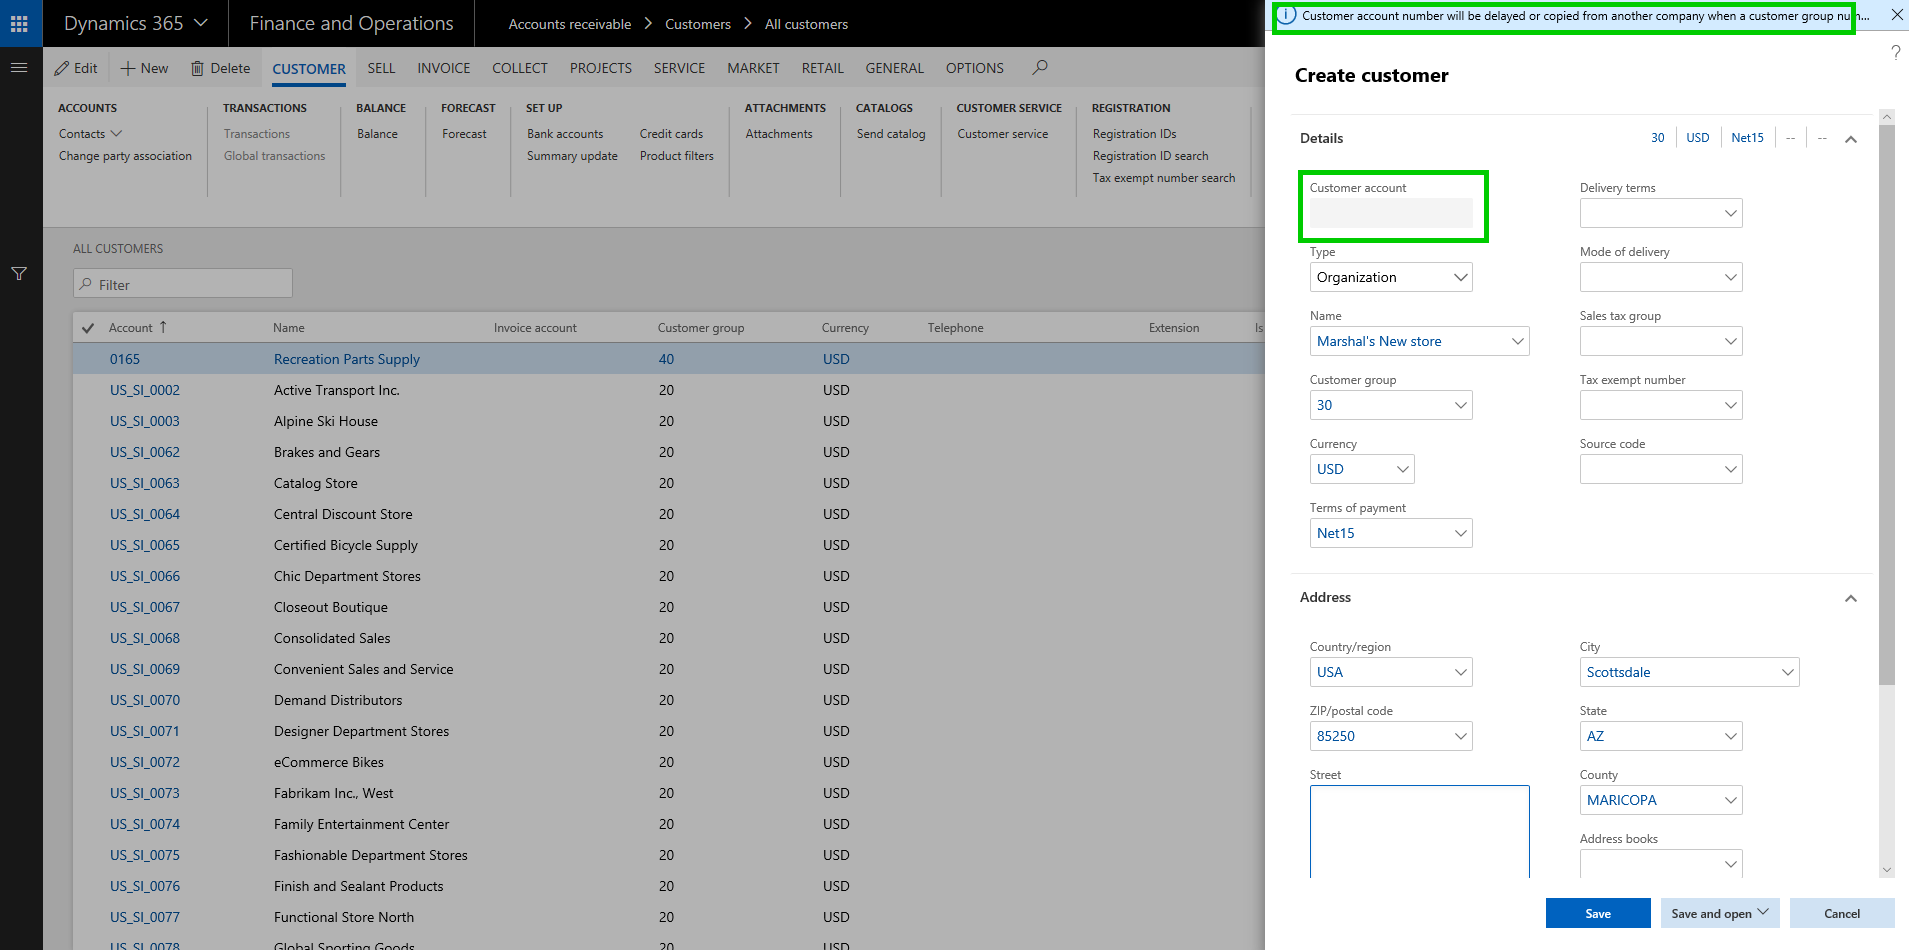
    Now i have filled the required details for this new customer and i save the data. System assigned a customer account number using the shared number sequence we had setup.

    We will now copy the customer in the USMF entity. Let us see how that process looks like. I will navigate to the Customer master in the USMF entity and click New on the All Customers page, and then i will type in the customer name i want to copy. System will automatically find the match and if they are an existing customer in another entity, it will present an option to copy the customer account.

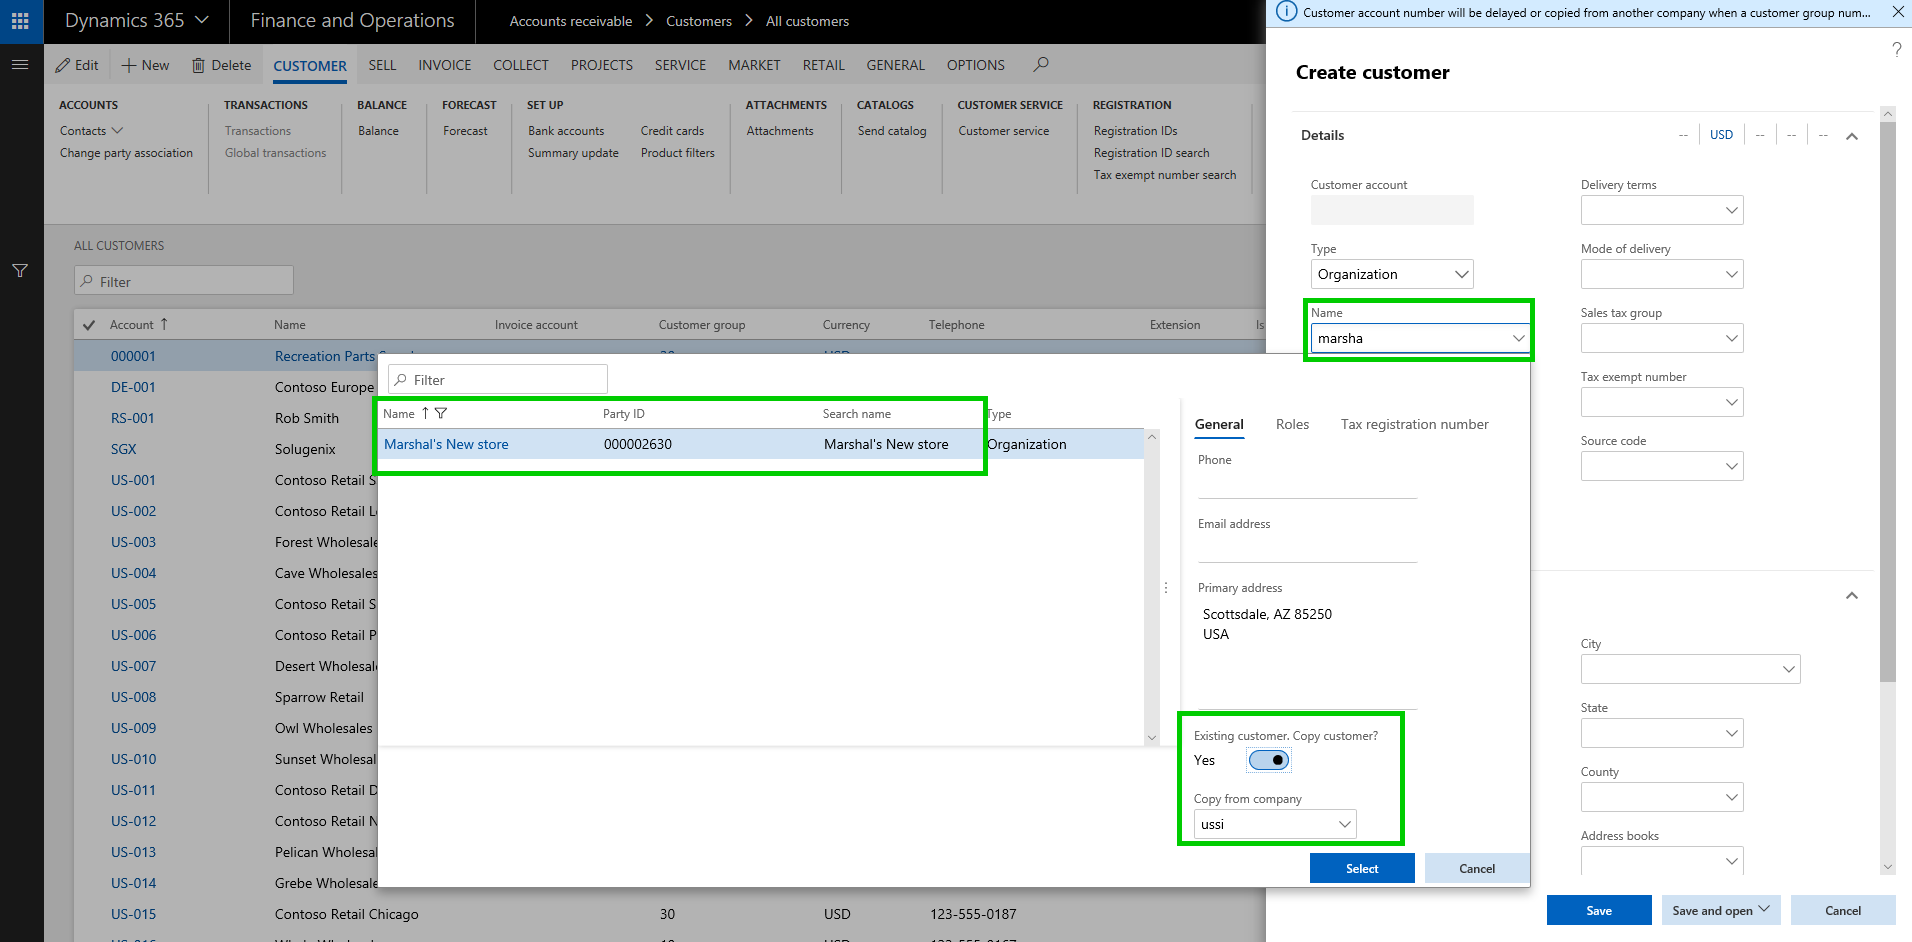
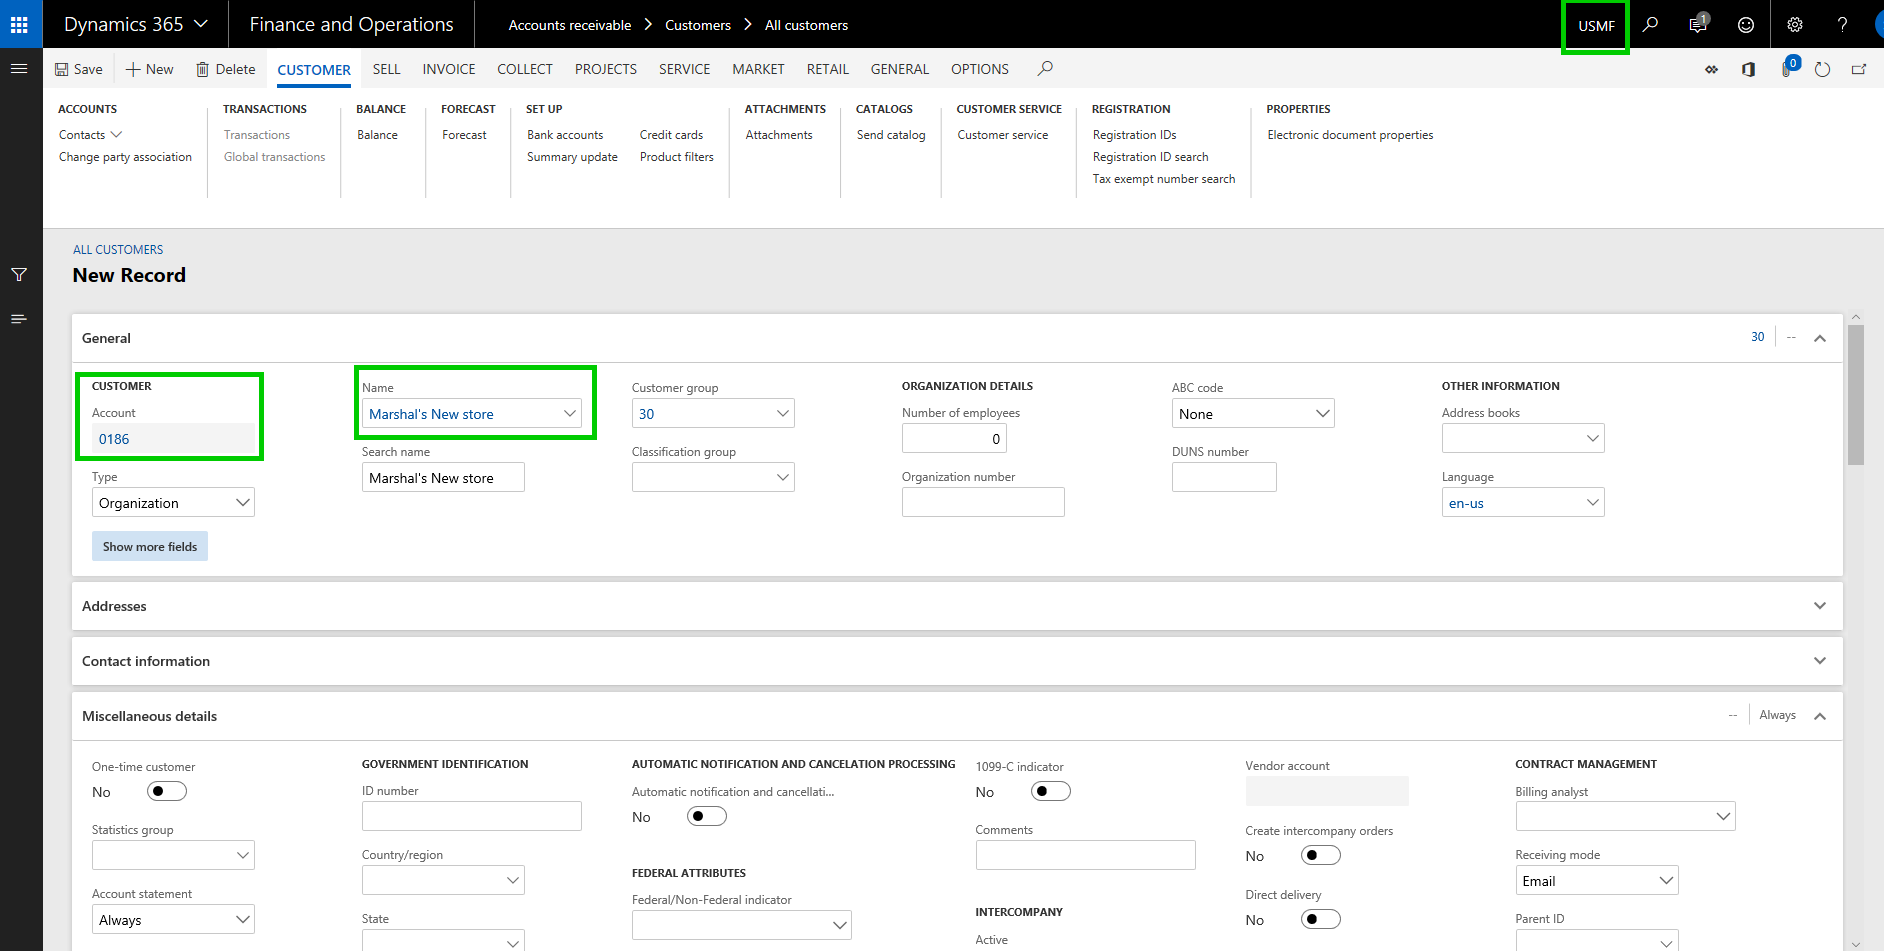
    You will now see that the Customer information is copied into the USMF entity and it used the same Customer account number.

    Note: You will need to make sure all the dependent data fields for the customer account are correctly setup in both entities.

    Now that we have the shared customer account numbers setup and customer accounts copied, let us look at another new feature that complements this feature.

    Global Customer and Vendor Transactions List page:  If you are using shared number sequence for customers/vendors and have copied the accounts between multiple entities, you would obviously want to see a centralized view where you can see the transactions of the customer of vendor in all the entities they are copied in. I have already posted some transactions for this new customer “Marshal’s New store” in both USSI and USMF entities.

    Invoice posted in USSI:

    Invoice Posted in USMF:

    Let’s see how the look in the new global transactions list page. I am in the USMF entity now and i will navigate to the global transactions list page.

    Notice that the new page shows me all the transactions for this customer account form multiple entities. You will notice here that when you select the transaction for the specific entity on this page, the system automatically switches the company account, so that you can perform required operations on the transaction correctly.

    That’s it for today’s post. In the next post, we will discuss in detail about another new feature in the core financials module called ‘Dual currency” and learn how it works and what are some of the significant changes that were introduced as part of this functionality.

    Till next time !!!

  • Microsoft PowerApps, Microsoft Flow, SharePoint and Dynamics 365 working together, No coding required!!

    Sandeep Chaudhury's avatar Dynamics 365, Power Platform & Dataverse

    All of you who attended the Microsoft Inspire and Las Vegas this year and the Microsoft Business Sumit at Seattle, would have heard a lot about the Microsoft Power platform. All the surrounding apps and services in Dynamics 365, such as Microsoft PowerApps, Flow, PowerBI, CDS etc. now are referred as the new Power platform.

    In today’s blog post, we will see how all these powerful services puts the real power in the hands of the super-users of the systems and enables them to create seamless business process automation between applications such as Office 365, Microsoft SharePoint, Dynamics 365 and others, without requiring to write a single line of code.

    The Scenario and the requirement:

    1. IT team of an organization uses Microsoft SharePoint(Office 365) for tracking company equipment loaned to it’s employees and for managing them. They use a SharePoint list for tracking these loaned equipment.
    2. Let us say the…

    View original post 1,351 more words

  • Dynamics AX Tip: Percentage complete calculation for revenue recognition, based on WBS Work Percentage Complete for fixed price projects

    Dynamics AX Tip: Percentage complete calculation for revenue recognition, based on WBS Work Percentage Complete for fixed price projects

    Traditionally, the 2 primary methods of revenue recognition for a fixed price project were the “Completed Percentage” and the “Completed Contract” methods. I have explained how these work in Dynamics AX for revenue recognition of fixed price projects in my earlier posts.

    With the AX 2012 R3 release (CU 10), the straight line method for revenue recognition was introduced, which I also elaborated in this earlier post.

    When you work with the Completed percentage method of revenue recognition, there are multiple ways to determine the percentage completion of a project. Some of these options are,

    1. Manage percentage completion on a manual basis
    2. Use project budgets or forecasts to the system automatically keep track of % complete.
    3. The new method to calculate % completion on a project is based on the WBS percent complete. In this quick post, we will how this works.

    The first step for this is to setup the Cost template and select the Completion based on as “Work percentage complete”. See screenshot below.

    Cost Template Setup

    Once you have that, associate it with the project group. See screenshot below.

    Project Group

    The next step is to setup the fixed price project and establish the project plan, which is basically the work breakdown structure. Once you have your WBS defined and the cost estimates established, Dynamics AX will automatically keep track of the “Percentage completion” for the project based on the WBS estimates vs the actual transactions. I have setup a very basic WBS for this walkthrough.

    WBS

    After I have progressed in the project and transactions (Timesheets, Expense reports, Purchase orders, journals etc.), Dynamics AX automatically starts tracking the % complete for the project at each task level of the project. See screenshot below.

    Percent Complete

    Let us say, at this point you are ready to run the revenue recognition for this project for the Month of August 2016.

    Navigate to the Project revenue recognition screen and click Create. You will notice here that “Work progress percentage” is a new option under the “Cost to complete method” dropdown. But we will just leave it as default (From cost template).

    Notice that after we have run the revenue recognition, system automatically shows the Percentage completion based on the WBS work percent complete.

    Revenue Recognition Percentage

    The process after this is pretty straight forward and as you would run the revenue recognition typically for the fixed price project.

    NOTE: The intention of this blog post was not to explain the end to end process of revenue recognition for fixed price projects. I have explained these in detail in my earlier posts. This post was specifically a quick tip to highlight the new method of automatic work percent complete calculation.

  • Adding LinkedIn Content Feeds into Dynamics AX Workspaces

    Social media today (LinkedIn, Facebook, Twitter, Yammer and more) are probably the most important as well as primary source, for one to stay up to date on news , information, updates on what is happening the professional world. Viewing and managing these social media feeds and social media intelligence right in your ERP on which your users spend most of their time on a workday, can open up tremendous new ways of approaching to work for those users and will also help them in certain business decision makings sometimes. That is not the end of it !

    In the post below, Murray Fife explains how to make sense of adding and managing these feeds in the Dynamics AX workspaces. A good read!! Thank you Murray.

    With Update 1 of Microsoft Dynamics, a new feature was introduced which allowed us to inject social feeds into the Workspaces. Initially this was just for Yammer and Twitter, but with Update 2, LinkedIn was also added as additional feed options, allowing us to add tiles for User Profiles, Company Profiles, Company Insider information and […]

    via Adding LinkedIn Content Feeds into Dynamics Workspaces — A Tinkerers Notebook

  • Financial Period Closing in the New Dynamics AX(AX 7) – Get real time status, Be more productive, Close faster

    Financial Period Close is probably one of the most important task that the Corporate Accounting team of your organization spends most time accomplishing. Accounting Managers of your organization spend tons of time in creating and assigning various tasks needed to close financial periods and always end up tracking status manually in MS Project, MS Excel or by other means. Today your Financial Period Close and status tracking probably looks something like below.

    Fiscal Period Closing Status - Excel

    With this, you are not able to,

    • Know who is working on what task and when are going to complete it.
    • How much percentage the closing tasks are complete by operational area.
    • Who is having how much tasks remaining to be completed.
    • Know real time status of closing across all legal entities of the organization.

    In today’s post, we will discuss the details of one of the workspaces of the New Dynamics AX, which is the Financial Period Close workspace and see how it can help you be more productive, track status in real time and close periods faster.

    Workspaces in the New Dynamics AX are a new way of helping your users gain and do more in the ERP, all at one central location. The dedicated workspace for Financial Period Closing also intends to do the same and help your accounting team stay on top of their tasks for period close and get real time status updates at any time, so that they can act and escalate on delayed tasks.

    Let us first see some of the insights into the some of the underlying setups before we discuss the workspace.

    Configure Financial Period Closing:

    • Under General Ledger Module > Period Close , navigate to Financial Period Close configuration form.
    • Under the Closing roles tab, create period closing roles as per requirement of you organization. Note that these roles are specific to financial period closing and does not relate in anyways to AX Security roles. These are only required from the Financial Period Closing perspective.

    Closing Roles

    • Under the Resources tab, define/select the employees from your employee master, who needs to be involved in the Financial Period closing process. Also you can set “What they will see when they go to the Financial Period Close workspace”. Additionally you can assign one or more closing roles of each of these resources.

    Resources

    • Under the Task areas, define the different areas of the tasks for financial period closing. These task areas will be ideally your different areas such as AR, AP, Bank, Fixed Assets, GL, Inventory etc.

    Task Areas

    • Under the Calendars tab, configure and set the calendar for scheduling the tasks of Financial Period Closing. Note that these calendars are different than the organization and resource calendars.

    Calendars

    • Under Templates tab, create the List of tasks from scratch or from an exiting template. This is your master list of tasks that needs to be executed to complete the Financial Period Closing process. You can set up the Task description, which area it belongs to, when is it due (before the end date of the closing schedule).
    • Then assign each task to a Closing role (Which is linked to employees or resources) and select the Legal entities you want the tasks to be applicable for. Additionally, you can also setup dependencies between tasks and also set direct links to different forms of AX to complete the tasks.

    Task List

    • Finally, create your financial period close schedule, select the start and end dates, the calendar applicable for it.

    Closing Schedule

    Now that we have gone though the setups and configurations, let us see how the Financial Period Closing workspace looks for an employee who is with certain closing roles and see how they can interact with the workspace in completing their daily tasks for period closing.

    Arnie who plays the role of AR and AP clerk in the closing process, navigates to the Financial Period Closing workspace.

    • On this workspace, she gets to see filtered and actionable data for her task list in live tiles. She can she how many of her tasks are past due, how many tasks pending to be completed today, how many tasks of her blocked due to incomplete dependent tasks by others and all remaining tasks.

    Task List Arnie Live Tiles

    • She also see the Task list that are assigned to her. For each of the tasks, she sees the due date, dependency and most importantly she can navigate to the destination form directly if needed by simply clicking on the task and take required action. For example she can click the Post Free text invoices task to directly launch the Free text invoices form.
    • Once she completes the task, she marks the task as Complete by marking the Completed checkbox.

    Task List Details

    Let us now see how the workspace looks like for an Accounting Manager, who is managing the status of the Financial Period Close process for multiple entities.

    When Phyllis Harris, the Accounting Manager navigates to the workspace, she gets to see real time status updates in terms of % completion of the tasks by entity, task area, by person and more.

    Workspace for Manager

    • So clearly, the manager gets clean, real time updates on the status of the tasks for period close. They can see the status by entity or by area and person in terms of how much percentage is completed.

    Status by Area

    Status by Person

    • She can even drill down to each tasks under each area, person or entity to get more status updates or modify anything as needed.

    Task List Details

    That’s it for today’s post. Stay tuned !!!

    Best,

    Sandeep


  • What is new in General Ledger Module – Top 5 enhancements in the New Dynamics AX (AX 7)

    What is new in General Ledger Module – Top 5 enhancements in the New Dynamics AX (AX 7)

    Hello Everyone,

    Hope everyone participated in the virtual launch of the New Dynamics AX on 9th March and got to learn more about the new fully cloud based ERP.

    In today’s post, I will explain the top 5 enhancements that I witnessed and tested under the General Ledger area in the New Dynamics AX.

    1. Financial Dimension Activation
    2. Global General Journals
    3. Global Fiscal calendar management
    4. Dedicated Process driven Workspace for Financial Period Close
    5. Account structure related enhancements

    Let’s get straight into it and see some additional details.

    1. Financial Dimension Activation: Starting with the new Dynamics AX, new financials dimensions will now need to be activated by a specific role, which has the privilege assigned for dimension activation or by System administrators. The intention here is to simplify the database schema for financial dimensions so that the reporting and data extraction becomes easier.

    • When a new Dimension is created under GL > Dimensions > Financial Dimensions is created, it will be in “Inactive” status by default.
    • Before users can start using this new dimension, it needs to be activated, which can be only done by either a System Administrator or by a role which has the privilege for dimension activation.
    • When the activation is run, system will add the new dimension across all applicable tables in the database and the database schema will change. See screenshot below for reference.

    Finnancial Dimension Activation

    2. Global General Journals: This new feature will allow accounting team members to create and manage general journals in multiple legal entities staying in one entity, without having to change the legal entity each time when they create or edit the journals.

    • The new global general journal is located under General Ledger > Journal Entries > Global general journals.
    • When you create a new New journal, you can select the Legal entity and the journal name of that entity for which you want to create the journal entry.

    Global General Journals

    • You can then continue to create the journal lines inside the current entity and you can directly Open the journal in the other entity if you wish to, or you can complete the entire journal entity, validate and post in the current entity and the unmoral entry will be created and posted in the destination entity.

    Global General Journals 1.jpg

    3. Global Fiscal Calendar Management: This feature will enable finance controllers and other related users of the accounting team to manage the the fiscal period status and Module level accesses for multiple entities which share the same Fiscal Calendar.

    • Navigate to General Ledger > Ledger Setup > Ledger Calendars.
    • Select the Fiscal calendar and the Fiscal year to see all the Periods under them.
    • Notice that you will now see all the Legal entities listed in separate rows , which share the same fiscal calendar.
    • You can change the Period status and Module level access for the required modules for one or more or all legal entities at once.

    Ledger Calendar

    Ledger Calendar1

    4. Dedicated Workspace for Financial Period Close: The new Dynamics AX brings in a a new dedicated workspace for the financial period close tasks. You all must be very familiar with what workspaces in the new AX are. The purpose of this workspace is primarily to help the corporate accounting team and Controllers to manage their fiscal period closing more effectively and make the process more transparent, get real time insights with the status of closing and get more timely insight into your business.

    • Controllers can create Period Closing schedules and templates.
    • Under each template and schedule, they can create breakdown of the tasks for the period close.
    • Tasks can be assigned to to different team members with required due date and times.
    • Can be done for multiple legal entities.
    • This workspace helps the corporate accounting team to collaborate and update the status of tasks assigned to them and enables controllers to view the status of closing is real time and take required actions.
    • Explaining this topic will become a separate blog in itself. I will try to explain sometimes later in future with a new post on this. Screenshots below shows a quick snapshot of how this workspace looks like.

    Closing schedule

    Closing schedule 2.jpg

    5. Account Structures related enhancements: In the new Dynamics AX, the over all view and arrangement of data fields and tabs on the account structure form makes it more intuitive and easy to use. You can see which entities are using the selected account structure staying in the same form. Most importantly you can now export Account structures to Excel. This allows you to make edits easily in bulk and push it back to AX from Excel.Export to ex cel

    Export to ex cel 1

    There are a few other minor enhancements under the GL area too, which I will leave up to you all to explore :)

    That is it for this post !! Keep DAXing..

    Regards,

    Sandeep


  • Dynamics AX Tip: How to Personalize forms and workspaces in New Microsoft Dynamics AX (AX 7)

    Dynamics AX Tip: How to Personalize forms and workspaces in New Microsoft Dynamics AX (AX 7)

    Hello Readers,

    Until AX 2012 version, personalizing the forms and adding/removing data fields on them was a very important and widely used feature used by customers.

    This quick post will help you understand how “Personalizing” looks in the new Dynamics AX. Let us take a look one by one.

    When you are on a form or a navigation page in the new Dynamics AX,  you can bring up your favorite Personalize options using the “Right click > Personalize:Form section” option. For example, I navigate to the Accounts Receivable > All Customers > Customer Details form/page > General fast tab and right click on it.

    How to add a new data fields on a form/page:

    • Navigate to the form that you want to Personalize.
    • Right click > Personalize: Form section, i.e Personalize:Customer

    Personalize Form

    • Click + Add a Field to load the field list form.

    Add a field

    • Select the data fields you want to add and click Insert button.

    Select Data Fields

    • Another way of adding a data field on a form is to select “Personalize this form” option after right click and Personalize.
    • Note that you can also launch the Personalization pane by navigating to Options > Personalize this form button.

    OptionsPersonalize

    Personalize this firm

    • Click the + button to load the data field list form. Select the data fields you want to add and click Insert button.

    Personaliation Pane

    How to change properties of a data field:

    • Once you are on the Personalize form screen, select the “Arrow’ button to enable the property changes for various data fields on the form.

    Data Field Property

    Data Field Property 1

    Hide: Mark this to Hide the selected data field on the form.

    Include in Fast Tab Summary: Mark this to show the value of this data field on the Fast tab header summary of the fast tab, under which the data field is present.

    Skip in Tab key sequence: Mark this to skip this data field on the tab key sequence.

    Don’t edit: Mark this to block editing of this data field.

    For example, let us mark the Include in fast tab summary for the  Classification group field and see that it appears on the fast tab Summary.

    Data Field Property 2

    How to rearrange or move around data fields on a form:

    • Once you are on the Personalize form, select the MOVE option on the Personalization pane and just drag and drop fields to move them around on the form as shown in screenshot below.

    Rearrange Data Field

    How to show/Hide data fields on a form:

    • On the Personalization pane, Select the Hide/Show button.
    • Now mark the data fields that you want to Hide/show.
    • If you had already made a field hidden, when you try to Hide/Show next time on the form, you can see those fields as marked for Hidden.
    • For example if I want to hide the ABC Code field hidden on the customer details form, I can mark that and upon refreshing the form, the field will be hidden.

    Show Hide Data Field

    How to add fields to show on the collapsed fast tab summary:

    • On the Personalization pane, Select the Summary button.
    • Now mark the data fields that you want to add to the fast tab Summary when collapsed.
    • For example, I have added the Language data field on the General fast tab.

    Add Field to Summary

    How to change the display name of a data field:

    • On the AX form/page on a specific data field, right click and Personalize.
    • You can type in the name that you would like to see as the display label for the data field.

    • For example, I have renamed the Search name field to My Search Name on the Customer details form.

    Change Display Name

    How to block editing of a data field:

    • On the form Personalization pane, click the Edit button.
    • Mark all the data fields that you would like to be shown as Non-editable fields.
    • For example, on the Customer details form, I want the Classification group field to be shown as non-editable.

    Block Editing

    Block Editing1

    How to Reset/Clear out all my Personalization:

    • If you decide to clear out all your form/page personalization,  click on Manage > Clear button on the form Personalization Pane.
    • Reload the page.

    Reset Personalization

    Reset Personalization1

    How to add form data as a Tile onto a workspace:

    • You can also add a filtered data view, i.e. data on a particular form as either a Live Tile or as a list on any workspace you like.
    • For example, I can add the Timesheets for my review as a Live tile to the Manager Self-service workspace.

    Add to workspace

    Tile on MSS

    Additionally, you can also Import and export form personalization using the Manage > Import/Export option on the form Personalization pane.

    Export Import Personalization

    So, that’s it for today’s quick tip on the new Dynamics AX !!

    Regards,

    Sandeep

  • What is New in Business Intelligence in the New Microsoft Dynamics AX (AX 7)

    Microsoft Dynamics AX ERP has evolved over several versions starting from AX 2.5, AX 3.0, AX 4.0, AX 2009, AX 2012 and all the way through the New Dynamics AX (Aka AX 7). In each of these versions, this ERP from Microsoft , has undergone several changes and enhancements in terms of architecture, technology, depth of functionality and support for industry verticals etc. The journey from the Client only AX 3.0 version to the fully web enabled version (The New Dynamics AX) has been phenomenal.

    As the technology behind the application kept on evolving, so did the Business Intelligence (Analytics) framework for each of these mentioned versions.

    In this post, we will discuss a little bit on the evolution of Analytics/Business intelligence framework in Microsoft Dynamics AX and we will also discuss about what are the various Analytics options we have in the most recent release, which is the New Dynamics AX.

    The picture below shows a quick snapshot of the evolution of analytics framework in Dynamics AX.

    image.png

    In the initial releases with version 4.0, the concept of “Perspectives” was introduced which basically presented the ERP data schema to the end uses in a format, that they can use to build analytics. In AX 4.0 the SMDL Model along with the SQL Report builder was primarily used for business analytics building.

    Then in AX 2009, Microsoft introduced the SQL Server Analysis services, which basically had the SSAS Projects/ CUBE Projects built for all the major areas of the ERP applications. These CUBES were then utilized to show data on the various pre-built dashboards on the role center pages. In AX 2009 you could also use Microsoft Excel to connect to the SSAS server and then build your own analytics.

    In AX 2012, the SSAS Cubes framework was taken a step forward and Microsoft basically used the same technology and concepts, but developed several additional dashboards for the various role centers that were shipped out of the box. One of the major enhancements to the analytics framework in AX 2012 was done by introduction of Power View. Using Power View, you could simply leverage the analysis cubes and build dashboards, graphs, charts, tables, bars and any sort of analytics you wanted.

    In the New Microsoft Dynamics AX (Aka AX 7) the analytics framework has evolved further and much better. In the new Dynamics AX, analytics can be primarily of 2 types.

    1. Real time built-in analytics on the workspaces
    2. Power BI analytics and integration with Dynamics AX.

    1. Real time built-in analytics in the Work spaces:

    Starting with AX 2009 till AX 2012 R3 release, most of the out-of-the-box analytics were contained in the Role center pages, which was basically the Home/landing page for the users when they launch AX client or Enterprise portal. In the new Dynamics AX, you will see something called as the “Workspaces”. You could compare workspaces with role centers, but the work spaces are designed keeping in mind a more process oriented approach.

    • The built-in analytics comes out of the box , as part of standard AX across various workspaces covering all major modules.
    • You can customize these further and create your own analytics in any of the workspaces.
    • One of the examples of such analytics is present under the Cost Administration workspaces. You can find these across all major business areas in the new Dynamics AX.

    Cost Admin Dashboard

    • You can furhter click on the analytics to drill down on data right from the analytics and research the data further.

    Drill Down.jpg

    • You also have additional option of presenting the data on the analytics by different parameters. For example you can view Top 10 Production variances by Production order number or By Produced Item Name.

    Dashboard Options.jpg

    • Below screenshot shows all other workspaces that are available out of the box in the new dynamics AX which has built in real time analytics built-in.

    Other Workspaces

    2. Power BI and integration with Dynamics AX:

    The second (and I think the most powerful and hopefully will be widely used too) analytics option in the new Dynamics AX is, the integration with Power BI, which is Microsoft’s business intelligence platform.  Below are some of the key highlights of the integration of Power BI and new Dynamics AX.

    • You can use Power BI Online to build complex data analytics from your Dynamics AX database. Using Power BI online, you can also connect to Azure SQL Server data base and build your content packs and  publish them with required permissions.

    PBI Online

    • You can use Power BI Desktop app and also mobile apps to connect SQL server database of your Dynamics AX application and then build any analytics. For example, the screenshot below shows a simple analytics of sales by customer groups. I have built this using the CustInvoiceJour table. You can use the advanced reporting options of PowerBI to build complex queries and joins.

    PBI Desktop 1

    PBI Desktop 2

    • After creating analytics in Power BI Desktop, you can publish them into the Content packs in Power BI online.

    PBI Desktop 3

    • Once you have your content packs are ready, you can Add power Bi analytics as tiles onto the workspaces in the new Dynamics AX.

    Pin Tiles to AX

    Auth PBI to AX

    • With the RTW release of the new Dynamics AX that was released during the Technical Conference (Feb 23rd to Feb 25th), Microsoft has released a few Pre-built Power BI Content packs for Dynamics AX (Primarily around Retail and Finance areas) that customers and partners can leverage for reporting. Partners can also build their own Content Packs as their intellectual properties, and make them available for consumption by customers. To access the Pre-built content packs provided by Microsoft for the RTW release of new dynamics AX, Sign in into your Power BI online account, Or launch Power BI desktop app.

    PreBuilt Content PacksLong enough  post !!!! Smile

    Note that this was not a Power BI specific blog post. I just wanted to highlight the key business intelligence options we have available in the New Dynamics AX and a very brief on how Power BI looks to be treated as a first class citizen inside the new Dynamics AX for BI and reporting. Stay tuned for future posts on How to build analytics for Dynamics AX using PowerBI and how to consume Content packs published by Microsoft or other partners.

    Till then….Have a great time !!

    Regards,

    Sandeep


  • What is new in Project Planning and Resource management in the New Dynamics AX (AX 7)

    What is new in Project Planning and Resource management in the New Dynamics AX (AX 7)

    Hope everyone is getting their grips tight on exploring the various possibilities in the new Microsoft Dynamics AX and also hope you all are having a great experience at the Technical Conference in Seattle. The journey of AX 7 from Preview, CTP 7, CTP 8 all the way through RTW has been phenomenal. The Dynamics AX team at Microsoft team has done a commendable job in getting the New Microsoft Dynamics AX out to the market !!

    In today’s post, I will explain some of the key enhancements and changes that I think are important and will be beneficial for customers.The enhancements are primarily around 3 key areas of the Project Management module as described below.

    Project Work Breakdown Structures:

    Starting with the CU7 release of AX 2012, the work breakdown structure functionality for the projects introduced several key enhancements that made it more usable for industries who’s projects are driven by stringent cost controls , such as Construction and Engineering. In the new Dynamics AX (i.e AX 7), there has been certain changes/enhancements introduced in the WBS area. Let us take a look what are those changes.

    • Ability to create and review WBS changes before publishing them.
    • After you have created the WBS, it will not come into effect until you Publish it.
    • If you make changes to a Draft version of the WBS, you can discard the Draft changes to get it back to the earlier version.

    Project WBS

    • You can now create and view the Cost and Revenue estimates on one screen which makes it easier to view the estimates without having to toggle a lot between the WBS node and the Estimate lines (as it used to be in AX 2012).

    Project WBS 1

    • Cost and Revenue estimates can be established for Project Roles, instead of actual workers.

    Project WBS 2

    Project Roles and Pricing setups with roles:

    Project roles concept was introduced in CU7 release of AX 2012, which basically allowed the project managers to generate and configure project team based on the roles and not actual workers. In the New Dynamics AX, this functionality is extended further which will open up new possibilities on how this functionality can be used.

    • You can now setup Project Hourly Cost and Sales prices for project roles, along with the other criteria such as Customer, contract, project, employee, category etc.
    • The system will then use this price data automatically when you create and setup Cost/Revenue estimates for the WBS tasks using project roles, in scenarios where you setup the project team using project roles instead of actual workers.

    Project Roles Prices

    Project Resources Management:

    • AX 2012 allowed to designate only workers (Employees & Contractors) as project resources. Other Operations resources of the organization which are created and managed under the Organization Administration Module were never allowed to be designated as project resources and could not be scheduled and used for projects. The New Dynamics AX will allow to designate the organization’s Operations resources as project resources and schedule them on the project and tasks under the project.
    • This new functionality also lays the foundation to be able to schedule non-human resources of the organization in the projects, such as location, Tool, Machines etc. which will be available in future releases.

    Project Resources

    Project Resources 1

    • We now have the ability to view and manage the Planned resources on a project and compare planned Vs. actual resources. The new Dynamics AX allows to auto-generate project team based on the resource requirements. Dummy resources are created and assigned to the project tasks and you can replace those with actual resources when you are ready.

    Auto Generate Team

    • The new Dynamics AX has introduced the concept of Booked Vs Assigned Hours. You can think of Booked hours as a high level booking of a resource on a project, where as the assigned hours are the number of hours which the resource is booked on actual tasks of the project in the work breakdown structure of the project.

    Booked Vs Assigned

    • The new dedicated Resource Fulfillment page allows to view the the resource requirements for all the projects and view available resources and their assignments all in one central location.

    Resource Fullfillment

    Till Next Time…!!!

    Regards,

    Sandeep

  • Business Intelligence and Reporting using Power View in Microsoft Dynamics AX 2012 R2/R3

    Most of us must be already aware of the new Power View reporting capabilities which is now fully integrated with Microsoft Dynamic AX 2012 R2, starting with the CU6 release.

    Getting real time access to your key business data anywhere, anytime, in any device is the real key to success and can help manage your business more efficiently by allowing the staff and executives to take more informed business decisions on time.

    Furthermore, the capability of being able to create, modify and view key business reports online anywhere in any device, can prove to be a real differentiator, in how your staff react to business situations, by getting most recent data from their Dynamics AX ERP system with few clicks.

    With Microsoft Dynamics AX 2012 R2(CU6 Onwards) and R3, Microsoft SQL Server Analysis Services Cube and the Power View tool, your organizations BI reporting capabilities just got much easier.

    In today’s discussion, we will take a look at the three key scenarios of the Power view reporting.

    View a Pre-built Report in Power View online:

    Once a Power View report has been designed, it can displayed on the employee role centers. Additionally, employees can add quick links to the Power View reports on their role center pages.

    For this demonstration, I will use one of the Region Wise Sales Performance Report, which was already built and is displayed on my role center as well as I have added a quick link to the report on my role center page. Follow the steps below.

    1. Launch Enterprise Portal and navigate to the My Links area of the home page.
    2. Click Sales Performance report.

    image

    3. Notice that system launches the Region Wise Sales Performance report online in Power View. The report shows the different regions of sales in Bing Maps and the details of the sales are displayed on the right hand side, by customer group, sales category etc.

    image

    4. The screenshots below shows another layout of the Sales Performance report in different layouts which the Power View tool allows to configure.

    image

    image

    Create or Modify a Report in Power View online:

    1. If you are provided with the required access and security permissions, you can create your own reports using the existing cubes or by adding additional data source as you need. Additionally, you can click the Analyze date button most of the list pages in AX rich client, which will launch the Power Viewer report designer and you can design your own reports by selecting the fields, design layouts, and several other options.
    2. In this case, I will select the Project Accounting cube and design a simple report of comparison of Project actuals vs budgeted by project category.
    3. Select the Project Accounting Cube and Launch Power View tool. You can create the design layout of your report by simply selecting and arranging the data fields you want. Refer to screenshot below, in which I have prepared the simple actual Vs. budgeted amounts by project category for each of the Projects.

    image

    4. From AX client, you can navigate to any list page such as HRM > Workers and click Analyze Data button on the action pane, to launch the Power View Report designer tool. In the screenshot below I have designed a very basic report of the worker skill/education details by launching the Power View from Workers list page.

    image

    Short and simple for today’s post. Till next time !!

    -Sandeep