Tag: Dynamics 365

  • Time & Expense Entry: The Task no one loves but is critical for all project/service-based organizations – Now Handled by AI Agents in Dynamics 365

    Time & Expense Entry: The Task no one loves but is critical for all project/service-based organizations – Now Handled by AI Agents in Dynamics 365

    Let’s dive into the new innovative Time Entry and Expense Entry AI Agents, which are now available in a production-ready preview within Dynamics 365 Project Operations and Dynamics 365 Finance & Operations! These are not just another feature; it’s a significant step forward in Agentic business applications that can truly transform how we handle project management.

    If you missed my last post about the AI Agentic T&E Approvals capability, you can read it here. That post mainly focused on simplifying and automating approval tasks for project managers.

    Why First Party Agents for Time & Expense Entry:

    Microsoft has released new AI agents in Dynamics 365 to make time and expense entry easier, a task often disliked in project work. These agents automate the process from capture to submission, cutting down on manual effort and mistakes. The integration with Dynamics 365 and Teams supports secure, efficient workflows. This is part of Microsoft’s effort to integrate AI into daily tasks, allowing employees to concentrate on more valuable work.

    The Benefits are aparent:

    • Reduced administrative overhead: Agents create Time and Expense Entries based on project bookings and receipts, saving time for employees. They review and submit these entries, allowing Finance teams and project leads to spend less time on follow-ups.
    • Accelerated billing cycles and cash flow: Real time and accurate capture of time and expenses ensure reduction is missed and incorrect T&E and faster invoice processing.
    • Improved Employee Experience: Employees interact with AI Agents within the flow of their work, i,e., Microsoft Teams. This reduces friction and improves adoption.

    Who this is for:

    If your organization uses Dynamics 365 Project Operations and/or Dynamics 365 Finance and Operations, you can use these new agents. If you only use Dynamics 365 F&O for expense reporting, you can deploy the Expense Entry agent.

    Let’s see the Agents in Action:

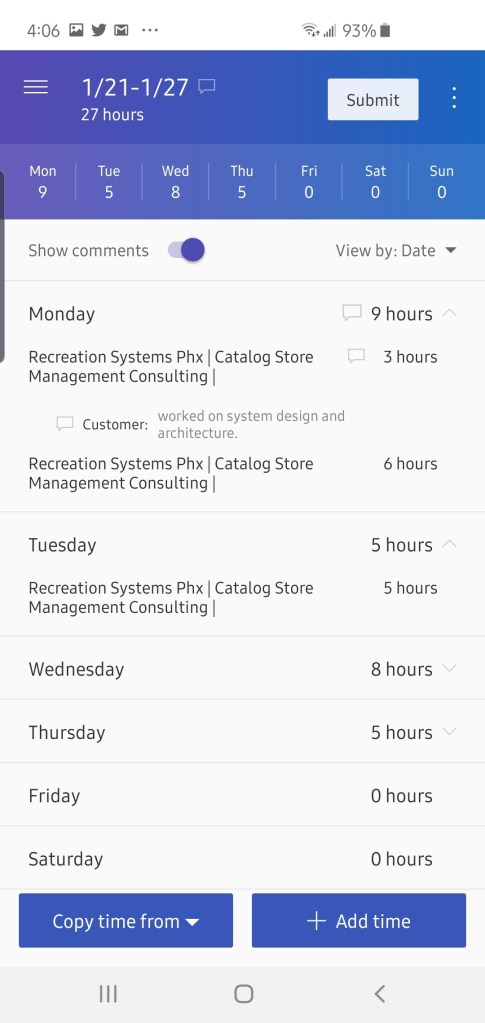
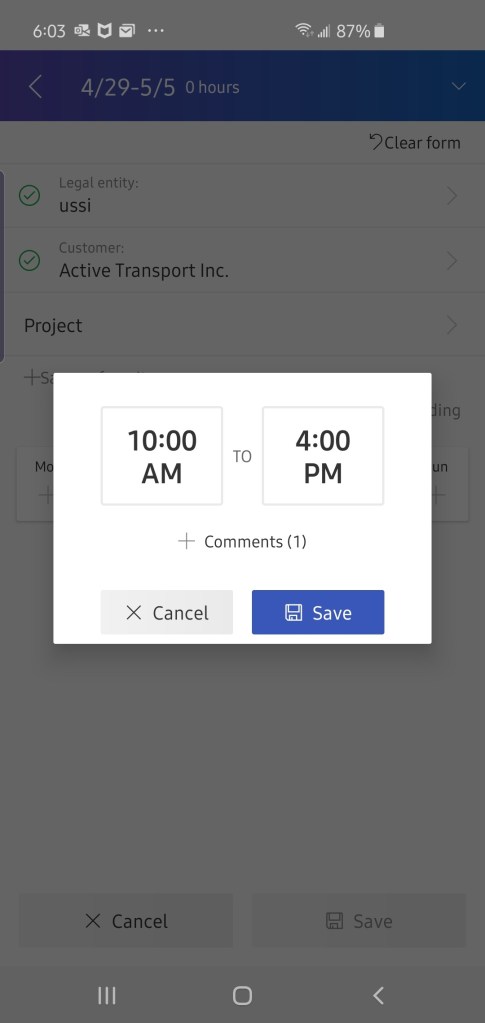
    The Time Entry Agent understands your project assignments and bookings and does automated time entry for you. It can check previous weeks’ timesheets and create current week entries based on that. It also generates smart comments for entries by looking at the project task details like the description and project name. Additionally, it can analyze your Outlook meeting invites to make comments based on meeting event titles.

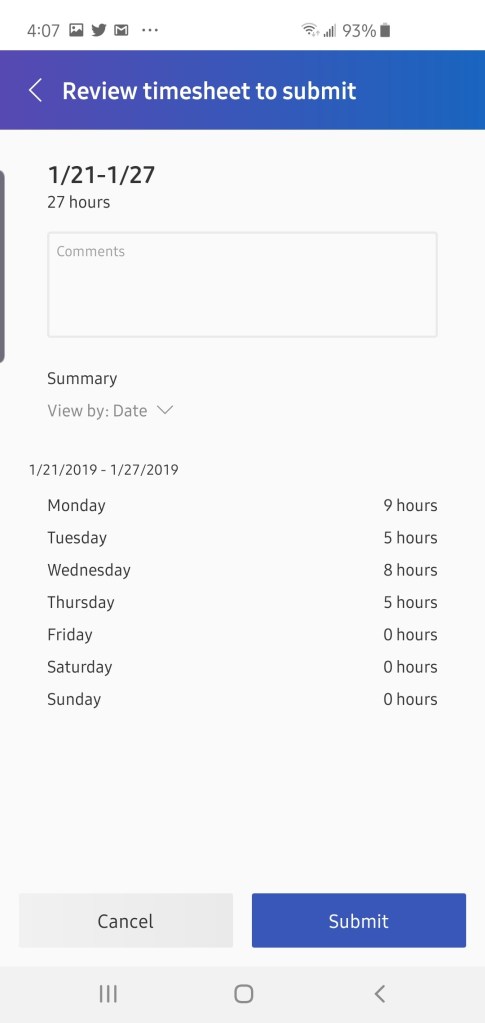
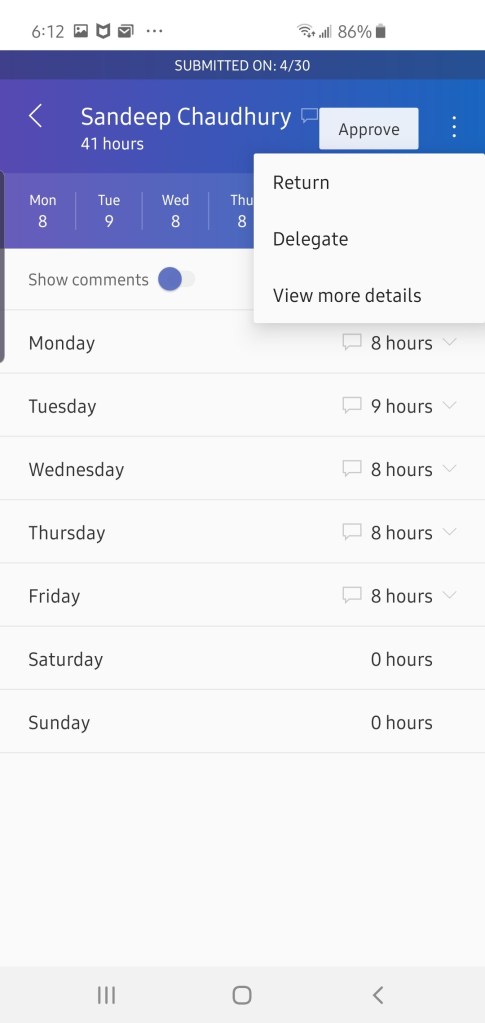
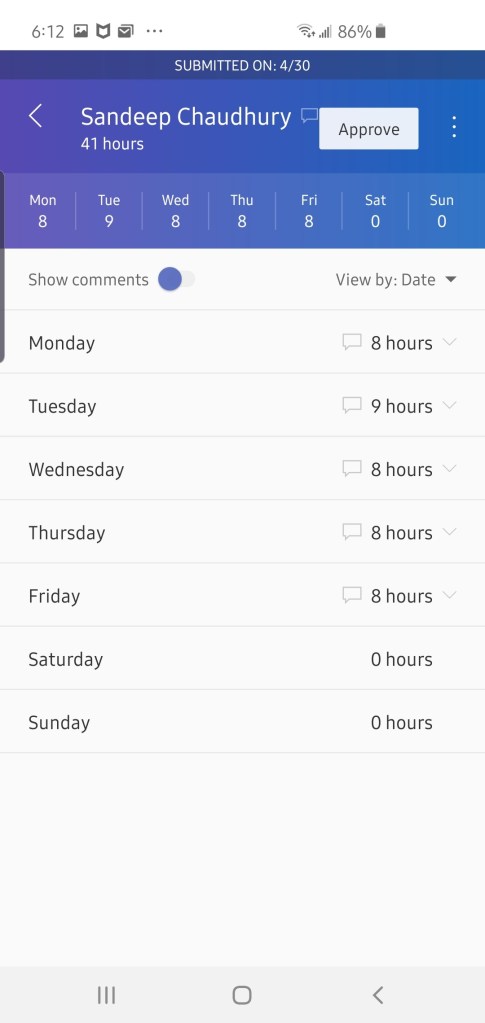
    You can review time entries created by the agent directly in Microsoft Teams, make changes as necessary and submit for approval. The agent also tracks unsubmitted entries and notifies you for proactive submission.

    The Expense Entry agent on the other hand is even more powerful. All I need to do as an employee is capture my receipts on my phone and send the captured images or PDF files to the mailbox used by the Expense agent. The rest is done by the agent for you. Here is what does for you.

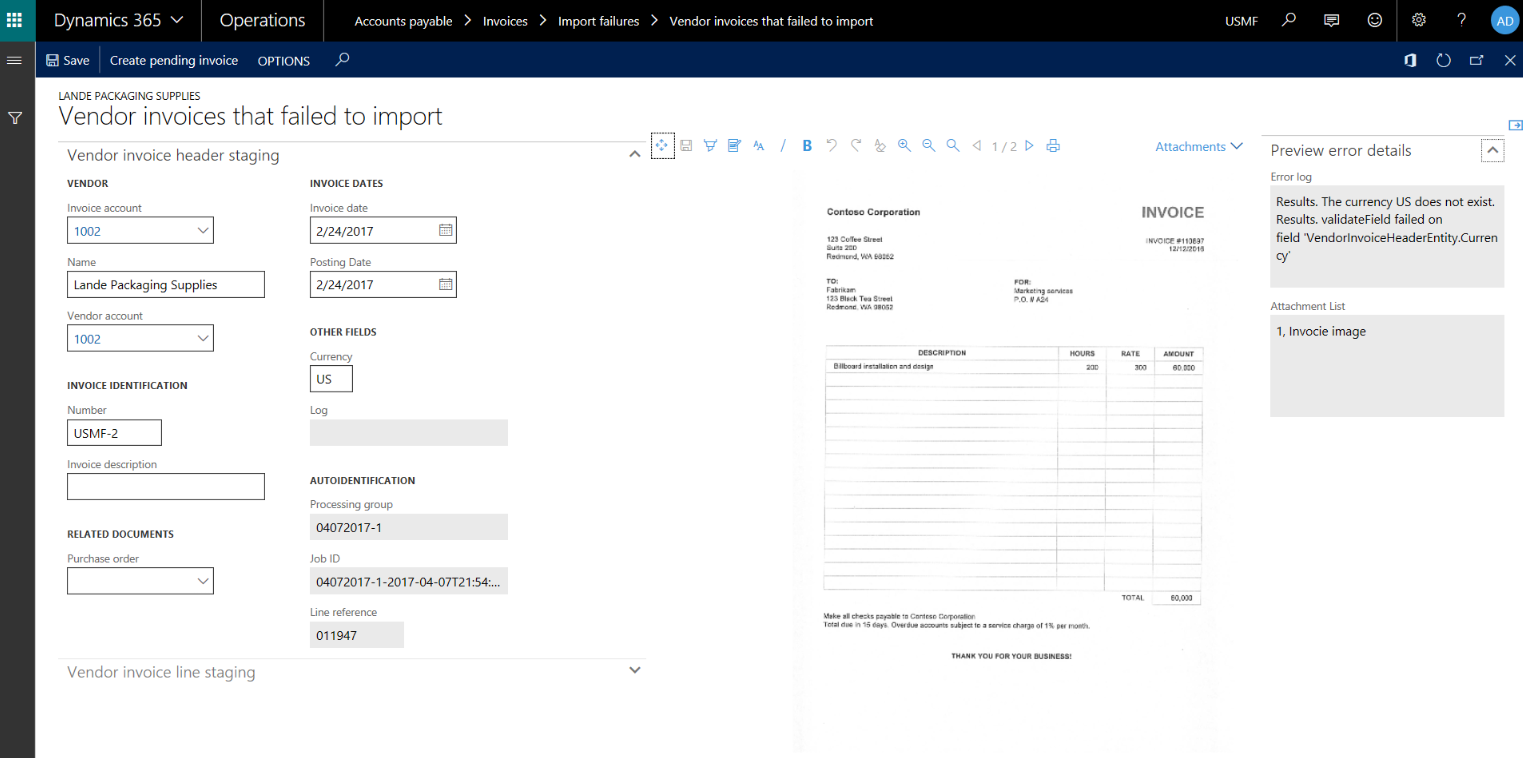
    • Process the receipts from your email or the ones you uploaded via the expense app.
    • Extracts receipt info and create expense lines automatically.
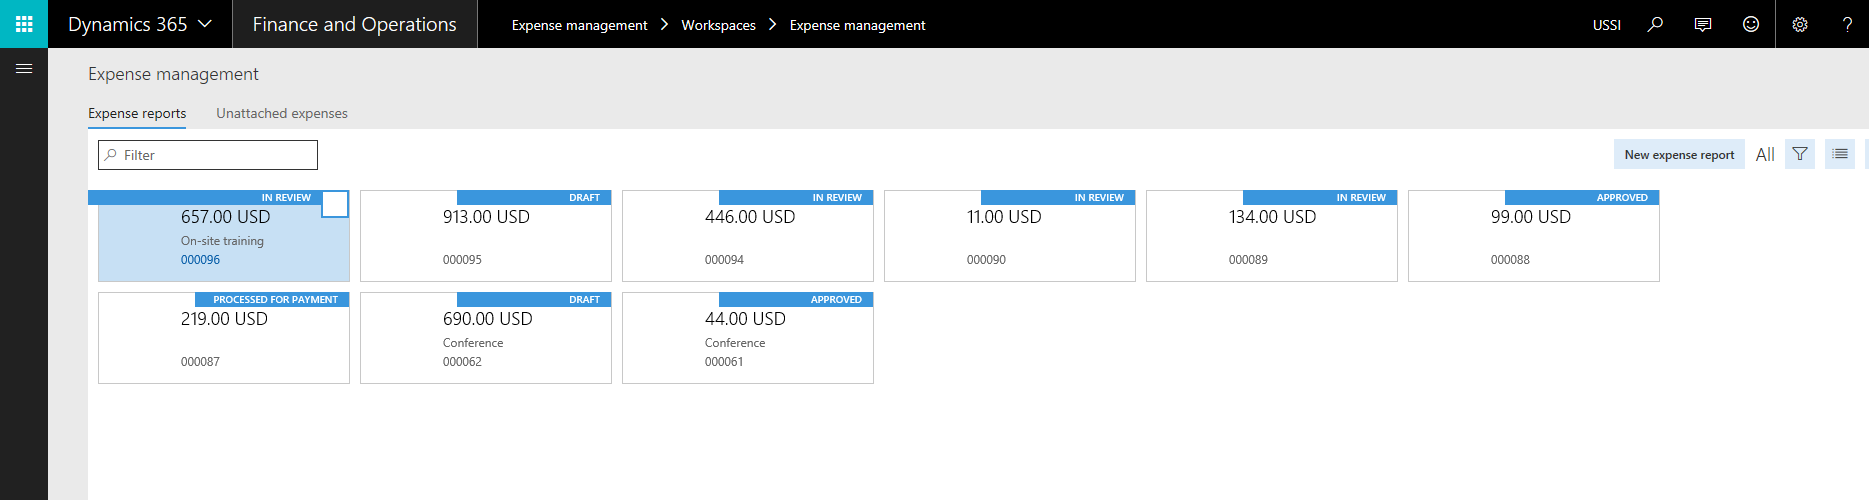
    • Not only that, it goes ahead and creates the expense report for you based on trip or by project (based on config) and sends a live summary of the expense reports in Teams for you to review and submit.
    • Additionally, it can intelligently identify active projects and assign those based on project location matching if you do project-based expense reporting. If you do your reporting by trip, it can create reports based on the location of travel and associate receipts. The agent can read your calendar events to look into details which may have key details such as location, project ID/name and use it identify project IDs that the expenses needs to be associated to.

    As an employee, you go from just sending receipts to the agent to just reviewing your fully prepared expense report within Microsoft Teams for corrections or submissions. Putting things into perspective, I can see saving an average of 20-30 mins per expense report. More than the amount of time it saves for you, it is the tedious manual work you don’t have to do.

    How can you deploy these for your employees today:

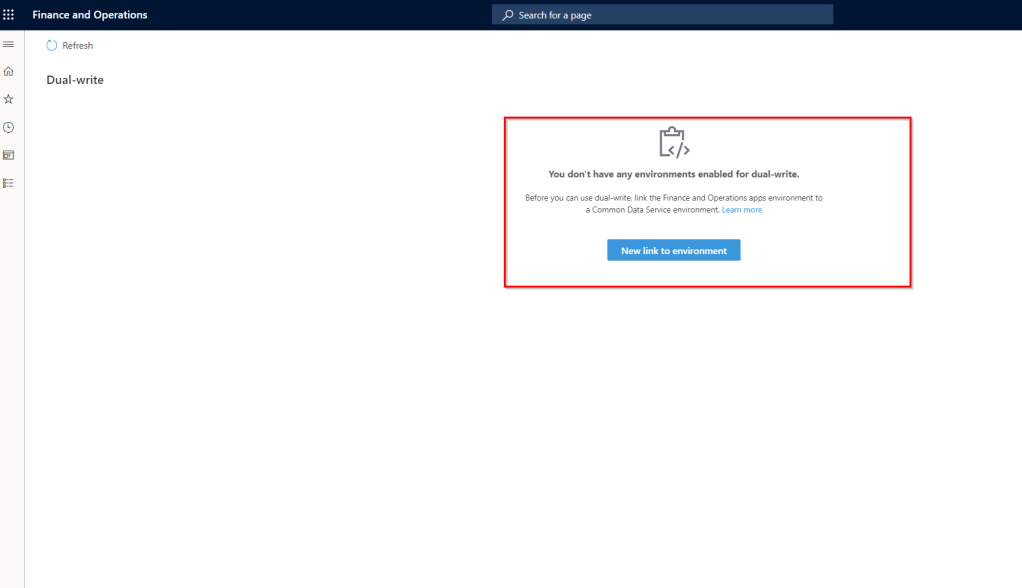
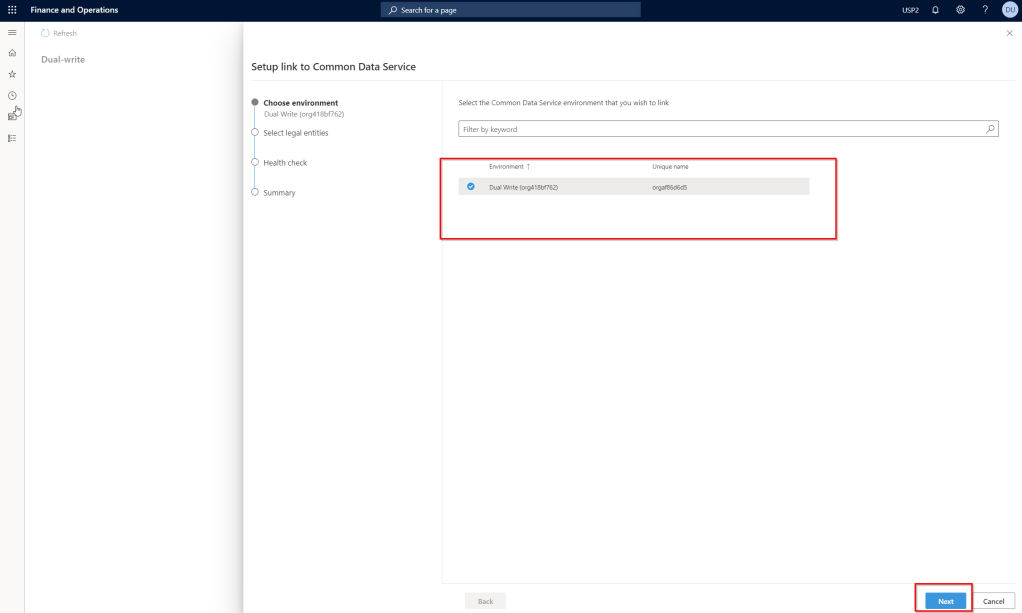
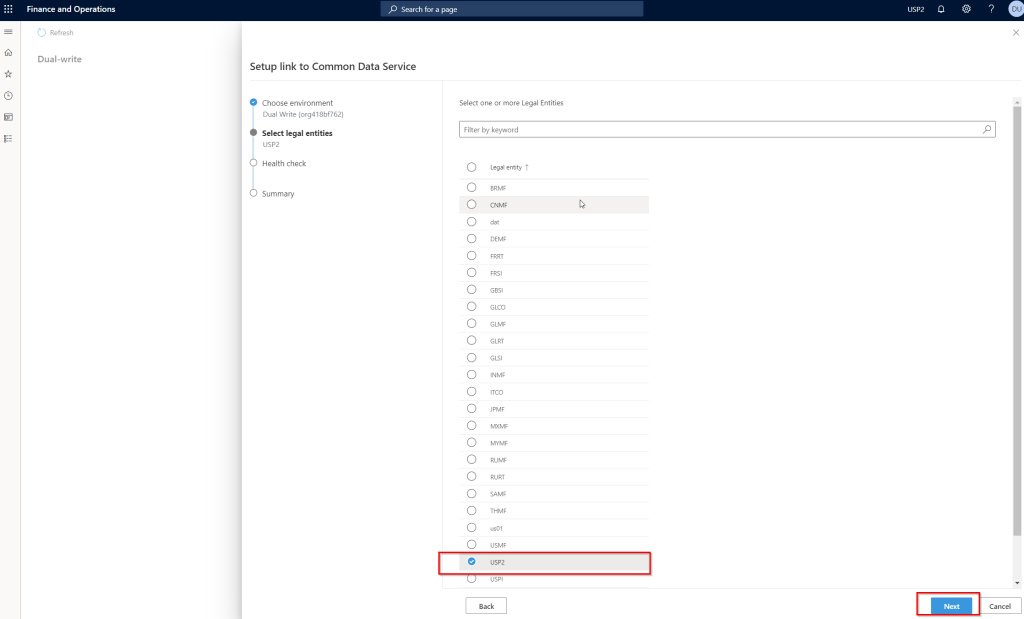
    To deploy the production ready(preview) agents today for your workforce, you will need to ensure the underlying features are enabled and the agentic automation infrastructure is setup correctly. This is more of an administrative one-time setup to get the agents up and running.

    For the Time Entry Agent:

    • Ensure you are on version 4.140.0.239 or late for Project Operations.
    • Enable the Feature for Time and Expense Agent in Project Operations.
    • Activate the power automate flows (used by the agent to complete actions on behalf of the employees, such as create time entries, expense reports etc.)
    • Finally, publish the agents in Microsoft Copilot Studio and optionally share in Teams channel/apps for your employees to get the full experience.
    • Follow Microsoft official guidelines here.

    For the Expense Entry Agent:

    • Ensure you are on D365 F&O version 10.0.44 or later
    • Enable the features for “Immersive home and Agent management in F&O.
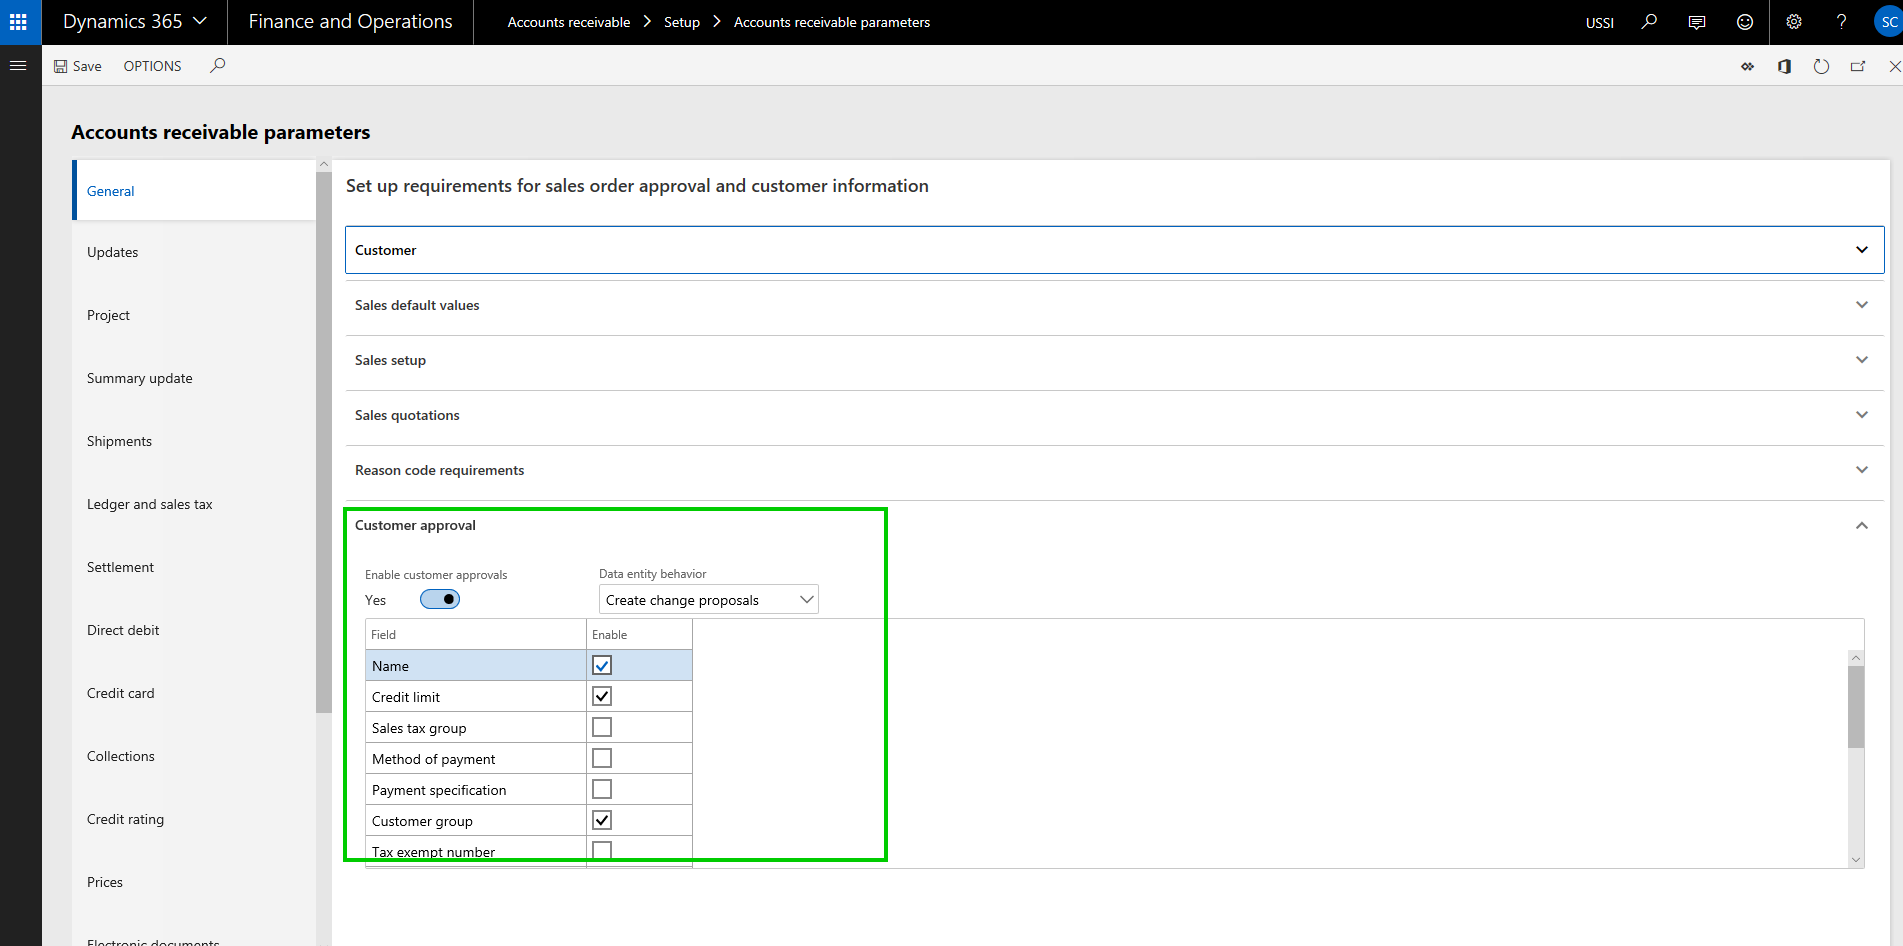
    • Setup the Agent behavior under the Expense management parameters.
    • Setup a shared mailbox (This is where your employees can send their receipts to or just upload via the expense mobile app).
    • Activate the power automate flows (used by the agent to complete actions on behalf of the employees, such as create time entries, expense reports etc.)
    • Finally, publish the agents in Microsoft Copilot Studio and optionally share in Teams channel/apps for your employees to get the full experience.
    • Follow Microsoft official guidelines here.

    Under the hood

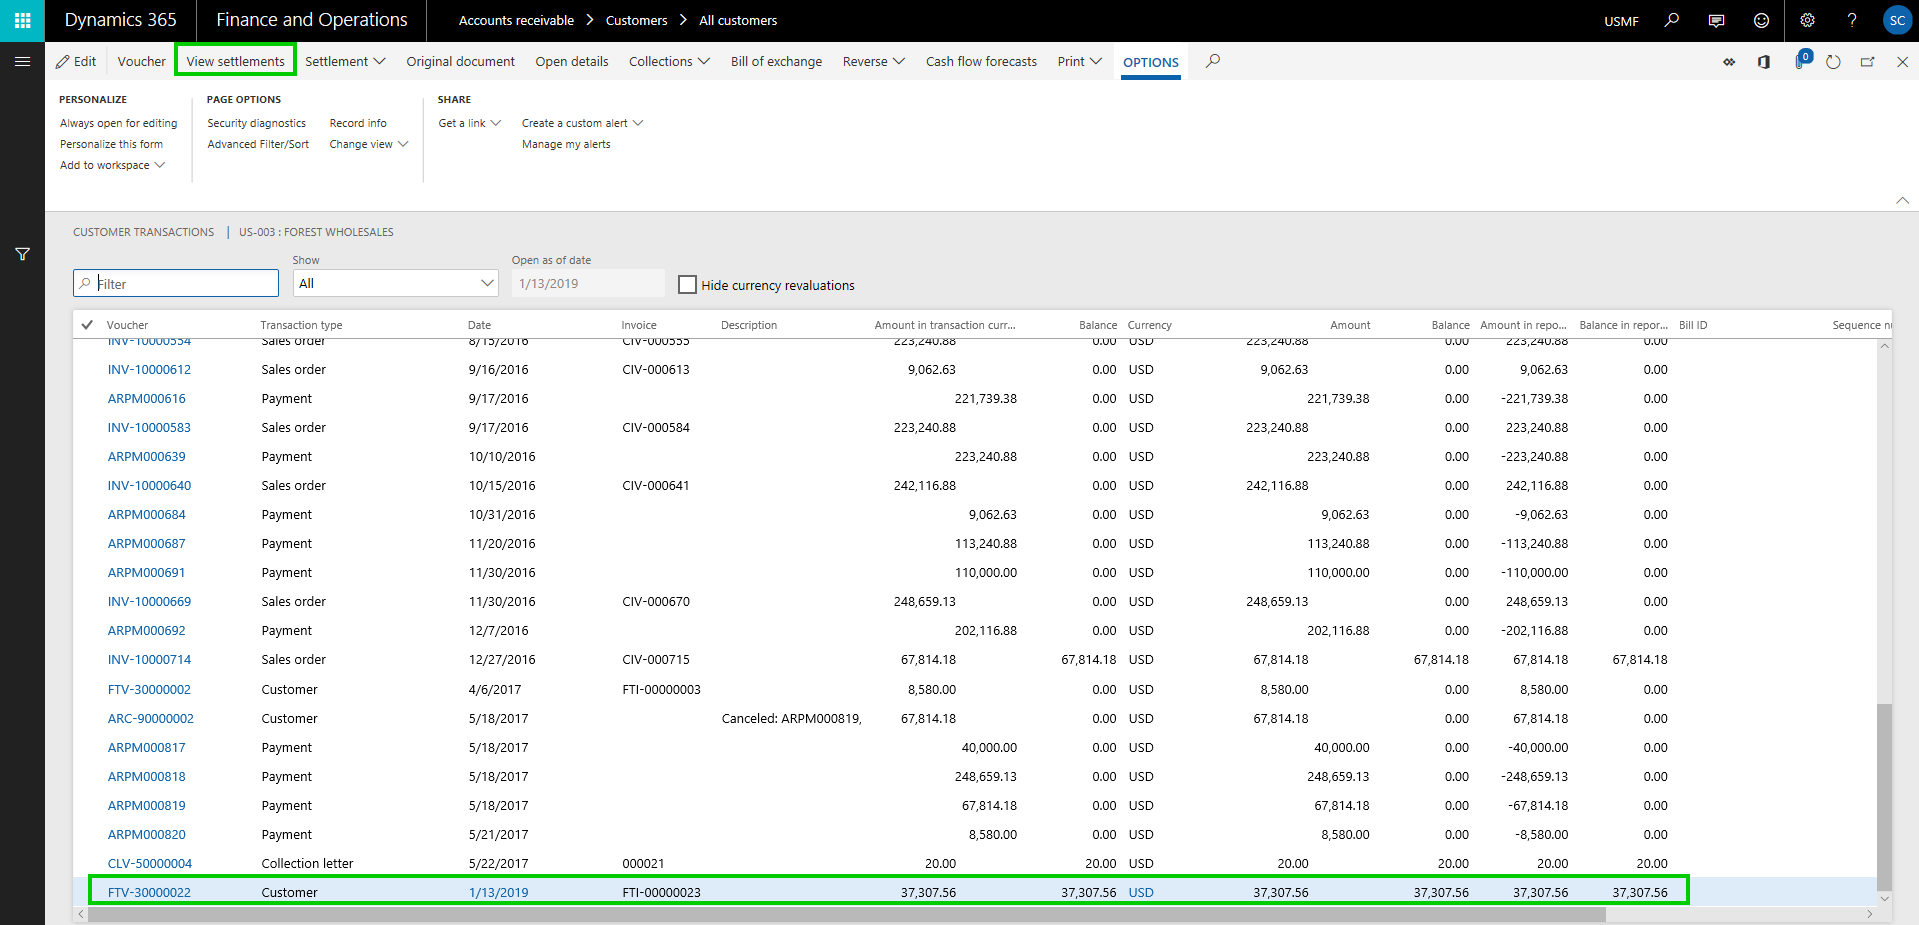
    The agent orchestration is managed by Copilot Studio along with a set of key Power Automate flows for both the agents. For the expense agent, these flows perform actions such as extracting expense details from receipts, identifying project IDs, reviewing calendar events when necessary, generating expense reports, and sending them to employees via Teams cards. The process begins with a Power Automate flow that runs periodically to process emails containing receipts and added to the unattached receipts entity. The agent subsequently parses these receipts to extract information, creates unattached expense lines, links the receipts, identifies project IDs, and assembles the final expense report.

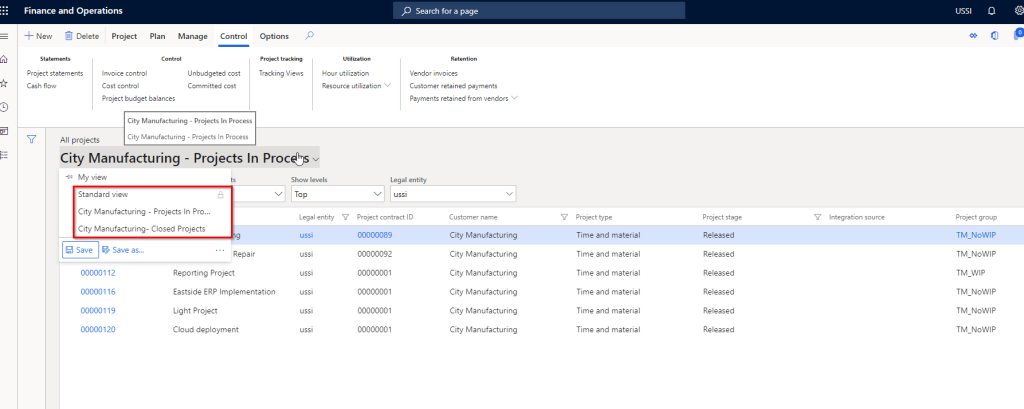
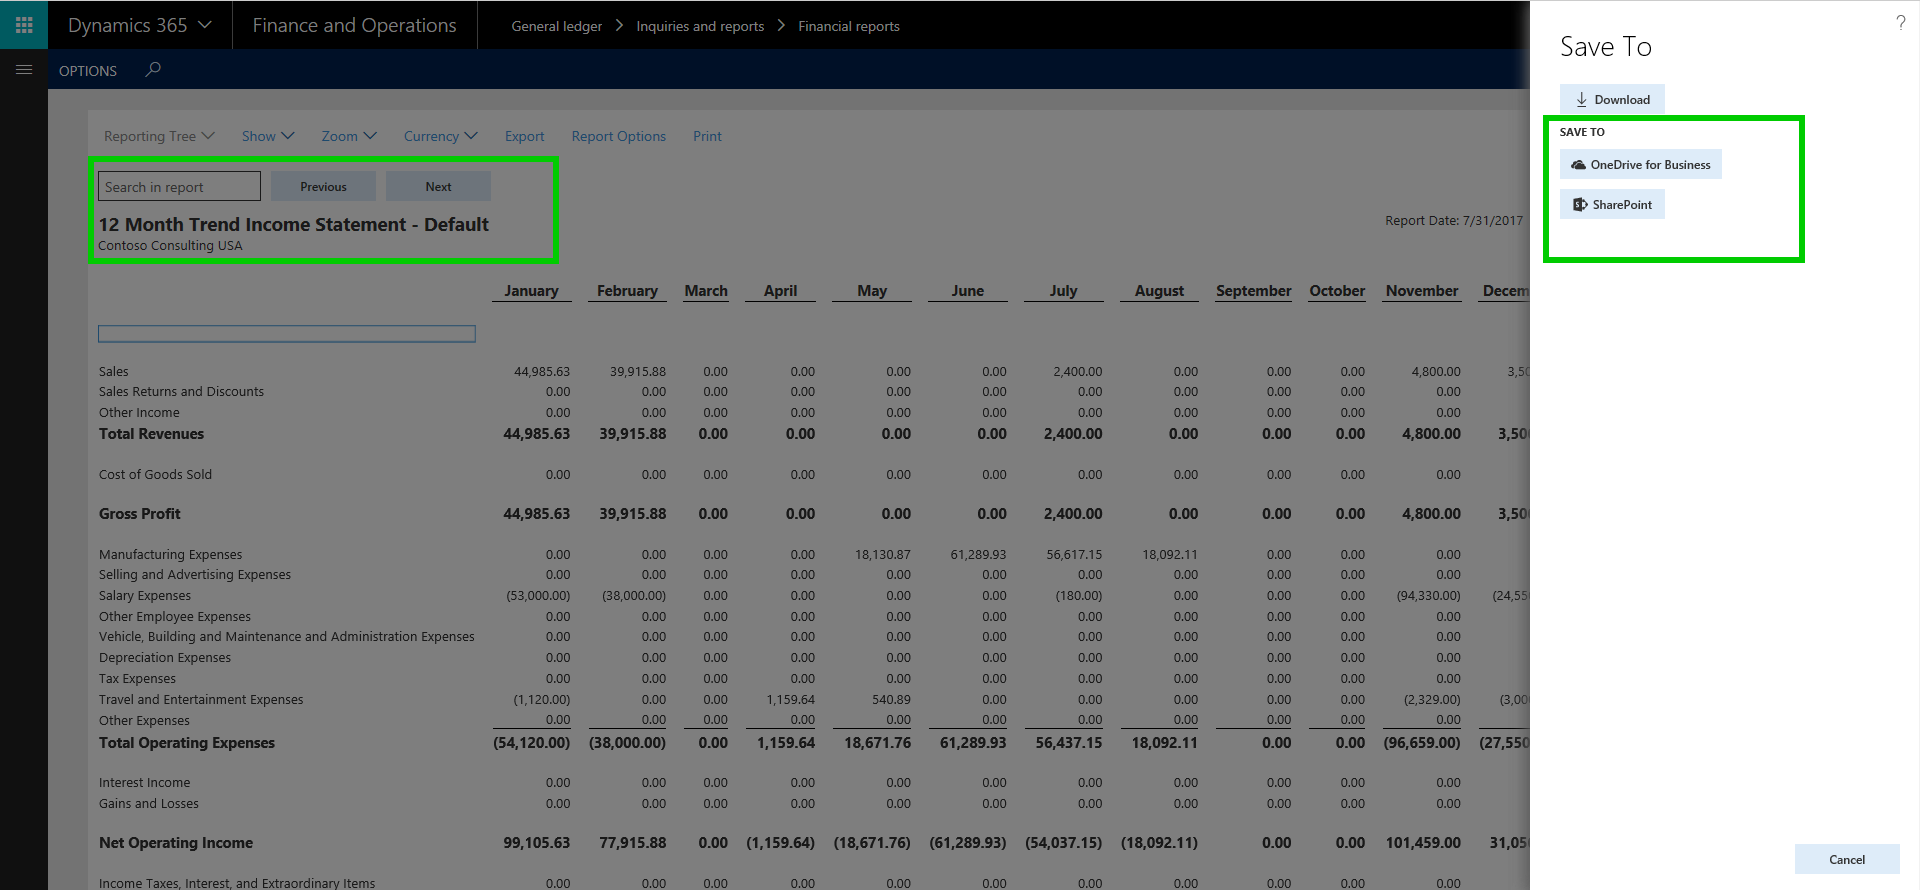
    Config Parameters that control the behavior of the Expense agent for report creation:

    Take the agents for a spin today and encourage your employees to take advantage of these.

    Regards

    Sandeep

  • Unlock faster time tracking, approvals, reduced revenue leakage, and accelerated billing with the new Time and Expense Agent in D365 Project Operations

    Unlock faster time tracking, approvals, reduced revenue leakage, and accelerated billing with the new Time and Expense Agent in D365 Project Operations

    For project and service driven organizations, accurately capturing and processing time and expenses is a balancing act between operational efficiency and revenue integrity. Manual entry delays, inconsistent submissions, and incomplete data can cause serious ripple effects—ranging from incorrect approvals, billing errors to delayed client invoicing and, ultimately, revenue leakage.

    Enter the new Time & Expense agent in Microsoft Dynamics 365 Project Operations, a game-changer designed to automate and streamline this critical process. Built on Microsoft Copilot Studio and the Power Platform, this intelligent agent not only empowers your employees to submit time and expense entries more quickly and accurately by staying in their flow of work within Microsoft Teams but also automates T&E reviews for project managers giving real-time visibility into project costs. The result? Faster time and expense approvals processing cycles, improved project accounting, and minimized revenue loss.

    The Agent is now in Production Ready Preview! If you’ve updated your solution to version 4.140.0.239 or later, you should already see it in action. While I’m still diving into the details of the Time and Expense Entry experience, I wanted to share a few quick thoughts on the Approvals Experience today. More insights to come soon—stay tuned!

    The new T&E Agent in Project Operations will transform the way your organization thinks about processing T&E entries and approvals. By simply uploading your organization’s T&E policy document, the agent intelligently interprets approval rules—automatically distinguishing which entries are “Ready to Approve” and which ones “Need Review.”

    Furthermore, it can process approvals for compliant entries on its own, significantly reducing the manual effort involved in reviewing each submission. This means project managers and approvers can focus their attention where it’s truly needed, while the agent takes care of the rest.

    The T&E policy document can look something like the below screenshot.

    You can just upload the policy document into D365 Project Operations under the Agent setup parameter area and agent does the rest of the work for you.

    Now that the policy document is in place, let’s see how the approval experience helps accelerate the T&E approvals.

    Let’s now go ahead and create, submit time entry. Bye the way, screenshot below shows the newly released Calendar view of the time entry which is Awesome. I strongly recommend you explore this further!

    Under the hood is an Approvals agent trigger which is a Cloud Flow that runs on a recurrence and gets the input parameters of each time entry lines that were submitted, parses JSON and passes on the dataset to the Copilot agent in Copilot studio.

    The agent configured in Copilot Studio has the detailed instructions, access to the policy document that we uploaded in Project Operations and agent tools (AIPlugin actions) to process the approval actions.

    Let’s now get back to D365 Project Operations and see how the agent flagged and/approved the submitted time entries. You can see the agent was able to flag the time entries as “Needs review” since they violated several of the policies. However, it was able to automatically approve the time I submitted on the “Holiday” project since my policy had an exception for that.

    It looks like our organization’s T&E policies are quite detailed—they even account for factors like resource assignment periods, task start and end dates and require all time entries to align with those parameters. The good news? The new agent gives you full flexibility to configure approval rules based on what best suits your business. Whether your policies are light-touch or highly granular, the agent adapts to reflect your organization’s expectations.

    Notice the agent was able not only able to flag but also was able to tell what policy the time entry line violated. From here, the approvers can take further actions on the time entry such as Approve/Reject or reassign to agent.

    So, what are the key take aways and how does the Approvals Agent benefit your organization?

    1. With the T&E agent, what was once a reactive, error-prone process is now a proactive, intelligent system that supports compliance, accelerates cash flow, and empowers teams to focus on delivering value—not chasing down hours and receipts.
    2. Reduces administrative effort and approval errors for Project Managers while speeding up T&E processing and project throughput. Project Managers gets to focus only on the flagged transactions and not thousands of lines that already meets the policies of the organization.
    3. Accelerates billing and enhances financial accuracy through automated, compliant time approvals. As long as time entries meet policies, they are automatically approved.
    4. As your organization adopts new changes according to changing business conditions, they just need to keep their policy document up to date and upload them in Project Operations and the agent will keep up.

    Next up, we will see how the Time and Expense Entry experience of the agent works and how it can benefit you.

    Stay tuned!

  • Does your organization have the right business technology to thrive in the subscription economy? See how Dynamics 365 Finance can help.

    Does your organization have the right business technology to thrive in the subscription economy? See how Dynamics 365 Finance can help.

    In the mobile first cloud first era, B2B and B2C businesses of all sizes are continuously introducing innovative subscription based products and service offerings and are finding new ways to generate recurring revenue to stay relevant in the business. The end goal is get customers subscribed to their services, keep innovating at scale to retain customers and create more predictable revenue streams for their business.

    The subscription model of generating revenue is great for organizations for predictable revenue and cash flow, but it also introduces new challenges for them to keep up with the complex billing and revenue recognition requirements. Organizations are challenged to create unique pricing models and easy & affordable bundling of their subscription offerings for faster customer adoption. This certainly requires them to have sophisticated business technology to manage the complex pricing(flat, tiered, flat tiered etc.), billing, revenue recognition and renewal needs. And of course, they have to stay complaint with the ever evolving regulation requirements around revenue allocations down to item level(specifically comply with ASC 606 and IFRS 15) and also manage revenue expense deferrals to align with US GAAP.

    Here is an example. Company A sells their cloud based software apps and hardware in variety of bundled subscriptions. The pricing model of these bundled offerings can be complex with tiered pricing requirements, based on what the customer subscribes to. For the customer, it is just a convenient subscription for which they pay a fixed fee either upfront annually, or pay them quarterly or monthly and they continue to take advantage of all the innovation Company A does in it’s software and hardware and stay up to date. However, Company A as an organization internally has to have the right business technology/application in order to manage the complex tiered pricing for the bundled contracts and be able to to bill accurately. They also have to allocate revenues to multiple revenue streams and manage the financial obligations and performances.

    The Good news: Dynamics 365 Finance now has the Subscription billing and revenue management capabilities built in the base offerings as part of the Dynamics 365 Finance SKU/license. You no longer need to look for ISVs solutions or external 3rd party apps to manage your subscription business. This new module and the features under it are designed specifically to tackle the billing and revenue management complexities of any subscription business and helps you shorten the quote to cash cycle. It also comes prebuilt with analytics and insights that can help your business leaders to make informed decisions.

    Subscription Management Workspace

    Important Note: Microsoft introduced a standalone Revenue Recognition module back in 2020. The new Subscription management module is much more comprehensive, more capable and it does override the capabilities of the earlier Revenue recognition module. So you will first need to turn OFF the Revenue recognition module in the application before you can enable the new subscription management capabilities.

    The 3 main features of the new Subscription management module are as follows.

    Recurring Contract Billing: This is the heart of the module. This is where you define the structure of the contract and establish key billing parameters such as the customer account, terms, the line items, dates, terms, pricing, item billing type, billing frequency, schedule, requirements for deferrals, renewals , terminations and more. This part of the module lets you create billing schedules for contracts with customers and automate complex pricing and billing processes. It also let’s you produce consolidated invoices for customers with multiple items under their contracts.

    After you have setup the billing schedules, you can view the automatically created billing schedule and associated details at any time. You can setup advanced pricing options, manage escalations and discounts and deferral requirements, putting contract lines on hold and terminations.

    You can preview invoices by individual lines, or consolidated by item or period prior to creating them and you can also chose what type of transaction to use to create the invoice(Such as Sales order Vs a free text invoice) and you can also chose whether you want to create the invoice lines for additional review or directly post them.

    Revenue Allocation: This part of the module has the functionalities that allows your finance team automate pricing and revenue allocations across multiple items. This also helps organizations that have specifically have to comply with ASC 606 and IFRS 15 standards. This functionality also lets you setup multi element revenue arrangement on contracts and manage those on the billing schedules. We will discuss this topic is greater details in future posts.

    Revenue and Expense deferrals: This functionality allows organizations to manage revenue and expense deferrals to stay compliant with US GAAP standards. In the ever evolving regulations in the subscription economy, this functionality will help your finance teams to use less manual spreadsheets and allows them to manage those directly in the system. You can setup the system to automate the deferrals on variety of source transactions such as Sales orders, purchase orders, general journals, FTI and manual invoice journals. You can chose deferral schedule types such as “Straight line or Event based” on your contract/billing schedule lines and also setup advanced deferral parameters on how you want to manage deferrals of discounts associated with revenues and expenses.

    When you generate the invoices for the billing schedules, the system will automatically create your deferral schedules . You can view the details of the invoice associated with the deferral schedule.

    You can manage deferrals from there on easily.

    That’s it for this post. I just wanted to highlight some of the key capabilities of the new Subscription Billing module in Dynamics 365 Finance and how it can help manage your complex subscription billing and revenue requirements. We will get into details of each of these functionalities, the setups and processes involved in upcoming posts.

    Till then, keep reading.

  • Dual Write feature for D365 F&O is now generally available – Great news for  Dynamics 365 customers and prospects!!

    Dual Write feature for D365 F&O is now generally available – Great news for Dynamics 365 customers and prospects!!

    If you are in the Dynamics space, you probably know the investments Microsoft has been making in Common Data Service (Aka CDS) platform. All business applications under the Dynamics 365 umbrella are connected to a CDS environment by default and they make data available directly CDS in real time, except Dynamics 365 for Finance and Operations (Also known as F&O). There was never an option to connect an F&O environment directly to a CDS environment until the release of Platform update 32. (Version 10.0.8).

    The CDS platform earlier did provide options to configure connections sets and run data integration projects to connect a F&O environment to a CDS environment. This was actually available in early 2017. Refer to my earlier blog post where I explained how CDS, Data integration projects, connection sets etc. worked back then.

    Even though the CDS platform allowed to connect an F&O environment to CDS using connection sets, data projects etc. earlier, the configurations were rather confusing(somewhat complex), time consuming and always felt like a disjoint admin process. Dual Write is the evolution of the CDS integration features such as Connection sets, Data integration projects and this is now natively built into the F&O app. The underlying complexity still exists, but Microsoft has now moved all the heavy lifting to happen behind the scenes and provided a intuitive , clean user interface, that is built within F&O app.

    In simple terms, Dual Write is a mechanism to sync D365 F&O Data with CDS and vise-versa, which allows customers using other popular D365 apps such as D365 for Customer engagement(Sales/CRM) to connect and share data between with D365 F&O seamlessly, right out of the box. For example, Without Dual write, your customer accounts data in D365 CE/Sales are not readily available in D365 F&O for you to create and fulfil, orders or to do invoice. Dual write solves this problem and makes required data available across the D365 apps using the power of CDS, so that you can use the respective D365 apps to do what they do best and do not worry about the underlying data to be in sync. With Dual write the D365 F&O data is is very tightly coupled and is in near real time sync with CDS always, for the entities you enable for syncing. This also provides bi-directional data sync.

    Starting the Platform Update 33 (Version 10.0.9) of D365 F&O, the Dual write feature is now a built-in embedded experience within the data management workspace of F&O. This means your administrators or integration folks do not have to login to a CDS environment to configure a dozen things to sync data :)

    Microsoft ships several out of the box entity maps between F&O and CDS that you can use right of out of the gate. You can also tweak the out of the mapping to suite your needs. It does not stop there!! If you have custom data fields or custom entities built for your implementation, you can use those as well.

    You should see a new Tile named “Dual Write” under Data Management workspace if you have deployed 10.0.9 deployed.

    Make sure you have the CDS environment deployed and ready under Power Platform admin center. For my testing purposes, I have also deployed sample data in my CDS environment, so that I can validate the data sync between F&O and CDS.

    Before you can link a F&O environment to CDS, you need to make sure the following configurations are in place.

    1. Make sure you have version 10.0.9 installed in the F&O environment.
    2. Install Dual Write Core solution from App Source in your CDS environment and enable the dual write entity map solution.
    3. Grant required accesses so that CDS and F&O can connect to each other.
    4. You can see the detailed documentation here.

    Now you have to link the F&O environment to a CDS environment and enable entities for dual-write. From the Data management workspace of F&O, go to Dual-write and click “New link to environment“.

    You should see the list of CDS environments available in there. Select the one you want to use and click Next.

    Select the legal entities you want to connect to CDS and click Next.

    If all your required configurations and installs are correct, the health check of CDS connection should succeed and you should be able to proceed with viewing and enabling entity maps and turn them ON for sync with CDS.

    I just wanted to share my initial thoughts and excitement, now that Dual write is generally available. Customers who are already using D365 F&O and D365 Customer engagement apps should look at leveraging this to sync data between the applications at all stages of the Prospect to Cash scenario.

    I am in the process of fully testing and validating this and I can’t wait to share my test results and additional details on the feature here soon.

    More to come soon!! Stay tuned.

  • Get your users from just using Dynamics 365 to Loving Dynamics 365 for Finance and Supply Chain Management

    Get your users from just using Dynamics 365 to Loving Dynamics 365 for Finance and Supply Chain Management

    As end users of any product, software application or any other app, we all love to spend less time in the system and get more done with less effort. Also we all love if the system gives us the flexibility to personalize the way we want it. Using an ERP systems should not be is no different. Dynamics 365 for Finance and Supply Chain Management has been on a journey to release new features every month. The goal is very simple. Drive the user base from just using Dynamics 365 to Loving Dynamics 365.

    With the newest version 10.0.9 that is coming out in a couple of weeks, there are some new cool productivity features that every user of Dynamics 365 should take advantage of. Here are some of my favorite ones.

    Saved Views:

    We all love the Personalization feature of D365 F&O, which allowed us to add/remove fields, rearrange data fields and more. One of the primary limitation of the personalization feature was “Only one set of personalization was allowed on a view/form and you could never have more than one personalized views of the same page/form. Saved Views feature addresses that in the 10.0.9 release.

    With Saved views, you can create your own personalized view with data fields added/removed or even with data filtered and save the view. You can switch to the custom view or the standard views any time based on what you want to see. An example of this is “Let’s say on the All Projects page, I want to see all closed projects of a customer (City manufacturing). I also want to see the “Project manage” column when I am in this view. I want another view to see all projects that are in Process for them and I want to see the Project group column in this view instead of the project manager. With the earlier personalization feature, you always had to filter the data and it was not possible to chose different columns to see depending on the view you are seeing. With Saved views, this is a breeze and will help user productivity significantly.

    Additionally you can pin a saved view as your default view and you can also publish your saved views and let others take advantage of it. You can rename your views at any time.

    Groupings and show totals of data in grids:

    Imagine how nice it will be if you can group, sort and see data sliced and diced without having to export them to Microsoft Excel!! With the new grouping feature, you can now group data by literally any data column and even see totals of amounts for the grouped data. You don’t have to export the data to excel. This feature is not replacing Export to excel by any means :) You can obviously do much more with slicing and dicing when you export data to excel, but if you were looking for basic grouping and view totals, then you an now do it right within the client.

    For example I am a project controller and I am reviewing all the posted transactions on the Posted project transaction page and i want to see the amounts grouped by Category or grouped by date. I can just right click on a column and select group by. I can also chose to see then totals of the amounts at the bottom.

    Run/View 3rd party Websites under a fast tab within D365 F&O:

    In the earlier versions, there was the capability to add PowerApp to run in a n embedded view within D365 F&O. You can now add any website to run embedded within a fast tab of any page in D365 F&O. This is a very helpful additional. Think of a scenario where you have a home grown website/web app and you want to run it within F&O, so that you don’t have to leave the F&O page to run the app.

    A sample use case of this will be adding vendor’s websites to the vendor records within F&O. When you are on a vendor record in D365 F&O, you can go to the site within the fast tab of the vendor record.

    You also have any inhouse websites/webapps running within the fast tab.

    Quick Personalization and faster data load on grids:

    Rearranging data fields within a page does not require to go to Personalization mode now. You can just drag and drop fields on any page and arrange them in the order you want. This can be a part of your saved views as well.

    The data filtering on the new grid control now got even better. Earlier if you were to filter certain records on a page using the “Is one of” option, it was very difficult and time consuming to type every single value, one at a time. With the new improved control, the “Is one of” control works like a charm. You actually get to see the values in the drop down and you can select them with just a click. That’s it!!

    The new improved grid also provides key enhancements such as,

    • Improved data rendering speed and faster scrolling experiencing.
    • You can do positional scrolling. So if you are looking at a page that has thousands of records, then you can scroll to specific position on the scrollbar to go to the specific records.
    • Enter mathematical expressions on numerical columns for the system to recognize values. For example I am on the Project Hours forecast screen and on the Hours field, I can type = 5*45, instead of 225.
    • Faster data entry, as server side data validation allows user to enter data first and then the system validates data.

    Thats it for this post.!!

  • Dynamics 365 Project Timesheets Mobile app – Seamless Project timesheet entry and approvals on the Go in Dynamics 365 For Finance and Operations!

    Dynamics 365 Project Timesheets Mobile app – Seamless Project timesheet entry and approvals on the Go in Dynamics 365 For Finance and Operations!

    Last few months have been pretty busy with lot of our customers getting ready to move to Dynamics 365 for Finance and Operations “ONE Version. All of you should probably know already what “ONE Version” is and what are some of the key expectations around this. The objective is very simple. “All customers should run the latest version of Dynamics 365, Always“. This means, no more expenssive and extenssive upgrade projects and timelines.

    For common questions on ONE version, you can find more info here.

    With that said, I wanted to write about the ALL NEW Project timesheets mobile app in Dynamics 365 for Finance and Operations, that launched with the ONE version. (The app was released a few weeks ago alongside the ONE version release in the first week of April 2019). In the earlier releases of D365 F&O, there was the Project time entry mobile workspace, which did allow you to enter your project timesheet on a mobile device, but it had very limited functionality. Now, there is a new dedicated mobile app called “Microsoft Dynamics 365 Project Timesheet” in both Apple Appstore and Google playsytore. This new mobile app is fully redesigned and provides full functionality for timesheet management using a mobile devide. Some key highlights of this app,

    1. Standalone app that seamlessly connects to Dynamics 365 F&O.
    2. Modern responsive and fast user interface which is easy to use.
    3. Easy time recording and internal/external comments/description entry.
    4. Mobile timesheet entry submissions.
    5. Mobile Timesheet Approvals.
    6. Enter start and stop times.
    7. Configurable Data fields visbility

    To get started, you need to download and install the mobile app from App Store or Playstore. Once you have done that, the syustem admin of your organziation will need to enable this mobile time entry within Dynamics 365 for Finance and Operation.

    Navigate to Project Management and Accoutning > Setup > Project management and accounting parameters > Timesheet tab.


    You can also pick and chose which data fields to show on the mobile app and which ones not to show. That’s it!!

    Now launch the mobile app and the timesheet entry process is very startight forward. You can Copy timesheets from previous, favorites and assignments. More importantly, you will always see the list of most recent projects you worked on, so that it is easy to find and select. The user interface for entering the time and comments is clean and welcoming. Great job Microsoft on this one and I am sure this will get new features in future versions.

    Here are some screenshots from the testing I performed and it worked like a Charm!! Try it and provide your feedback to Microsoft directly in Appstores.

  • Some useful new features of Dynamics 365 for Finance and Operations version 8.1 under Core Financials management module – Part 1

    Some useful new features of Dynamics 365 for Finance and Operations version 8.1 under Core Financials management module – Part 1

    The October 2018 release of Dynamics 365 for Finance and Operations (Version 8.1) introduced several new and very useful features in the core financials management area of the application, along with several other new functionality and enhancements across various other modules, analytics, overall platform, extensibility and more.

    In this blog post, we will review some of the key new features under the core financials area, which a lot of end users will certainly fall in love with.

    Central view of Settlement Transactions: In the past, when you had to see the settlements on a customer or vendor transaction, you always had to make a few clicks and jump to more than one screen to find the relevant information, which was time consuming. With the new “View Settlement” form/option on the Customer and Vendor transactions form, you can now see the full settlement details, related transactions, accounting, history and more, all at one place. Here is an example.

    A customer invoice is posted: The View settlements form shows just the required details of the invoice.

    cust trans8.1
    view settlements

    Let us now settle this invoice against a customer payment along with some cash discount. Here is what you see in the view settlement form.

    view settleemnts after settlement

    On this new “View Settlements” form, you can,

    • View any related transaction lines for the invoice, payment, cash discount lines etc.
    • You can dig into the Settlement history, if there a transaction was settles, unsettled multiple times.
    • You can view the accounting entries directly from this screen, for each individual line.
    • You can also initiate the Undo Settlement process from this new form.
    options on view settlements

    Customer and Vendor data field change approvals: On the Customer and Vendor master records, if you want approval process to be in place, when certain data fields are changed on the customer or vendor records, you can now enable that functionality optionally. This is a pretty neat feature, which let’s you chose which data fields you want to control from being changed accidentally, and then configure a detailed one or multi step approval process, so that the changes can be reviewed and approved, before the new field value comes into effect for the customer or vendor. In the post today, we will see this on the Customer side, but it is the same functionality on the vendor side as well.

    So the first step is to Enable the approval process. As i mentioned, this is completely optional and if you do not need, you just leave the feature turned OFF. To enable this, go to Accounts Receivable > Setup > AR Parameters form and mark the “Enable customer approval” check box under the General tab.

    Enable Customer fields approval

    The next step is to actually configure the approval workflow, which will be used for routing the proposed customer account changes for review and approval. This workflow is similar to other workflows in the system. In my case, i have setup a basic workflow with just one step approval process.

    Once you have the workflow configured, let us now see this functionality in action. Navigate to the customer master and you will notice that the data fields you selected in the parameter screen , will now show as “requires approval” indicator. This is super helpful and easily tells the user that this field if changes will require approval. Let’s try to change the customer credit limit and customer group field.

    Let’s try to change the customer credit limit and customer group field. When you save the changes, system will create and show the change proposal, which shows both current values and the proposed changed. At this point, the user if wishes, can discard the changes they made.

    Notice now that the status of the Customer account says “Changes not submitted”.

    One important thing to note here is, when the changes to the data fields are in process, you can still transact with the customer. System will just use the current values.

    Once you are done with the changes, click Workflow > Submit to submit the changes to the workflow for review and approval. When the changes gets assigned to the approver, they can view the Proposed changes on the customer record directly.

    Important note: There is a periodic option to submit all changes created for customer accounts in bulk. You can do it both manually and in the background/batch.

    The changes to the data fields will come into effect after the change proposal has been approved. It works the same way for vendor records as well.

    Financial Dimension values on Derived Dimensions: In many of the implementations I have done, a common requirement we here is to have some of the master records such as Item, Project, Customer etc. to be configured as one of the financial dimensions, so that customers can do adequate financial reporting on those. We use Derived dimension values for this and often end up having to select the financial dimension value manually on the master data record or we end up doing additional customization to automatically populate this value when new records are created in the master data table.

    With this new functionality, you do not need to do any customization or even setup the dimension value manually when new records are created. If enabled, the system will automatically set these up now. Let us see this in action.

    Additionally, there is another new functionality available on the financial dimensions area, where you can now setup certain dimension values to be defaulted when you select another dimension value. For example, when you select a specific business unit, you can have the system automatically default a cost center value for you.

    To set this up, go under Financial dimensions > Select the dimension record and click Derived dimensions button. Here you can setup the value combinations of the defaulting of dimensions.

    In this case, i have setup to default Cost center and Department values to be defaulted when i select a certain business unit.”. Let us see this in action.

    With the above setup, when I select Business Unit dimension on a master record setup such as Project/Customer or anything else, the Cost center and Department dimensions will be auto populated, and i do not see to select them specifically. This is a pretty handy feature and will certainly save a lot of time for users in some cases.

    For example, when i select Business unit 001 on my customer record, the Cost center and Department values auto populates to what i have setup.

    The same defaulting functionality works on journal entry as well. For example, when I do a general journal entry and select the Business Unit dimension, i can have other dimension values defaulted (as long as they pass other account structure related validations)

    Financial Journal Validation: Additional functionality to simulate posting during journal validation is available, which allows you to basically run the whole posting process, without actually posting the journal. As a result, you can see the possible errors, messages or warnings and you can take corrective actions on the journal.

    Global Shared Number Sequence for Customers and Vendors:  The global shared number sequence functionality allows you to use a single number sequence across many legal entities for customers and vendors. With this, you can also copy customers and vendors easily between legal entities. Since you cannot share master data using virtual companies anymore in D365 F&O, this might be a functionality you want to use to share the customer or vendor master if needed in your implementation.

    Note: This functionality is not a replacement of the Virtual company feature by any means. It is just a possible alternate that can be leveraged to have same customer ID and info for one customer across multiple entities, but they will live as separate data records and have their own transactions.

    The first thing you have to do is configure a Shared number sequence and then you will need to select the same shared number sequence under the Number sequence parameter.

    Then you need to make sure you select the same number sequence code for the customer account under the AR parameters page in all the entities where you want to use the shared customer account ID.


    With that setup, let us now see how you can copy customer accounts from one entity to another and they will use the same customer account number and other related info for the customer.

    In USSI entity, I created a new customer account. Notice that when i create the new customer, system does not assign a Customer account number immediately. This is because, if you want to copy the customer from another entity, it will use the same customer account number. If not, it will assign a new shared number after you save the details on the customer. (We will see this copying feature when we create this same customer in another entity USMF).

    Now i have filled the required details for this new customer and i save the data. System assigned a customer account number using the shared number sequence we had setup.

    We will now copy the customer in the USMF entity. Let us see how that process looks like. I will navigate to the Customer master in the USMF entity and click New on the All Customers page, and then i will type in the customer name i want to copy. System will automatically find the match and if they are an existing customer in another entity, it will present an option to copy the customer account.

    You will now see that the Customer information is copied into the USMF entity and it used the same Customer account number.

    Note: You will need to make sure all the dependent data fields for the customer account are correctly setup in both entities.

    Now that we have the shared customer account numbers setup and customer accounts copied, let us look at another new feature that complements this feature.

    Global Customer and Vendor Transactions List page:  If you are using shared number sequence for customers/vendors and have copied the accounts between multiple entities, you would obviously want to see a centralized view where you can see the transactions of the customer of vendor in all the entities they are copied in. I have already posted some transactions for this new customer “Marshal’s New store” in both USSI and USMF entities.

    Invoice posted in USSI:

    Invoice Posted in USMF:

    Let’s see how the look in the new global transactions list page. I am in the USMF entity now and i will navigate to the global transactions list page.

    Notice that the new page shows me all the transactions for this customer account form multiple entities. You will notice here that when you select the transaction for the specific entity on this page, the system automatically switches the company account, so that you can perform required operations on the transaction correctly.

    That’s it for today’s post. In the next post, we will discuss in detail about another new feature in the core financials module called ‘Dual currency” and learn how it works and what are some of the significant changes that were introduced as part of this functionality.

    Till next time !!!

  • Configure Currency exchange rate providers and import exchange rates automatically in Dynamics 365 for Finance and operations

    Configure Currency exchange rate providers and import exchange rates automatically in Dynamics 365 for Finance and operations

    Microsoft Dynamics 365 For Finance and Operations provides integration with 3 exchange rate providers out of the box.

    1. Central Bank of Russian Federation
    2. Central Bank of Europe
    3. OANDA

    Depending on the country of your operations or your preference, you can use any of these providers to import currency exchange rates directly into Dynamics 365. Usually, OANDA is the widely used and most trusted exchange rate provider.

    The configuration of these is pretty simple and straightforward. The integration with Central bank of Russian Federation and Central bank of Europe does not require you to setup an API key within Dynamics 365, where as for OANDA, you will need to get the API key from OANDA and set it up in Dynamics 365. OANDA also lets you do more flexible setups, such as how many decimal places you want to use, what quote type you want to use.

    Lets take a quick look at how the process for setting these up and importing the exchange rates looks like.

    The first thing is to setup the Currency exchange rate providers within Dynamics 365. You can do this under General Ledger > Currencies > Configure exchange rate providers form.

    Exchange Rate Providers

    Exchange Rate Providers Config

    If you look at the default key configurations for the Central Bank of Russian Federation and Central Bank of Europe, there are pre-populated by Dynamics 365 with the Key values, which are basically the service endpoint (XML files). Screenshot below shows the configs.

    Central Bank of Russian Federation

    Central Bank of Europe

    To demonstrate the feature, i have created 3 separate Exchange rate types for the 3 different providers.

    Exchange Rate Types

    Now that the exchange rate providers and exchange rate types are setup, lets ee how the import of the exchange rate works. I will first do it for the Central Bank of Russian Federation and Central Bank of Europe and then i will do the setup for OANDA feed, since that involves some additional steps.

    There are 2 options of importing the exchange rates. You can trigger the import manually every time you require or you can set the process to run in batch at specified recurring intervals.

    • To initiate the import, navigate to General Ledger > Currencies > Import currency exchange rates.
    • On this screen, you can select the Exchange rate type into which you want to import the exchange rates.
    • Then select the Exchange rate provider (CBRF, CBE or OANDA)
    • You can import “As of today’s date” or you can specify a date range as well (From date and To date)
    • If you using the Central Bank of Russian Federation as the exchange rate provider, you can tell the system to automatically create the currency pairs. This is nice !
    • You can chose if you want to override existing rates also.

    CBRF Import

    • Here you can setup the import process to run automatically in the background(batch) at specified recurring time intervals)

    Batch Import

    • After you click OK, the import process will start and you will get a confirmation message telling what was imported.

    Import Confirmation Message

    • If you are using the Central Bank of Europe as the exchange rate provider, you can additionally tell the system to prevent import on national holiday.

    CBE Import

    • After the import process is complete, you will find your exchange rates in the Exchange table.

    Exchange Rate Imported

    • For OANDA as your exchange rate provider, you will do some additional setup. First you will need to get a API key from OANDA. If you have a paid subscription with OANDA, you will already have a API key for exchange rates. But to test, you can just start a 30 days free trial by simply specifying your email ID. You will receive the API key in your email.

    OANDA Signup1

    OANDA Signup2

    OANDA Signup3

    • One you have the API key from OANDA, you will need to set it up under the Exchange rate service provider configuration.

    Setup API Key on Provider

    • With this setup, You are all set!!. Now the import process for OANDA is the same as we saw above for CBRF and CBE. Only thing you need to note is, with OANDA, you will need to create the currency pairs depending on how many currencies your organization operates in.
    • You can verify that the exchange rates are imported.

    OANDA Import

    • You can see below that i had created 3 currency pairs (USD to INR, USD to EUR and USD to GBP) and the import process imported the corresponding exchange rates.

    OANDA Imported

    OANDA ER

    That’s it for this post..


  • My favorite features from July 2017 update of Microsoft Dynamics 365 For Finance and Operations – Enterprise Edition

    One of the most awaited releases of Dynamics 365 For Finance and Operations is now available (The July 2017 and Platform Update 8). Lot of new capabilities and exciting new features across all the functional modules and quite a few technology stack improvements!!In this post, I will highlight some of the most important new features that are my favorites so far, that I think are going to helpful for customers in big time.

    First thing first! Starting with the July release, there is a change in the naming of the Dynamics 365 apps . Earlier we had “Dynamics 365 For Operations”, which basically represented the Enterprise edition of Dynamics 365 and “Dynamics 365 For Financials’ which represented the Business edition targeted for SMB customers.

    Starting with the July release, the naming will be as below.

    Dynamics 365 For Operations => Dynamics 365 For Finance and Operations – Enterprise Edition (For Enterprise Customers)

    Dynamics 365 For Financials => Dynamics 365 For Finance and Operations – Business Edition  (Suitable For SMB Customers)

    You should notice this name changes, when you login to the new version.

    Default Landing Page

    Here are some of my personal favorite features and functionality fro this latest update of Dynamics 365 For Finance and Operations.

    Embedded PowerBI and Analytical Workspaces for all D365FO licensed users:

    Microsoft Power BI is the backbone of Dynamics 365 for delivering critical business intelligence to all users of an organization with rich interactive visuals, dashboards and reports, with appropriate drill downs, data filter options etc. When Dynamics 365 was first released, users had the option of consuming preconfigured or customized Power BI dashboards and reports from their PowerBI online workspaces right into their workspaces within Dynamics 365. This is a great capability and allowed users to mash up data from Dynamics 365 or even from external data sources and then see them all together right on their workspaces. However, this required every users to have at least a free PowerBI.com subscription to be able to do this.

    With the July 2017 update, Power BI Embedded services are integrated into Dynamics 365. Embedded Power BI is a Microsoft Azure Service that allows to embed the dashboards and reports directly into Operations workspaces of Dynamics 365. Embedded Power BI is an ideal way of presenting near real time data insights, with Direct Query to the Entity Story (Data warehouse for Dynamics 365). These embedded dashboards and reports are available for all users with the base license of Dynamics 365 for Finance and Operations and does not necessarily require the user to have a PowerBI.com subscription.

    The diagram below shows the key difference between the PowerBI Online and PowerBI Embedded services.

    Power-BI-Embedded-Overview

    The good news is, Microsoft has already shipped several out of the box PowerBI asset files within Life Cycle Service starting with the July 2017 release, which can be simply included in the Dynamics 365 deployment options to get instant access to readily available dashboards and reports across all major business areas. Below are some of the sample examples of these embedded Power BI dashboards and workspaces in Dynamics 365.

    This slideshow requires JavaScript.

    Prospect to Cash Integration between Dynamics 365 for Sales and Dynamics 365 for Finance and Operations using Common Data Services:

    This one is a HUGE step forward!! Since Dynamics 365 launched back in February 2016, the Primary objective and goal for Microsoft was to combine the best of Dynamics CRM and ERP worlds and provide a unified experience to end users, so that they can advantage of best of breed functionalities within the Modular apps for Sales and Financials & Operations and still be able to integrate the data flow between these apps seamlessly to get a 360 degree view of their business. We have seen steps Microsoft has taken in last several months to get the Common Data Service (Azure Public Cloud data storage) Platform ready for prime time along with the supporting surrounding services such as Microsoft Flow and PowerApps. With the July release, these all are coming together as a first significant step towards truly unifying the CRM and ERP worlds. This is the beginning of the departure from the traditional custom 3rd party integrations between CRM and ERP.

    The following key scenarios are supported currently with this integrations, primarily in the Supply Chain side. More to come in future. I have not got chance to test this end to end yet. Will share some details when I am able to test it in coming weeks.

    • Maintain accounts in Dynamics 365 for Sales and sync them to Finance and Operations as customers.
    • Maintain contacts in Dynamics 365 for Sales and sync them to Finance and Operations.
    • Maintain products in Finance and Operations and sync them to Dynamics 365 for Sales.
    • Create quotes in Dynamics 365 for Sales and sync them to Finance and Operations.
    • Generate sales orders in Dynamics 365 for Sales for existing products and sync them to Finance and Operations.
    • Generate invoices in Finance and Operations and sync them to Dynamics 365 for Sales.

    Mobile Apps/Workspaces:

    Mobile workspaces/apps were introduced with the Update 3 release of Dynamics 365. Since then, these workspaces have been evolving and Microsoft continues to deliver more and more mobile workspaces covering various mobile business process scenarios. Some of the key mobile workspaces that were released in the July 2017 update are as below.

    This slideshow requires JavaScript.

    The highlight of these workspaces is the mobile app for Project Timesheet Entry and the Expense Management app. I provided my views on the preview version of these mobile workspaces in my earlier post. These workspaces have added significant amount of new features with the July 2017 release. The Expense management workspace now support end to end expense management from receipt capture, new expense report creation, submission, expense approvals and expense status inquiry and so on. Below are some screenshots of the mobile workspaces released in the July Update.

    Employee Expenses Management and Reimbursement related enhancements:

    There are several new features and usability enhancements that are introduced for Employee Expenses management in the July Update. From all these features and enhancement, my favorites are as below.

    • Dedicated Expense management workspace

    Expense Workspace

    • Grouping of vendor invoices for different expense lines of an expense report, as opposed to create separate vendor invoices for each expense line, for reimbursement. This was one of the most talked about concerns in the earlier version (AX 2012), since it was causing problems creating individual invoices for each expense lines and there by causing issues in Check printing etc. Now with this release, you can optionally group all expense lines with the same method of payment to post as grouped vendor invoice instead of individual invoices. If you enable the grouping of vendor invoices, this functionality basically posts all the expenses of the expense report with same payment method on the recent transaction date from the list of expense lines.

    • Several usability enhancements in some key screens. Also, Employees can now track payment information for their expense reimbursements. Nice and very useful functionality, as this is one point that customers usually ask and they used to customize it in AX 2012.

    This slideshow requires JavaScript.

    OCR interface for capturing vendor invoices automatically:

    One of the most common asks from customers in the AP invoicing area is the functionality of OCR and vendor invoice automation. Organizations often offload the paper invoice processing to 3rd party OCR reader service providers. These service providers provide machine readable metadata for the invoice along with scanned imaged the invoice headers and lines. In the July 2017 release, the solution/standard interface to read these invoice metadata and invoice scanned attachments is in-built into the AP invoice process of Dynamics 365. 3rd party OCR service provider systems will be able to send metadata feed for invoices directly to D365FO.

    This new functionality basically provides the following.

    • Out of the data entities invoice header, invoice lines, and invoice attachments.
    • Exception processing for invoices. A frontend UI for users to make it easy to track failed invoice imports.
    • A side by side invoice attachment viewer to imported invoices and exceptions.

    Vendor Invoice

    PowerBI reporting with Financial Dimensions:

    This feature will be available with July 2017 Update and you will also need to have the most recent Platform update of Dynamics 365, which is Platform Update 8. This features let’s the power users or the BI report creators to add financials dimensions to the readily available aggregated measurements or custom built aggregated measurements in the Entity store.

    With that, when the Entity store is periodically updated/refreshed, the financial dimension information of all the General ledger transactions will automatically be included in it. Then you can use those aggregated measurements to write joins, queries within Power BI to create any sort of financial report/dashboard within Power BI itself. Screenshot below shows just an example.

    Publish financial reports from Dynamics 365 to SharePoint:

    In the earlier versions/releases, you could generate financials reports and export/save it to your local computer. With the July 2017 release, you can now save financial reports directly to a SharePoint document library. The benefit of this is, you can setup alerts within SharePoint to notify you when new reports are available.

    Note: I don’t have SharePoint configured in the demo environment, so not able to show the full experience.

    FInancials Statement to Sharepoint

    You could also extend this further and write a Microsoft Flow, to automatically send the reports directly to your inbox from SharePoint. Endless possibilities !!

    Tools for upgrade from AX 2012 or AX 2009 to Dynamics 365:

    You can upgrade from Dynamics AX 2012 to Dynamics 365 for Finance and Operations, Enterprise edition. The complete Dynamics AX 2012 database can be brought forward, and your AX 2012 codebase can be upgraded to Finance and Operations. You can migrate from Dynamics AX 2009 to Finance and Operations via a migration toolset to bring forward master data and opening balances. It would be interesting to test these upgrade experiences and tools as opportunity comes !! 

    The Upgrade is now more predictable, which reduces the overall cost of the upgrade process. Upgrade starts with an automated analysis phase, which defines the preparation tasks required to reduce the time and cost to upgrade, as well as the ongoing future cost of Finance and Operations. Post upgrade, an automated validation phase provides statistics and metrics on the success of the upgrade process. The validation details can be used to quickly assess the state of the upgrade, so you can continue with functional testing and sign off.

    In Finance and Operations there are no expensive upgrades needed to stay current and take advantage of continuous innovation. You can update to the latest versions of the product with a click of a button.

    Support for Hybrid Cloud (Cloud + Edge) and Op-premise (Local Business Data) Deployment scenarios:

    In one of my earlier posts, I explained some details about the 3 different deployment options that Dynamics 365 is going to provide. Starting with the July 2017 Update, both these deployment options are available. Customers who are keen on having an On-premise deployment of Dynamics 365 for Finance and Operations to capitalize on their existing infrastructure investments or due to data security and compliance requirements, will have the option to deploy D365FO in Hybrid as well as On-Premise model.

    d365-opr-deployment-scenarios

    Microsoft published system requirements documentation explaining the detailed system requirements for an On-premise deployment of D365FO. You can find the information at this URL

    There was system requirements document also that Microsoft published. See URL below.

    https://www.microsoft.com/en-us/download/details.aspx?id=55496

    I will share more info about this in future as we move with some testing and some actual deployments for customers.

    That was a long enough post :). There are several other features and functionalities across technology stack, Retail and manufacturing modules, that I have not highlighted here in this post. There is a lot to explore and learn!!!

    Stay tuned and stay current !! Till next time..

    Regards, Sandeep

  • Vendor Self-service portal and Vendor collaboration in Dynamics 365 For Operations

    Vendor Self-service portal and Vendor collaboration in Dynamics 365 For Operations

    Having a fully functional vendor self service portal in an enterprise class cloud ERP solution is a huge advantage and allows your organization to streamline the collaboration with vendors, there by helping you reduce back office efforts and improves accuracy of business transactions with vendors and procurement. Dynamics 365 For Operations provides this right out of the box !

    In today’s quick post, we will take a look at some of the key capabilities of the Vendor Collaboration/Self-service portal in Microsoft Dynamics 365 For Operations. Let us first look at some of the key setups involved.

    Activate a vendor for Self -service/Collaboration:

    • On the vendor master record > General fast Tab, select Active (PO is auto-confirmed) or Active (PO is not auto-confirmed).

    vendor-master

    • Setup the Primary contact for the vendor. I have setup Erin in this demonstration.

    Prim Contact.jpg

    • Setup the user account for the vendor contact/vendor user. You will need to setup a Azure AD account for this for the vendor user and assign the Vendor(external) or Vendor admin(external) or both of these roles to this user. Then link the vendor primary contact to this user. Important Note: Note that you would not want to give the System user default role to this user, as this is purely an external user.

    vendor-role

    Additional Note: Since the vendor is an external user, you would definitely want them to personalize Dynamics 365 screens to add new data fields on their views. To block this, you can Block personalization for the vendor user in Dynamics 365 for Operations.

    With the understanding of the some of these basic setups, let us now see , what are some of the key features of the self-service portal.

    Shared View of Purchase Order Communications and Responses with Vendor:

    • Let us say Contoso Entertainment Systems USA wants to order some Wiring Harness and Speaker Units from their vendor Fabrikam Suppliers. The purchasing clerk at Contoso USA creates the PO. The purchase order is shown below.

    po

    • He then sends the PO to the vendor portal for obtaining confirmation response from vendor.

    send-for-conf

    • Notice at this stage, the PO status is “In External Review”.

    po-status

    • Now, Erin the contact Fabrikam Suppliers logs in to Vendor portal and can see that the PO that Contoso just sent is right there on the portal. He  logs in and navigates to Purchase Order confirmation workspace.

    vendor-portal-po-conf

    po-for-review

    • He sees that the PO sent by Contoso appears there and then he goes into the PO details.
    • At this point, as a vendor Erin from Fabrikam can review the PO header and line details and do the following.
      • Print a copy or original PO if he needs to send it to anyone else.
    • printpo
      • Review the PO Header and Line information and Accept or Reject the PO Confirmation request. If he accepts the PO confirmation request, then the PO will be automatically confirmed.
    • accept-reject
      • Additionally, Erin can suggest changes on the PO, such as Mode of delivery, Delivery date and Quantity. Erin can also view or attach Notes and documents both at the PO header and line levels at this stage. Let us say he changes the Quantity of the Wiring Harness to 170, as Fabrikam does not see to have enough stock at the moment to fulfill the order.
    • suggest-change-1
    • suggest-change-2
      • Eric can substitute a specific PO line if needed. He can also split the delivery of the PO into multiple deliveries for each PO line. Let us say, he splits the delivery of Wiring harness into 2 deliveries as shown below. He also adds appropriate note saying that they can deliver only 170 Qty. of the Harness ordered and they will need to delivery them in 2 schedules.
    • split-delivery
    • split-delivery2
    • notes
      • Erin can now go ahead and Accept all the changes he suggested and proceed further Accepting the PO with changes. He clicks on Accept with changes on the PO. At this point, Contoso will review the suggested changes on the PO on their side and confirm the changes, after which Eric has to do the final acceptance without making any further changes.
    • accept-with-changes-1
      • The purchasing clerk at Contoso can now view the suggested changed and accept the changes followed by final acceptance from the vendor.
    • vendor-accepts-changes


    Vendors can manage their Contacts and New Collaboration Users easily:

    • The primary contact/user at the vendor can view and manage the contacts and users for the vendor portal.
    • They can create new contacts and request to provision new vendor users for collaboration portal.
    • Can update contact information of the vendor users any time, anywhere.

    vendor-users

    provision-user

    vendor-user-requests

    Vendors can view and inquire on invoices and payments using the portal workspace:

    • Vendor can review the status of the their invoices and payments online.
    • Create purchase order invoices and upload invoice documents on the portal.
    • Inquire status of payment for the invoices.

    vendor-invoice-workspace

    vendor-creates-invoice

    vendor-invoice-attachments

    Vendor can view and inquire information about consignment inventory:

    consignment-inventory

    Vendor portal and Vendor collaboration feature  continues to be one of the major investment areas for Microsoft in Dynamics 365 For Operations, which means we will only continue to see more and more new features in the upcoming platform updates in next few months. Stay tuned !!