Hello,
Today, I wanted to discuss few of the enhancements which have been introduced in AX 2012 in the Cash and Bank Management module. Most of us must be already aware of these, but I just want to discuss these in this forum as I found these enhancements very useful.
![]()
Follow the points below which describes the major enhancements.
- Additional validation on the Bank account number and routing number(USA and Canadian Bank accounts):
-
Earlier in AX 2009, there was no real-time validation on the bank account number and routing number fields and users could enter any random values into those fields.
-
In AX 2012, new validation have been introduced where only valid bank account numbers and routing numbers are accepted.
-
These validation are triggered based on the “Address” which you select for the bank account. If the Country of the address is USA, then the bank account number and routing number validation are thrown accordingly. If the Country of the address is CANADA, then the bank account number and routing number validation are thrown as per Canadian bank validation.
-
To verify this go to Cash and Bank Management > Common > Bank Accounts.
-
Select USA OPER bank account.
-
Verify that routing numbers and bank account number fields accept random values with no validation.
-
Now specify an address for the bank under the Address fast tab and System will throw the necessary validation errors/warning for the bank account number and routing number fields when you save the record(In Conjunction with routing number type).


2. Bank Credit Limit check during vendor payments with bank as the offset:
-
We can now define credit limits and credit limit tolerance thresholds for a bank account in AX 2012. These credit limit check gets triggered during making a vendor payment(with bank as offset).
-
System will check for the available balance in the bank account and will throw required tolerance message as per the credit limit specified for the bank.
- We can define Credit limit related parameters in the Cash and Bank Management parameters form.

- Define the credit limit for a selected bank account under General fast tab.

- Note that the available balance in the USSI OPER bank(CONTOSO demo data) is $72771678.46. We will now record a vendor payment journal with an amount $7277378.46(Bank balance + Credit Limit) and validate the journal. System will successfully validate the journal and say It is Ok.

- So system now allows you pay an amount which is within the (Available balance+Credit limit) range of for the bank. If we try to make a payment for an amount $727737946, this will exceed the credit limit and system will stop us from validating and posting it.

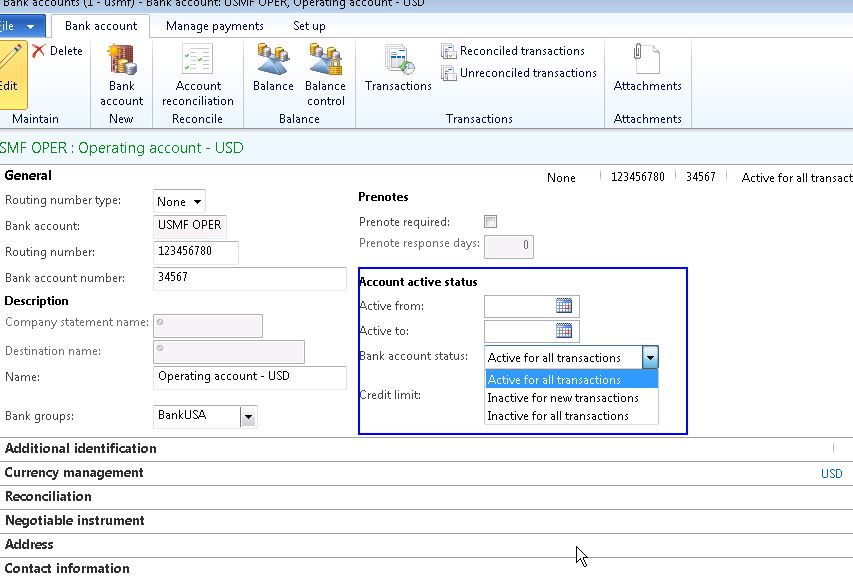
3. Inactivate a Bank account:
-
In AX 2009, there was no way to deactivate or close a bank account from the Bank sub ledger. The only way possible was to close the GL account(Cash account) related to the bank account.
-
Now in AX 2012, we can inactivate bank accounts from the bank sub ledger. The steps below explains this change.
- Go to Cash and Bank Management and Select a bank account.
- Expand the General fast tab.
- You can provide a from and To dates for which the back account will be active.
- Additionally you can set bank account status to 3 different options such as
Active for all transactions – Bank account is active and transactions are allowed.
Inactivate for new transactions – Bank account is inactive and no new transactions are allowed.
Inactivate for all transactions – Bank account is inactive and no transactions are allowed
4. Bank Account Statement Import and advanced reconciliation
- A much-needed functionality. AX 2012 now allows importing electronic bank statements and then performing advanced reconciliations.
- To be able to use the back statement import and reconciliation functionality, you will need a series of one time configurations. Below are the high level steps to do all required configurations .
- The first step is to configure the setup required for the electronic bank statement import which includes the parameters, bank statement format, transaction code mapping and bank reconciliation matching rules etc.

- The next step is to set up the required AIF inbound ports(Services) and import formats etc.

- After all the setups are done, finally we can import the electronic bank statements(XML/XSLT) formats and perform advanced reconciliation.

In my next post, I will explain in detail the step by step procedure for setting up bank accounts for statement import and advanced reconciliation procedure.
Till next time !! keep exploring.
Regards
Sandeep

Leave a comment