Hello Everyone,
I hope all of you found my earlier post on “Enhancements to the project management functionality in CU7” useful. As mentioned in that post, today I will take some time to explain the new enhancements to the “Project Resource Scheduling” functionality in the latest release of AX 2012 R2, which is the CU7 release.
For a professional services firm, the workers of the organizations are the key assets and are also the key sources of revenue generation. When your organization grows in size and number of Projects you manage grows, you ill need effective tools to manage and schedule the workers on projects to ensure that the skilled and most available people are assigned to the project tasks, to ensure optimized cost management and realize better profits.
Microsoft Dynamics AX 2012 R2 provides you with such functionalities under the Project Management & Accounting Module. Let us take look how this functionality has evolved over the last few releases of AX.
-
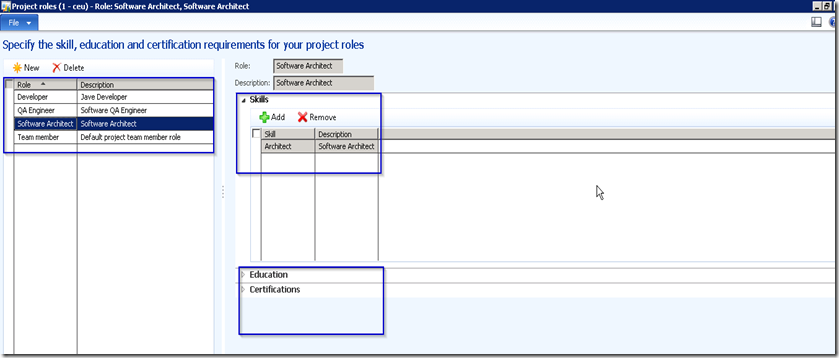
Project Roles: The Project Managers can now create “Project Teams” for each project and include appropriate project roles to the team. The project roles/project role templates basically act as pre-defined roles, where you can specify the required competencies such as “Skills”, “Certifications” and ‘Education” for that role, which ultimately will help in the resource search operation for the project.

-
Create Project Teams: For today’s demonstration, I have created a sample Time and Material project for a Website development project. Let us now see how the project managers can create the project team by adding project roles. For this project, I will need one software architect, one Java developer and a QA engineer.
-
-
Go to the project details screen and expand the Project team and scheduling fast tab.Specify the project start and end dates.
-
Note that these days might not be always accurate, but the PM can specify the approximate start and end dates.
-
Click Add roles button and select all the roles you will need in the project by creating new records. Note that you can specify how many workers you will need in each project role.
-
-
Reserve the workers for the project: The next step is to find, identify and reserve the most suitable workers for this project.
-
-
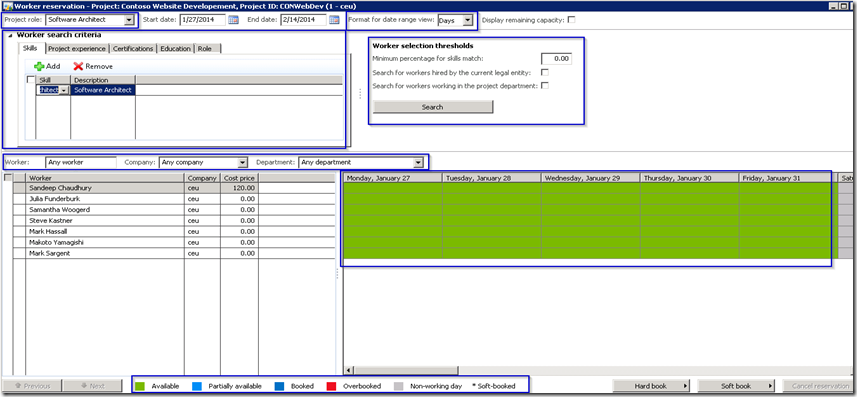
Click the “Reserve worker” button to open the Worker reservations main form.Note that the project manager has several options on this form such as editing the worker competency criteria, search workers by role, by name, department, legal entity.
-
Also they can view the worker’s availability in the specified duration of the project by Days, Weeks and Months. Additionally they get to see the worker’s availability statuses such as ‘Available’, ‘Partial available’, ‘Booked’, ‘Overbooked’, ‘Non-working day’ and ‘Soft booked’ in different colors, with an indicator of what each color means. Screenshot below highlights each of these options.
-
The worker search criteria (Competency) automatically populates from the roles selected, but the manager can always override them on this form.
-
The ‘Display remaining capacity’ checkbox allows the project manager to see the available capacity of the worker in terms of Hours for each Day/Week/Month.
-
The PM can either hard book or soft book the appropriate workers for the project by selecting the required options on the Hard book > and Soft book > buttons.
-
In my example I have reserved the software architect, java developer and the QA engineer to their full capacity in the full duration of the project. Below screenshot shows the results after the reservation. The #hours the workers are reserved for the project is now update in the Hours reserved column. Also, notice the color code of availability for the workers now have changed on the Worker reservations form.
-
Notice that the Hours assigned column still shows ZERO as the PM has not yet assigned these workers to the project tasks or activities (WBS).
-
-
Assign workers to the Individual tasks of the Project: The next step for the PM is to do the detailed assignment of the workers (Project team) to the individual tasks or activities of the project on the work breakdown structure form.
-
-
Go to Plan tab of the project detail screen and click Work breakdown structure button.
-
Notice the Hours assigned column of the project details screen now. It automatically shows the #hours the worker is booked for the project by calculating it from the assignments done in the WBS screen.
-
-
New forms to show project resources and availability: Two new list pages are now available to help the project resource management function.
-
-
Project resources – This new form under now allows the project managers to see the project resources quickly without having the need to navigate to the HRM module.
-
This form also allows to view/edit several worker related data such as cost price, sales price, assigned projects, categories, competencies etc.
-
The PMs can also initiate the hard/soft booking of the workers to projects by clicking Hard book or Soft book buttons.
-
Resource availability: This list page shows one stop snapshot of the worker’s availability, everything at once :). This form also lets the PM to initiate the Hard/bookings for the resources.
-
-
Inquiries: At any time in the duration of the project, the PMs can see the detailed analysis of the resource assignments. Let us see it for one of the workers “Sandeep Chaudhury” whom we booked in the example above.
-
-
Navigate to PMA > Inquiries > Resource Scheduling > Resource assignment analysis –by worker.
-
Well ! That was a pretty long write up !!! But it deserved it 🙂 In my next post, I will explain all the new enhancements in the Project Timesheets functionality in the CU7 release.
I hope you all will find this post useful. keep reading !!
Regards,
Sandeep


